
Showing posts with label pie. Show all posts

Monday, February 28, 2011

I'm Done With Pies


That's it. I give up. I'm quitting pies. I've tried and I've tried, but I just don't like making pies. I've taken classes on pies, I've practiced making pies, and I still get frustrated. The effort to result ratio is way too high, plus the results are never certain until you cut into the pie.

This past weekend we celebrated two birthdays. For birthdays I am always happy to make a cake, tailored to the tastes of the birthday boy or girl. When asked what they wanted, both birthday boys, independent of each other, requested pie. Sigh.

To accomodate the tastes of all involved (ie, my husband hates peaches), I made two pies - one peach, one apple. I started out two days ahead of time because the pie dough has to be made then chilled. I carefully went through all the required steps, cutting in the butter till pea-sized (no shortening here, all good butter), carefully adding the ice water a bit at a time, chilling the dough disks, rolling out, filling, baking.

I suspect the baking time was the problem. The pies had different baking temperatures and times. And by the time I got the final pie in the oven it was bedtime. My sweet husband volunteered to stay up and babysit the pies. Then when I heard the timer beep I sat bolt upright in bed, remembering that I'd forgotten to turn the oven temp up for the second pie. I ran into the kitchen, cranked the temp, and set the timer for another 15 minutes, hoping for the best.

Well, if hopes were dollars, we'd all be millionaires, right?

The pies looked beautiful, resting on the counter. The birthday boys eyed them appreciatively as they arrived. But looks alone don't make a good pie. When we cut into them, we had.....sigh....pie soup. So disappointing. Everyone said it tasted fine, but this was a polite group. The final word came when I sent some leftover pie home with my sister. Her report? "The peaches were good, but the pie crust was...eh. Tasted flat, like you forgot the salt."


Now, understand that I really do appreciate honest feedback. I can't improve unless I get those kind of comments. But knowing that I'd served bland pie soup to a birthday boy was the final straw. If you want a birthday cake, call me. If you want pie, go to Marie Calendar's.

(My family isn't panicking about this edict. They're confident I'll forget all about it by Thanksgiving, and will take on three different kinds of pies, just to make everyone happy. We'll see.)

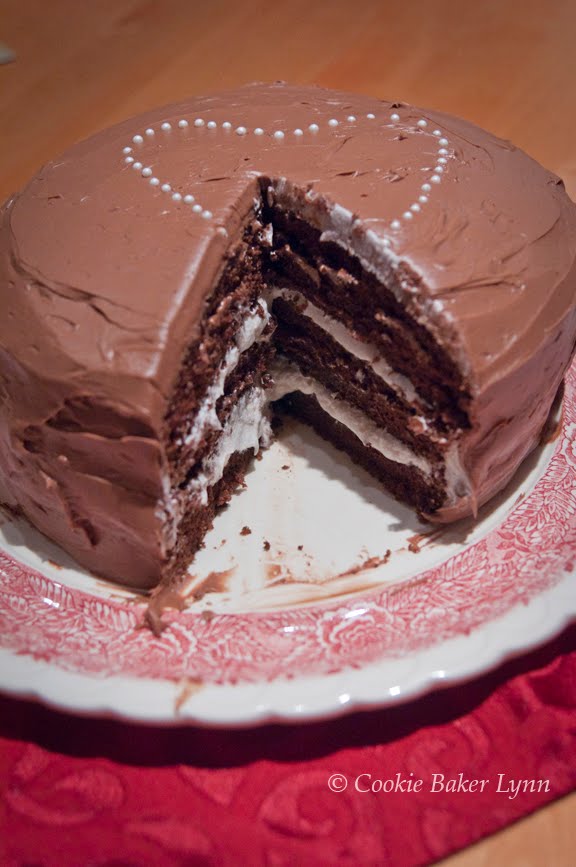
You might have already noticed the lack of pie pictures here today. I was so angry at the pies, I refused to take their pictures. So, instead, I give you the cake I made for Valentine's Day. Yes, the layers did slide a bit as I frosted it. Yes, it was a bit on the sweet side. But at least it wasn't a pie!

Raspberry Chocolate Cake
- adapted from Taste of Home
3 cups sugar
2-3/4 cups all-purpose flour
1 cup baking cocoa
2 teaspoons baking soda
1-1/2 teaspoons salt
3/4 teaspoon baking powder
1-1/4 cups buttermilk
3/4 cup canola oil
3 teaspoons vanilla extract
3 eggs
1-1/2 cups strong brewed coffee, room temperature


FILLING:
3 tablespoons all-purpose flour
6 tablespoons milk
9 tablespoons butter, softened
3 cups confectioners' sugar
2 tablespoons raspberry liqueur
1/4 teaspoon salt
2 drops red food coloring, optional (I didn't use it)
4 tablespoons seedless raspberry jam, melted


FROSTING:
1 package (8 ounces) cold cream cheese
1/3 cup butter, softened
1/2 cup baking cocoa
1 tablespoon raspberry liqueur
4 cups confectioners' sugar


1- Butter three 9-inch round cake pans. Line the bottoms with parchment paper rounds. Butter the parchment paper. Dust the pans with baking cocoa. Preheat the oven to 350 deg. F with a rack in the center of the oven.

2- In a large mixing bowl, combine the sugar, flour, baking cocoa, baking soda, salt, and baking powder.

2- In a separate bowl combine the buttermilk, oil, and vanilla. Add this mixture to the flour mixture.

3- Add the eggs, one at a time, beating well after each addition. Beat for 2 minutes. Gradually add the cooled coffee (the batter will be thin.)

4- Pour batter into prepared pans. Bake at 350° for 35-40 minutes or until a toothpick inserted near the center comes out clean. Cool for 10 minutes in the pans before removing to wire racks to cool completely. Peel off and discard the parchment paper.

5- For filling, in a small saucepan, whisk together flour and milk until smooth. Cook over medium heat for 1 minute or until thickened, stirring constantly. Remove from the heat and let stand until cool.

6- In a large bowl, cream butter until light and fluffy. Gradually add confectioners’ sugar and mix well. Gradually add cooled milk mixture; beat for 4 minutes or until light and fluffy. (It will look odd, but will eventually come together). Beat in liqueur, salt and food coloring if desired.

7- If the cake layers have domed, using a long, serrated knife, level the tops. Place one layer on a serving plate; spread with about 2 tablespoons jam. Spread one of the remaining layers with the remaining jam. Let stand for 30 minutes.

8 - Spread 1/2 cup filling over cake on the plate to within 1/4 in. of edges. Top with jam-covered layer, then spread with remaining filling. Top with remaining cake layer.

9- In a large bowl, beat cream cheese and butter until smooth. Add in cocoa and liqueur. Gradually beat in confectioners’ sugar until light and fluffy. Frost top and sides of cake.

(If at any point the cake starts sliding around, pop it in the refrigerator to firm up the filling.)

Store in the refrigerator.

Monday, October 11, 2010

Everything is Peachy


I'm sad. Peach season is over. Costco has been carrying boxes of organic peaches and each week I'd buy a box. One week I bought two. Each peach was perfect - ripe, juicy, and amazingly delicious.

I had big plans of slicing the peaches and freezing them so I could make pies and cobblers throughout the winter. It never happened. We ate them all. The kids would beg for them for snacks, I'd slice them over homemade yogurt with granola, and I'd slice them over the kids' breakfast cereal as a special treat.

I did manage to make one pie with them. It's a good thing that piecrusts are such a pain in the patoot to make, otherwise I'd make (and eat) a pie every week. Sigh. Since I lack internal restraint, the external restraint of laziness is a good thing.

This pie lasted for exactly two days. Even my husband, the professed peach hater, choked down two or three slices. I told him he didn't need to make that sacrifice for me, but he selflessly ate his share.

Since I wanted to do the delicious peaches justice, I went to the pie Bible, specifically The Pie and Pastry Bible from Rose Levy Berenbaum. The crust used cream cheese and took two days to make, but was worth the wait. Tasty, flaky, without a trace of shortening, I think I'll be using this pie crust again. The next time I work up the energy to take on a pie again.

I especially like Rose's technique of cooking down the peach juices so the pie isn't a soggy mass. Because the peaches were so very juicy, I think I didn't sufficiently reduce the liquid. The bottom crust was a bit on the soggy side. Next year I'll do better. If I save enough peaches to make a pie. No guarantees on that, though.

Rose's Perfect Peach Pie for Perfect Peaches
- adapted from The Pie and Pastry Bible by Rose Levy Berenbaum

Flaky Cream Cheese Pie Crust (recipe follows)
2-3/4 lbs peaches (about 8 medium), peeled, pitted, and sliced into 16ths
1 Tbsp freshly squeezed lemon juice
1/2 cup + 1 Tbsp sugar
pinch salt
4 tsp cornstarch
1/2 tsp pure almond extract


1- Remove the pie dough for the bottom crust from the refrigerator. Let it sit for about 10 minutes or until it's soft enough to roll.

2- On a generously floured surface, roll the crust 1/8 thick or less and 12-inches in diameter. Drape the dough over your rolling pin, brush the excess flour off with a pastry brush, and gently transfer the dough to your pie pan. Trim the edge almost even with the pan. Cover it with plastic wrap and refrigerate it for 30 minutes (or up to 3 hours).

3- While the bottom crust is chilling, place the peach slices in a large bowl and sprinkle them with the lemon juice. Sprinkle on the sugar and salt and toss gently to mix evenly. Allow the peaches to sit at room temperature for a 30 minutes (or up to an hour).

4- Place a colander over a bowl. Transfer the peaches to the colander and allow the juices to drip to the bowl below. This will yield almost 1 cup of juice.

5- In a small saucepan over medium-high heat, boil down this liquid to about 1/3 cup, or until syrupy and lightly caramelized. Swirl the liquid, but do not stir it. Meanwhile, transfer the drained peaches to a bowl and toss them with the cornstarch and almond extract until no traces of cornstarch remain.

6- Pour the syrup over the peaches, tossing gently. It's OK if the syrup hardens when it touches the peaches; it will dissolve during baking. Transfer the peach mixture to the pie shell.

7- Roll out the top crust large enough to cut a 12-inch circle. Using a pan or cardboard circle as a template, use a sharp knife and cut the circle.

8- Moisten the edge of the bottom crust with water. Brush excess flour from the top crust and place it over the fruit. Fold the overhang around the bottom crust edge and press to seal it. Crimp around the edge using a fork or your fingers. Make 5 evenly spaced 2-inch slashes in the top crust, radiating from the center. Cover the pie loosely with plastic wrap and refrigerate for an hour before baking.

9- Set an oven rack at the lowest level and place a baking stone or baking sheet covered with foil on it. Preheat the oven to 425 deg. F.

10 - When the oven has heated, remove the plastic wrap from the pie and place the pie directly on the foil-topped baking stone. Bake 40 to 50 minutes or until the juices bubble thickly through the slashes and the peaches feel tender but not mushy when a cake tester or small sharp knife is inserted through a slash. After 30 minutes, protect the edges from overbrowning with a foil ring.

11- Place the pie on a rack to cool for at least 3 hours before cutting.

Serve the pie warm or cold, preferably with a scoop of vanilla ice cream. Store at room temperature for up to 2 days.


Flaky Cream Cheese Pie Crust

12 Tbsp unsalted butter, cold
2 cups bleached all-purpose flour
1/4 tsp salt
1/4 tsp baking powder
4-1/2 oz. cream cheese, cold
2 Tbsp ice water
1 Tbsp cider vinegar


1- Cut the butter into small cubes. Wrap it in plastic wrap and freeze it until frozen solid, at least 30 minutes. Place the flour, salt, and baking powder in a zip-loc reclosable gallon-size freezer bag and freeze for at least 30 minutes.

2- Empty the flour mixture into the bowl of a food processor with the metal blade in place. Process for a few seconds to combine.

3- Cut the cream cheese into 4 pieces and add it to the flour. Process for about 20 seconds, or until the mixture resembles coarse meal. Add the frozen butter cubes and pulse until none of the butter is larger than the size of a pea.

4- Remove the cover and add the water and vinegar. Pulse until most of the butter is the size of small peas. The mixture will not hold together at this point.

5-Working with half the mixture at a time, spoon it into your flour zip-loc bag. Knead the mixture in the closed bag by pressing it with the knuckles and heels of your hands until the mixture holds together in one piece and feels slightly stretchy when pulled.

8- Wrap the dough with plastic wrap, flatten it into disc. Repeat with the other half of the mixture. Place both discs into the refrigerator for at least 45 minutes, preferably overnight.

Monday, September 13, 2010

She's Baaaaack


What I Did on My Summer Vacation

As a student, I always felt that the compulsory first day back at school writing assignment was a time filler for teachers who had procrastinated on their lesson planning. As a teacher now, I see some value in it. It's helpful to look back at the blur that summer becomes in the rear view mirror of fall, to look back and sort through the days, giving weight to accomplishments and reliving the delight of the perfect days.

I have leapt full into the school year, as usual putting off ordering school books and materials until the last possible moment, as if the procrastination will postpone the inevitable return to structure, scheduling, and the straight-jacket of school. I look regretfully at the dark clouds lowering in the sky, echoing my mood.

Where did summer go? It went so quickly that it seems little more than an ephemeral mist lingering in the memory. Did I really have a summer?

Looking back at the calendar I recall that there were indeed things happening. I didn't go to Paris or Hawaii, but life happened.

My daughter had a baby. That's been a big part of the summer, helping her adjust to being a mom. Frequent visits to help, to visit, and to hold the baby. Lots of holding. We want her to know that she is loved.

We painted the deck. Again. Replacing the wood with something that doesn't need painting went up a notch on the priority list.

We had birthdays, but no parties. My son's pirate party got pre-empted by his niece's birth. I made him a cake to console him. My husband had a birthday with a zero at the end. I made him a cake to console him.

My son learned to ride his bike. We thought it would never happen, but this year he got the hang of it and is giddy with the freedom of riding all the way around the block by himself.

My daughter went to camp. Her dad almost called it off when we were signing her in - there were boys in line who shaved! Camp and a week of sickness meant she missed 2 out of the 5 swim meets for the season. It was a really lame year for swim team.

And me? I just did what I normally do. I worked out, ate blueberries from my bushes, watched some junk TV, went to the farmer's market, and baked. Since I was on vacation, I gave myself a lot of freedom in baking. If I'd made it before and had already blogged it, I could make it anyway. If it was ugly, I didn't have to take pictures. And it was too hot to turn on the oven, I didn't. It was really nice.

Now I'm back from vacation and I'm trying to carve out my new schedule and routine. I'll try to be faithful in posting. But if I miss a day or two, please understand. It's not that I don't want to share, it's just that life is going on. Not necessarily memorable, but day after day it goes on. And when baking is a part of that, I'll let you know.

Last Gasp of Summer Fruit Tarts
- adapted from Taste of Home


1-1/2 cups all-purpose flour
1/4 cup sugar
1/4 tsp salt
1/2 cup cold butter
1 egg, beaten
4 oz cream cheese, softened
1/4 cup sweetened condensed milk
2 tbsp lemon juice
Assorted fresh berries
2 Tbsp apricot preserves


1- In the bowl of a food processor combine the flour, sugar, and salt. Pulse to cut in the the butter until the mixture resembles coarse crumbs. Add the egg and pulse briefly to blend. Shape the dough into a ball. Cover and refrigerate it for an hour to help the dough relax.

2- Preheat the oven to 350 deg. F. Grease six 4-1/2-inch tart pans.

3- Divide the dough into six portions. Press each portion into a prepared tart pan. Place the tart pans on a baking sheet and bake for 15-20 minutes, or until edges are lightly browned. Cool for 10 minutes before removing from pans to wire racks to cool completely.

4- In a small bowl beat cream cheese until smooth. Beat in sweetened condensed milk and lemon juice.

5- Spoon 2 rounded tablespoonfuls of the cream cheese mixture into each cooled tart, smoothing the top. Arrange the berries over the filling.

6- In a small saucepan, melt preserves over medium heat. Stir until smooth. Using a pastry brush, brush the preserves over the berries.

The tarts can be served immediately or refrigerated until serving time.

Monday, December 28, 2009

The Sweetness of Christmas


I love the soft exhalation of stress that follows Christmas. All of the to-do's are either done or are no longer relevant. The family playing with toys, reading books or instruction manuals amid drifts of torn wrapping paper, illuminated by twinkling Christmas tree lights, are a lovely tableau of peace and contentment.

Normally on Christmas Day I choose to stay out of the kitchen, preparing only the easiest of heat and eat meals. I don't want to lose that easy, comfy feeling of having nothing that needs doing. This year, though, I choose to do one thing, just for fun. This recipe was featured in December's Bon Appetite and I thought it would be a lovely way to round out our Christmas dinner.


Because I didn't have the right size pan, I chose to make 6 individual tarts and see how that worked. No biggie if it didn't work, because I was just playing. I won't say it was a Christmas miracle, but it was certainly a gift, that everything about this tart worked out. Dividing the dough into 6 pans - just great. Dividing the filling - perfect. Making the caramel (not my forte) - easy, peasy, lemon squeezy. The only downside was that the tarts are sooooo rich that unless you have superhuman capacity, you can only eat a half of one. So if you have 6 couples eating, or 12 close friends, make the 6 tarts and have them share. Or make it per the Bon Appetite specs and cut slices. Either way, you'll wow the crowd.

Chocolate Caramel Macadamia Nut Tart
- adapted from Bon Appetit

CRUST
1 cup all purpose flour
1/3 cup powdered sugar
3/4 teaspoon salt
1/2 cup (1 stick) chilled unsalted butter, cut into 1/2-inch cubes
1 tablespoon (or more) ice water


GANACHE
1/3 cup heavy whipping cream
8 ounces bittersweet chocolate (do not exceed 61% cacao), chopped
1 1/2 cups unsalted macadamia nuts (about 7 1/2 ounces), toasted, coarsely chopped


CARAMEL FILLING
1 1/4 cups sugar
1/3 cup water
1/2 cup heavy whipping cream
1/4 cup (1/2 stick) unsalted butter
1 teaspoon vanilla extract
1/2 teaspoon salt


1- Blend flour, powdered sugar, and salt in processor. Add butter and pulse until mixture resembles coarse meal. Add 1 tablespoon ice water and blend just until moist clumps form, adding more ice water by teaspoonfuls if mixture is dry.

2- Divide dough into 6 equal lumps and gently press a lump into each of six 4-1/2-inch tart pans, patting it with your fingers up the sides of the pan and evenly across the bottom. Chill the dough in the pans for 1 hour.

3- Position rack in center of oven and preheat to 375°F.

4- Line each crust with foil; fill with dried beans, rice, or pie weights. Bake crust until pale golden around edges and sides are set, about 15 minutes. Remove foil and beans; bake until crust is golden and cooked through, about 11 minutes. Transfer to rack and cool crust completely in pan.

5- Bring cream for the ganache to simmer in heavy small saucepan. Remove from heat. Add chocolate; stir until smooth.

6- Spoon 3 tablespoons ganache into 1 corner of small resealable plastic bag and seal; set aside at room temperature for piping. Spread remaining ganache evenly over bottom of the crusts. Sprinkle chopped macadamia nuts evenly over ganache layer in crust. Freeze crust while preparing caramel filling.

7- Combine sugar and 1/3 cup water in heavy medium saucepan. Stir over medium-low heat until sugar dissolves. Increase heat and boil without stirring until syrup is golden amber, occasionally brushing down sides of pan with wet pastry brush and swirling pan, about 8 minutes. (I was concerned at this point because it appeared that sugar crystals were forming on top of the boiling mixture, but it wasn't a problem. I kept brushing and swirling and the sugar crystals went away.)

8- Remove pan from heat. Add cream and butter; stir until any caramel bits dissolve and mixture is smooth. Attach candy thermometer to side of pan and bring mixture to boil over medium-high heat. Boil without stirring until thermometer registers 240°F, about 2 1/2 minutes longer. Remove from heat. Whisk in vanilla and salt.

9- Remove crusts from freezer. (It's helpful if you can have someone else fetch them for you while you're whisking in the vanilla.) Working quickly, pour caramel filling into crusts. Gently shake tart pans to allow filling to settle evenly in crusts. Cool completely at room temperature, about 3 hours.

10- Place reserved resealable plastic bag with chocolate ganache in microwave and heat in 5-second intervals just until smooth and pourable. Using scissors, cut off very small tip from corner of bag with ganache. Pipe ganache decoratively over caramel filling in crosshatch pattern. Chill until chocolate is set, about 20 minutes. The tarts can be made 2 days ahead. Cover and keep chilled. Bring tarts to room temperature before serving.

11- To serve, remove the sides from the tart pans and place on pretty plates. If you feel you haven't reached your holiday quota of fats, you can garnish with a blop of whipped cream or vanilla ice cream.

Friday, September 4, 2009

Alpha Baker


This summer my daughter, Sarah, and I took a class together at Sur La Table. Her confidence with pies was low and I still didn't know how to roll out a pie crust into a round, so we were excited to take the Summer Baking: Pies and Tarts class. Our instructor was Rachael Coyle, a pastry chef, and she was super. She gave very clear instruction, showing each step of the way, giving pointers as she demonstrated. Then the class was divided into groups and each group got to try their hand at making the pies and tarts.

I jotted down some of the information that was new to me.

~ In her pie crust recipes, Rachael doesn't give a measurement for water. It should be added a tablespoon at a time and worked in by hand so that you'll know when it feels right, rather than just dumping in the amount a recipe calls for and ending up with a gloopy mess. Because the amount of moisture the flour can absorb is very weather dependent, this step should always be done by hand.

~ When working in the water, as bits become moistened, pull them out of the bowl and set them aside. You avoid overworking the dough that way and are only adding moisture to the dry bits.

~ You can use a food processor to cut in the chilled butter, but add the water by hand. If you continue to use the food processor, you'll continue chopping up the butter, and won't end up with the pea-sized pieces needed to give a flaky pie crust.

~ If you make a double batch of pie dough, you can wrap 1/2 of it in a double layer of plastic wrap and put it in the freezer. It will keep for up to 1 month.


Rachael also gave very specific instructions on how to achieve a circle of pie dough.

~ Generously flour your work surface. Not just a dusting. You want enough flour so that the dough won't stick and you can move it easily.

~ Move the rolling pin back and forth straight away from your body and straight back in. Then turn the dough 45 degrees and repeat. Turn and repeat. Turn and repeat. Never try to push the rolling pin at an angle, as you'll get uneven force on the pin and the dough will be uneven in thickness.

~ Feel the edges to make sure it's even. Then just roll over the thick bits to even it out.

~ Use a dry pastry brush to brush the excess flour off the top of the crust. As you lift the crust, either draped over the rolling pin or folded, brush the underside with the pastry brush to remove the excess flour.


Then as we broke into groups, I learned a few other things. I learned that I'm an Alpha in the kitchen and it's really hard for me to sit and watch someone else do it wrong.

I saw a woman blithely rolling out her pie crust in precisely the way the instructor had just said NOT to do it, rolling back and forth at angles. I watched another woman manhandle her dough into a homogenous mass. And the pair at the KitchenAid were throwing ingredients in without regard to recipe or instructions. Sarah said it was really funny watching my face; she knew exactly what I was thinking as I bit my tongue to keep from shrieking, "Why are you here? Why did you pay $69 for the class if you weren't going to listen to the instructor? If you know everything already, why did you think your pies and tarts needed improving?"

Whew, deep breaths, deep breaths. Control regained.


When I got home from the class I was eager to put what I'd learned into practice. I made the Summer Berry Tart and wow, was it delicious! So, rounding out my week of blueberries, here's the tart recipe with pointers. But of course, if you already know all about making tarts, be sure to do it your way. Just don't tell me about it. It would stress me.


Summer Berry Tart with Mascarpone Cream


Pate Sucrée
- enough for one 8-9-inch tart

7 oz. all-purpose flour
2 oz. granulated sugar
pinch of salt
4 oz (1 stick) of unsalted butter, cut into 1/2-inch pieces and chilled
1 egg yolk
2 Tbsp heavy cream, plus more as needed

(To cut the stick of butter, cut the stick lengthwise with a long knife, turn the stick a quarter turn and slice lengthwise again. Then chop slices off the end.)

Either by hand or with a stand mixer fitted with the paddle attachment, cut the butter into the flour, sugar, and salt until the butter is very fine; the mixture should look like course sand. In a separate bowl, whisk the egg yolk and heavy cream. Add the liquid to the flour mixture and just mix until combined (just turn the mixer on for a second and then off); add more heavy cream if the dough seems dry. Gently, with minimal handling, press the dough into a flat circle, about 1-inch thick. Wrap the dough in plastic wrap and chill for at least 2 hours or overnight.


for the tart:


3/4 cup heavy whipping cream
1/4 cup sugar
1 Tbsp Grand Marnier (optional)
1 cup mascarpone cheese at room temperature
1/2 vanilla bean, split and scraped or 1 tsp vanilla extract
2 pints assorted berries
confectioner's sugar for dusting

1- On a lightly floured surface, roll the chilled pastry out into a circle just under 1/4 inch thick. Fit the pastry into a lightly greased tart tin (with a removable bottom) and press dough into the corners to that it lies flat with no air pockets. Trim excess pastry from the edges. Chill shaped tart shell for at least one hour.

2- Preheat oven to 350 deg. F. Blind bake the tart shell: fit the chilled pastry with a round of parchment paper and fill the parchment with dried beans or pie weights. Bake for 30 minutes; remove the parchment and the weights and bake for another 10 minutes or until the pastry shell is cooked through and golden brown. Let it cool completely.

3- Whip the cream with the sugar and Grand Marnier to medium peaks. Chill.

4- In a stand mixer with the paddle attachment or with a handheld mixer, beat the mascarpone with the vanilla bean or extract until smooth with no lumps. Gently fold the whipped creaminto the mascarpone until just mixed.

5- Fill the cooled tart shell with the mascarpone cream and spread into an even layer. Arrange fresh fruit over the top. Dust with confectioner's sugar just before serving. Store any leftovers in the refrigerator.

Thursday, July 2, 2009

You Don't Know Till You Try


In high school I got invited to a formal dance by a young man who I was glad to go with because he was a lot of fun, but he was on the short side. If I wore my normal (for then) 3 to 4 inch heels, I'd tower over my date.

To solve this dating dilemma, I borrowed a cute little mandarin-style dress from my friend who was 2 inches shorter than me and I bought some super cute flat shoes. The shoes were black, satin sandals that were held onto the feet with long, satin ties that tied around the ankles like ballet slippers. As I said, super cute.

So I went on my date, thinking that this date would be great and my outfit was the cat's meow. As is so often the case in life, expectations were far greater than the actuality. I spent the majority of the evening bending over and retying up the silly ribbons that held my shoes on. I guess if I'd thought it through, I'd have known that satin's defining characteristic is slipperiness and a satin ribbon holding on a shoe was not a good design. I finally took the shoes off altogether and my date put them in his pocket and although my toes did get trod on a wee bit, we had a much better time.

This pie reminded me a bit of that date because sometime you never can tell how something's going to work until you try it out. I found the recipe for the rhubarb curd on Patricia's beautiful site (be sure to check out her gorgeous artwork in her shop!). I had the brilliant thought of putting it into my favorite strawberry pie, combining two great flavors together.

I made a crumb crust (too lazy to do the regular kind, plus I didn't want the crust to get soggy with the curd), spread in a layer of the curd, piled on sliced strawberries, and covered it in a beautiful strawberry glaze. I took some pictures of the pie after it had chilled, then prepared to get the money shot - the gorgeous piece of pie standing tall on it's plate.

I sliced and, um, no, that's not going on the blog. It oozed. I couldn't slice the pie. I had to scoop it out like a cobbler. It wasn't lovely at all. But it was sooooo good. Not one person complained about the look of the pie. Instead there were intense discussions about whether the stomach could hold seconds. Or thirds.

So, here's the recipe. Be forewarned, it's not company pie. Not glamorous at all. But your family will be pleased that you made it for them!

(Note: this is a multi-stage recipe, so you can do parts of it as your schedule allows, put it together early the day you want to serve it, and let it sit in the refrigerator till it's time for dessert.)

Strawberry Rhubarb Curd Pie

Crust:

1-1/2 cups graham cracker crumbs
1/4 cup sugar
6 Tbsp butter, melted

Rhubarb Curd:

2 cups of rhubarb cut into small pieces
1/4 cup sugar
1/4 cup water
4 teaspoons lemon juice
4 egg yolks
3/4 cup sugar
1/2 cup (1 stick) butter

Strawberries and Glaze:

2 to 3 cups strawberries, cleaned, hulled, and sliced
3/4 cup water
1 cup sugar
3 Tbsp cornstarch


1- Preheat oven to 375 deg.

2- Combine all the crust ingredients in a bowl; mix well. Press firmly on the bottom and up the sides of a deep 9 inch pie plate.

3- Bake for 6 to 8 minutes, or until the edges are brown. Allow to cool to room temperature.

4- To make the curd, combine the rhubarb, 1/4 cup sugar, 1/4 cup water and lemon juice in a non-reactive saucepan. Bring to a boil over med-high until rhubarb goes completely mushy. Remove from the heat and let it cool to just warm. Put the mixture into a blender or food processor and process until smooth.

5-Whisk the yolks and sugar together in a heat-resistant bowl set over a pan of simmering water. Add the cooled rhubarb and the butter in pieces and stir until it is all combined and thickens. Cool completely and it will thicken some more.

6- To make the strawberry glaze, place one cup of the strawberries in a non-reactive saucepan with 3/4 cup water. Bring to a boil and simmer for 5 minutes.

7- Mix together the sugar and cornstarch; add to the strawberry liquid and cook until clear. Remove from heat and allow to cool.

8- Spread the cooled rhubarb curd over the crust. Arrange the remaining strawberries over the curd. Pour the cooled glaze over the strawberries, completely coating the top.

9- Refrigerate until serving time.

Thursday, May 28, 2009

Coming of Age Dessert


One of the factoids about myself that I like to put into those "how well do you know Lynn" quizzes is that I've worked as a bartender. Now, you might be getting a certain mental image with that. Put that image on hold while I tell you that at the time, I was 16. How did I do that? Where can you work as a bartender at sixteen? Well, in a dry state.

One of my first jobs was working at a dinner theater. I had the job of plating salads and desserts (and by plating, I mean slopping them onto a plate - nothing artistic involved), and then putting together set-ups for the patrons' drink orders. The patrons would then have to go buy mini-bottles of liquor, the kind they sell on airplanes, and pour those into their set-ups to make a fully leaded drink.

So for a long time, although I knew how to make a set-up for a greyhound, a screwdriver, or a strawberry margarita, I had no clue what kind of alcohol went into them.


The strawberry margarita was kind of a house speciality. We had buckets of sliced strawberries in sugar syrup and we'd scoop some into the blender along with some ice, blend it to the consistency of a Slurpee, pour it into a tall glass, and add a slice of lime for a garnish. Ta da! Virgin Margarita.

This pie combines two of my skills from that job - drinks + dessert. Or drinks in dessert. And there's definitely booze involved. If you have kids around, they'll want a slice of this cool, creamy dessert. Have some strawberry ice cream on hand to placate them, because this is definitely a dessert for grown-ups only.


You can tell I didn't let it freeze overnight. The center was a bit on the deliciously oozy side. No one minded a bit.

Strawberry Margarita Pie
 
2 c. hulled fresh strawberries
10 tbsp. sugar
1 3/4 c. graham cracker crumbs
1/2 c. (1 stick) unsalted butter, room temp.
3/4 c. sweetened condensed milk
7 tbsp. tequila
6 tbsp. Triple Sec
1 tbsp. fresh lime juice
2 c. chilled whipping cream
8 fresh strawberries (opt.)


Butter 9 inch springform pan. You can use a deep pie plate, if a springform pan is unavailable. Toss 2 cups strawberries with 4 tablespoons sugar in small bowl. Blend remaining 6 tablespoons sugar, cracker crumbs and butter in processor. Press crumb mixture into bottom and up sides of pan.

Puree strawberries and sugar with milk, tequila, Triple Sec and lime juice in blender or processor. Transfer to large bowl. In a medium bowl with an electric mixer, whip cream until stiff peaks form. Fold 1/3 of cream into puree. Gently fold in remaining cream. Pour filling into crust. Cover and freeze until firm, preferably overnight.

Run hot sharp knife around pan sides to loosen if necessary. Release pan sides. Cut pie into wedges. Top each wedge with strawberry, if desired.

Saturday, December 6, 2008

A Peck of Pears - Part 3


My first Thanksgiving away from home was when I was at college. My sister, who lived in the area, invited me to come over and break turkey with her. For the two of us we had an enormous turkey, stuffing, mashed potatoes, and two pumpkin pies. We got so hungry waiting for the turkey to cook, that before it was out of the oven we'd eaten one whole pumpkin pie.

When we sat down to our plates of turkey and fixings I decided what it needed was gravy. My sister said that she didn't know how to make gravy, but I said, no problem, I'd make it, gravy is easy. Well, not so much if you've never actually made gravy and don't have a recipe to follow. What I ended up with was a glutinous white sauce. Not really tasty as a gravy substitute. It was years before my sister stopped teasing me about my mad, hot gravy-making skills.

In the intervening years I've learned how to make gravy and also learned how to time the prep work of all the dishes so you don't have rolls, pies, and a 20 lb turnkey all jockeying for position in the oven. This year, though, things changed. My newly married daughter, her husband, and her in-laws would be joining us for Thanksgiving. She offered to bring the rolls and 2 other dishes, so that cleared a big space on my Thanksgiving day to-do list.


So when I walked into the kitchen Thursday morning and saw the last of the bag of pears sitting on the counter, I had a risky thought. Should I try something new? Very risky, indeed. But I had possibly enough leftover pie dough in the refrigerator and all the ingredients for a new pie recipe that I'd been eyeing for two weeks. Putting aside common sense, I went for it.

With my helper peeling pears, it went together quickly and easily. I didn't have enough crust to make a lattice top and I put on a crumbly streusel topping instead. It went perfectly with the flavors of the pie - sweet, tangy, gently spicy, and altogether wonderful. The only thing I'd do differently next time would be to add a bit of instant tapioca to the fruit mixture to keep it from turning into pie soup.

Cranberry-Pecan-Pear Streusel Pie

1 unbaked pie shell
4 cups sliced, peeled fresh pears (about 5 medium)
1/2 cup chopped dried cranberries
1/2 cup chopped pecans
1/2 cup honey
1/4 cup butter, melted
3 tbsp cornstarch
2 tbsp grated lemon peel
1 tsp ground cinnamon
Instant tapioca - 1 to 2 Tbsp (optional)


Streusel topping:

1/2 cup quick oats
1/2 cup flour
1/2 cup brown sugar
1/2 tsp cinnamon
1/4 cup unsalted butter, cold


1- Preheat oven to 400 deg. F.

2- In a bowl, combine the pears, cranberries, pecans, honey, butter, cornstarch, lemon peel and cinnamon; pour into crust. If mixture looks very juicy, stir in 1 to 2 Tbsp of instant tapioca.

3- Mix streusel ingredients in a small bowl and cut butter into dry ingredients until it’s crumbly. Sprinkle streusel over the pie.

4- Bake at 400 deg. F for 15 minutes. Reduce heat to 350 deg. F and bake for an additional 40 to 50 minutes or until the filling is bubbly. Cool on a wire rack.

Wednesday, October 1, 2008

Pie Time is Back


There is a lot to worry about these days. The election, the stock market roller coaster, and the travails of the honey bee. I know these things are troublesome, but in spite of that, or maybe because of that, I think it's important to have a break. Somewhere to relax, think happy thoughts, and eat pie.

Yes, in case you didn't know or care, tonight is the return of Pushing Daisies, my favorite fantasy escape to a world of fabulous fashion, intrigue and puzzles, quirky characters, and pie. Always pie.

Last season I took on the ambitious task of making a pie a week to celebrate the show. Unfortunately for me, but fortunately for my thighs, the show was cut short by the writer's strike. I don't think I'm up for a pie a week this time around, but I'll certainly be working some pies into the baking schedule, and of course I had to celebrate the return with a pie. A pie I'd never made before.


A blue berry pie isn't out there, weird, nouveau cuisine by any stretch of the imagination. It's just that I've never made one before. I had a 1/2 flat of blueberries in my fridge and my son said, "Pie!" so I tried something new.

I used Dorie's Never Fail Pie Crust and her recipe for Blueberry Pie. My family was hovering in the kitchen while the pie was baking, drawn by the irresistible smell of baking pie. (Why doesn't someone come up with a perfume like that? Obvious answer: it would be annoying having to swat drooling men away all day long.) I was seasoned enough to know it had to cool down and firm up a bit before cutting into it, but it was hard work keeping away the eager tasters and resisting the siren call myself. Worth the wait, though, to get neat slices and lovely, dark blue oozy filling. None of the glutinous, nasty, canned filling here - this is the real deal, homemade blueberry pie. Worthy of the return of the pie maker!


Blueberry Pie
- adapted from Baking by Dorie Greenspan


1 double-crust pie dough, either from here orBaking
2-1/2 pints fresh blueberries
1 cup sugar, or more, to taste
1/2 cup all-purpose flour
Pinch salt
Coarsely grated zest of 1/2 lemon
Squirt of fresh lemon juice
1/4 cup dry bread crumbs

Egg Wash:
1 large egg beaten with 1 tsp. water

Sugar, for dusting


1- Butter a 9-inch pie plate. Roll 1/2 of the dough to a thickness of about 1/8 inch. Fit the dough into the pie plate and trim the overhang to 1/2-inch. Roll the other half of the dough into a circle, 1/8-inch thick and place it on a baking sheet lined with parchment paper or a silicone mat. Cover both halves of the dough with plastic wrap and refrigerate while you preheat the oven and prepare the filling.

2- Place a rack in the lower third of the oven and pre-heat the oven to 425 deg. F.

3- Put the berries in a large bowl and gently stir in the sugar, flour, salt, zest and juice. Let this mixture sit for about 5 minutes then taste and adjust the sugar and lemon juice, if needed.

4- Remove the pie shell and top crust from the refrigerator. Sprinkle the bread crumbs into the bottom of the pie pan. Gently stir the filling then spoon it into the crust.

5- With your fingertips, moisten the rim of the bottom crust with a little cold water. Center the top crust over the filling and gently press the top crust against the bottom. Fold the overhang from the top crust under the bottom crust and crimp the edges attractively with a fork or pinch with your fingers.

6- With a small, sharp knife, cut 4 slits and a hole in the center of the top crust. Brush the top with the egg wash, then sprinkle the crust with a little sugar to give it sparkle.

7- Place the pan on a baking sheet (to catch any bubble over - your oven will thank you for this step) and place the pie in the oven.

8- Bake for 30 minutes. Reduce the oven temperature to 375 degrees F and bake for another 30 minutes or so until the crust is a beautiful golden brown and the filling is bubbling up through the slits. If the crust is browning too quickly, tent loosely with foil or use strips of foil around the edge of the crust to protect it.

9- Transfer the pie to a rack and let it cool and settle for at least 30 minutes before serving.

Tuesday, July 29, 2008

Swimming Pool Pie


When I was a little girl birthday parties were a pretty simple affair. I'd invite all my friends over and their mothers would bring them to my house decked out in party clothes, bearing a wrapped gift. We'd play some party games like pin the tail on the donkey then sit down at the dining room table to eat cake and ice cream. As a crowning touch of high society, each place would have a nut cup. Oooh. Then I'd open the presents, say thank you, and the girls would go home. Every body happy.

Somehow in the years it took me to grow up and have kids, this all changed. I realized this when, after the games / cake / presents extravaganza, a sweet little girl from the neighborhood lisped , "Where's the party bags?"

Hunh? What's a party bag? I asked my kids and they brought me up to date. Apparently you must buy bags for each guest and fill them with candy and stuff. Why? Well, because you must.

I called my sister to ask if she'd encountered this curiosity. She, too, was horrified at the escalating birthday parties. She'd recently attended a catered, sit-down dinner for 50 that was a birthday party - for a one year old! What??

I used to stress out for a month before a my kids' birthday parties, planning the perfect party on a shoe-string budget, trying to give my kids a glittering gala that would be on a par with the ones they attended. I was elated when they were old enough that I could just tell them to go have fun with their friends and I'd bake them a cake.

This year my son's birthday came about 2 weeks after we'd just had a wedding in our back yard. I was barely out of the stress coma and the idea of putting on a birthday party was making me think longingly of prescription medications. Every idea that I had seemed to blossom into a huge party that would require me to work non-stop for a week ahead of time.

In a panic I called my sister, the clipboard commando who'd run my daughter's wedding, and said, "Help! Fix my life. What do I do?"

She said, calmly and wisely, "Just have his friends come over and play in the pool in the backyard." Yes, a pool party. I could handle that.


The little kids swam and played on the slip and slide. The older kids played inside. And they all enjoyed the birthday pie.

It was a swimming pool pie, and it had every good thing a child loves - a crust made from rice krispie treats, a pool filling of whipped cream, blue jello, and blueberries, and a group of gummie bear friends hanging out together enjoying the sun.

Playtime with friends and sugar. What more does a child need?


Gummie Bears at the Pool Pie
(adapted from Taste of Home -makes 2 pies)


40 large marshmallows
1/4 cup butter
5-6 cups crisped rice cereal
1 package (6 oz) berry blue gelatin
1 cup boiling water
1 cup cold water
4 cups heavy whipping cream
1/2 cup plus 2 Tbsp powdered sugar
3-1/3 cups fresh blueberries
About 30 gummie bears

Grease 2 pie pans.

In a large microwave-safe bowl cook the marshmallows and butter on high for 1 minute. Stir, then cook for another minute. Stir until the butter and marshmallows are melted and combined, returning the bowl to the microwave for 10 second intervals if needed.

Stir in the cereal. With greased hands, press 1/2 the mixture onto bottom and up the sides of the pie pan. Repeat with the other half and the other pie pan.

In a large bowl dissolve the gelatin in boiling water; stir till dissolved. Stir in the cold water. Refrigerate until partially set, about 1 hour. (I got distracted and my gelatin was pretty well set, hence the blue chunks in the pie.)

In a large mixing bowl, beat the cream until it begins to thicken. Add the powdered sugar and beat until soft peaks form. Fold whipped cream into the the gelatin mixture, then gently fold in the berries. Divide this between the pie crusts, smoothing out the top. Refrigerate for up to 4 hours.

Garnish with gummie bears just before serving.

Serves 12 to 16.

Friday, June 13, 2008

Has Anyone Seen My Brain?


My brain is officially MIA (missing in action). If anyone's seen a grey, squealchy thing, sulking in a corner and refusing to come out till the stress is over, please return it to me.

My son came home from college for a weekend to help us paint the deck. It's a 5 hour drive each way (although in his case it's probably more like 4). Such sacrifice is not to be sneezed at; it should have cookies made for it instead. When I offered fresh cookies to take back with him he was on that offer like a boy who hasn't had fresh cookies since the last time he was home.

He requested these cookies. No problem. I'd made them many times and they really are delicious. But he also wanted to catch an episode of a funny TV show he'd missed. No problem. We had it on the computer in the kitchen so together we watched and laughed as I baked. Then I pulled the first batch out of the oven. Problem. They were all flat and spread out.

My cookie baking experience told me that this was a case of not enough flour. But I'd made this recipe before and didn't have to add extra flour. I double checked the amount in the recipe and on my blog - same amount both places, just the amount I remembered carefully measuring out.

I sent my son home with a bag of cookies and apologies that they didn't turn out better. My mind still churning over why they didn't turn out, I set to cleaning up the kitchen. And I discovered the bowl with the carefully measured out flour, baking powder, and salt sitting behind the mixer. Aaaaahhhhhhh!

So, what's a girl to do with a batch of huge, flat, slightly greasy cookies that no one really wants to eat? The obvious answer, scrape them into the bin, is beyond me. I simply cannot throw away perfectly good perfectly adequate food.

I had recently made this luscious pudding from Nigella Express and the thought of the pudding arced and sparked with the conundrum of the crumb puddle cookies - Pie!

I crumbled up the cookies, pressed them into a pie pan, baked at 425 deg. for about 10 minutes, then let it cool completely. Then I made the pudding. When it was cool, I whipped about 2 cups of whipping cream and carefully folded in the pudding, then poured the mousse into the pie crust and chilled it.

Why do I not have pictures of the pie to show you? Well, we ate it all. Yes, every last gluten-free crumb. It was creamy, smooth, sweet, and delicious. The chocolate nuggets in the "pie crust" were a taste and texture surprise in every bite.

So, like a 19th century children's book, I close with a moral. At the first sign of failure in the kitchen, don't give up. The only sure sign of failure is a smoke alarm. Most other disasters can in some way be saved or given new life in another form. Oh, and don't watch distracting television shows while you're baking.

Fabulous Chocolate Pudding
- adapted from Nigella Express

1 cup whole milk
1/2 cup heavy cream
1/3 cup sugar
1 Tbsp cornstarch
1/3 cup cocoa ( Dutch will give a darker color, but regular is fine)
2 Tbsp boiling water
2 egg yolks
1 tsp vanilla extract
2 oz dark chocolate, finely chopped

1- Either in a saucepan or in the microwave, warm the milk and cream together.

2- In another saucepan mix the sugar and cornstarch. Sift in the cocoa. Add the 2 Tbsp of boiling water and whisk to a paste.

3- Whisk in the egg yolks, one at a time, followed by the warmed milk and cream, and then the vanilla extract.

4- Scrape down the sides of your pan and put it on the heat, cooking and whisking for about 3 to 4 minutes, until the mixture thickens to about the consistency of mayonnaise.

5- Remove the pan from the heat and whisk in the finely chopped chocolate. Pour the chocolate into 4 small cups or glasses, or if you're going to make a mousse with it, into a bowl.

6- Cover the surface with plastic wrap and refrigerate till cooled. To serve in the cups, bring to room temperature and garnish with a blob of cream. To make the mousse, fold the pudding gently into whipped cream.

As you can tell, the pie recipe is not one that you have to follow to the letter. If you want to play with it, have fun!

Monday, May 12, 2008

Apples to Apples


I'm sorry I've been absent of late. My brain short-circuited when my daughter informed me that the wedding was only 45 days away. 45 days? How did that happen? I've had a year and a half to prepare and now I feel so unprepared. So much to do and so little time.

For some reason, way back early in the planning stages, we decided that it would be simpler and easier to hold the wedding in our back yard. Huh? Where was my brain? What was I thinking?

We spent most of last summer having the front and back yards landscaped. Now we're into filling in the landscaping with more plants and forever weeding. Cleaning, scraping, sanding, and painting the deck comes next. And in between are the innumerable details involved. Always more things to be done. Instead of getting shorter my to-do list is getting longer.

So if I don't post super regularly or don't make it to your site to leave a comment, please understand, I'm not being aloof or snotty. I'm probably balled up in a corner whimpering. This, too, shall pass, but in the meantime, please be patient with me.

Here's the post that I meant to get up for Mother's Day, but it also fits in with today's theme of stressed mother of the bride. When I got married my mother helped put together my wedding from out of state. She did all the invitations. She sent up her wedding dress for me to wear. She even encouraged me to spend money! All this with much less whining than I'm doing.

She just makes it all look so easy. Easy as pie. Which for her is true. She's a whiz at making pies.

Growing up, I didn't appreciate pies like I do now. They didn't have frosting, so they rated much lower in my book than cakes. But now that I have made a fair amount of pies, I'm amazed at the number of pies my mother made. When our apricot tree began to dump it's annual ton and a half of fruit, my mother would whip out pie after pie and put them in the freezer so we could feast on fresh apricot pie all winter. When apples were in season, she'd throw together an apple pie just to make my dad happy. And she made it look so easy.

So here is my late Mother's Day tribute to mom and her amazing pies. Apple pie bars. The taste of an apple pie without the fuss of a crust, because as much as I practice, pie crusts aren't as simple for me as they are for her. And I know she'll understand the post being late. She knows me pretty well by now.

Apple Pie Bars
- adapted from Great Cookies by Carole Walters

6 Granny Smith or Golden Delicious apples, peeled, cored, and sliced 1/4-inch thick
1/3 cup firmly packed light brown sugar
2 Tbsp fresh lemon juice
1 Tbsp honey

crust:
2-1/4 cups all-purpose flour, spooned and leveled
1/2 tsp baking powder
1/2 tsp salt
1 cup (2 sticks) unsalted butter, slightly firm
1/2 cup lightly packed light brown sugar
1 large egg


streusel topping:
1 cup all-purpose flour, spooned and leveled
1/4 cup granulated sugar
1/4 cup lightly packed light brown sugar
1 tsp ground cinnamon
1/4 tsp salt
1/2 cup (1 stick) cold unsalted butter, cubed
1 cup medium-chopped toasted pecans


1- In a large skillet over medium heat, combine the apples with the brown sugar, lemon juice, and honey. Cover the pan for 2 to 3 minutes. Uncover when the apples have released their juices and cook, stirring occasionally, until the apples have turned a golden brown and there is no liquid left in the pan, about 15 minutes. Set aside to cool.

2 - Position a rack in the center of the oven and preheat to 375 deg. F. Line a 9 x 13 x 2-inch baking pan with aluminum foil, pressing it smooth and snug in the corners and sides. Using a pastry brush, grease the bottom and sides with softened butter, taking care not to tear the foil.

3- Sift together the flour, baking powder, and salt into a medium bowl. Set aside.

4 - In the large bowl of an electric mixer fitted with a paddle attachment, cream together the butter and brown sugar on medium-low speed for about 2 minutes. Add the egg and mix to blend. On low speed, add the dry ingredients in two additions, mixing only to combine after each addition. Divide the mixture into eight parts and place them in two rows down the length of the pan. With lightly floured hands, press the mixture evenly into the pan.

5- Bake for 15 to 18 minutes, or until the crust has turned golden brown and begins to release from the sides of the pan. While the crust is baking, prepare the streusel topping.

6- In the large bowl of an electric mixer fitted with a paddle attachment, combine the flour, granulated and brown sugars, cinnamon, and salt for the streusel topping. Mix briefly on low speed. Add the butter and mix on medium-low speed until the mixture is crumbly and barely holds together when squeezed gently. Stir in the pecans with a large rubber spatula or a large wooden spoon. Set aside.

7 - When the crust is done, immediately spread the cooked apples evenly over the hot crust. Sprinkle the streusel topping over the apples, pressing gently to help it adhere.

8 - Reduce the oven temperature to 350 deg. F. Return the pan to the oven and bake for 20 to 25 minutes, or until the topping is lightly browned and crisp. Let rest in the pan for 2 to 3 hours before removing and slicing with a long, sharp knife. They will slice better if they are chilled.

To store the bars, refrigerate layered between sheets of wax paper for up to 5 days. Bring to room temperature before serving.


Tuesday, February 26, 2008

Double Dog Dare

One of my favorite movies, A Christmas Story, has a scene on the playground in winter where an escalating series of dares leads to a boy touching his tongue to the metal flagpole. It stuck and the fire department had to come rescue him.

I'd never have fallen for that dare. I knew the outcome of sticking your tongue to cold metal because I'd already succumbed to a dare by one of my sisters to stick my tongue to the lid of a can of frozen orange juice concentrate. Yup, it sticks. I didn't need the fire department to rescue me, just a bit of warm water, but it was a wee bitty bit uncomfortable, all the same.

Since then, I've stayed away from dares. Dares are for suckers. Dares are for losers. Except when the challenge involves food. Not the "dare you to eat that" kind, but the "dare you to make that" variety.

Recently I was out with my lady friends for our monthly get together. This one was at a Tex-Mex type restaurant. One of my friends said we just had to try the chocolate chili pie. We all tried bites, savoring the flavors, rolling our eyes in enjoyment. Then my friend flung down the gauntlet, the double dog dare. "I bet you could make this." Ha, I will take that dare!

I changed the crust. We all agreed a regular pie crust didn't go well with the oozy chocolate. and I played around with a recipe for Mississippi Mud Pie, adding ancho chili. The result? Really good. I used a very dark chocolate so it's flavor is intensely chocolate. The amount of chili I used doesn't flavor it as much as add a bit of heat lingering on the tongue. When served warm or at room temperature it's oozy and gooey, but when you chill it it firms up to a more cheesecake-like texture. I recommend trying it both ways. With whipped cream. Maybe a couple of times, so you can nail down that elusive chili flavor.

Texissippi Mud Pie
adapted from The Great American Cookbook

Crumb crust:

4 oz chocolate wafer cookies, crushed
1/2 cup pecans, finely chopped
1 Tbsp light brown sugar
1/2 tsp ground cinnamon
6 Tbsp butter, melted

Filling:

1 cup unsalted butter
6 oz bittersweet chocolate, chopped
1/2 cup corn syrup
1-1/2 tsp ancho chili powder
4 large eggs, beaten
1/2 cup pecans, finely chopped
whipped cream, for serving

1- Preheat the oven to 350 deg. F. Lightly grease an 8-inch springform pan. (You can use a 9-inch, but the pie will be thinner, and you'll need to decrease the cooking time.)

2- To make the filling, put the butter, chocolate, and corn syrup into a pan over low heat and stir until melted and blended. Let cool, then beat in the chili powder, eggs, and pecans.

3-While the chocolate mixture is cooling, put the chocolate wafers, pecans, sugar, and cinnamon into a food processor and process until fine crumbs form - do not overprocess to a powder. Add the melted butter and process again until moistened.

4- Tip the crumb mixture into the springform pan and press over the bottom and about 1-1/2 inches up the side of the pan. Cover the pan and chill until the filling is cooled.

5- Pour the filling into the chilled crumb crust and smooth the surface. Place the sprinform pan on a baking sheet and place that in the center of your pre-heated oven. Bake for 35 minutes, or until just set but still soft in the center. Let cool on a cooling rack. Serve at room temperature or chilled. Top with generous blobs of whipped cream, plain or lightly sweetened.


Note- If you prefer sweeter desserts, you can use semisweet instead of bittersweet chocolate. Just be sure it's a good quality chocolate, since it's the premier flavor of this dessert. Plus, if you love the heat, you can increase the amount of chili powder.

Monday, January 28, 2008

Bittersweet Pie


When I was dating my husband-to-be, he told me about his grandparents who lived in sunny, southern California. They lived in a sprawling old farmhouse that had once been in the middle of an orchard. The orchard had been sold off and developed into business real estate, so the house sat, an island of history in the stream of commerce.

The house had a pecan tree, a lemon tree, an apricot tree, and gardenia bushes lined the drive. Whenever my husband's family made the trek to visit, his grandmother would give him a big hug and say, "I'm gonna make you a pie, honey. Go pick some lemons." The scent of gardenias and the taste of lemon meringue pie are links to his grandmother.

She passed away before we were married so I never got to meet this sweet woman. But in her honor I had gardenias in my wedding bouquet and one of the first pies I ever made for my husband was lemon meringue.

I've made several lemon meringue pies over the years, but it's been awhile since the last one. My husband's palate has changed and though he has sweet memories of his grandmother's pies, the reality is a bit too sweet for him now.


When the Daring Bakers announced that the challenge for January was a Lemon Meringue Pie, I was pleased to revisit this old favorite and to have something that wasn't too difficult. So I thought. But what I thought would be easy as pie.....wasn't.

The pie crust turned out quite nicely for me and I was looking forward to the pie coming together without a hitch. The custard was another story. It never set up. I let it cool then swathed it in a turban of meringue, then baked it to a perfect golden brown.

I knew I was in trouble when I took my lovely pie out of the oven and the center wobbled ominously. I took the picture, hoping for the best, but when I cut into it, I found I'd baked Lemon Meringue Soup. We each tried a piece, but I knew it was doomed when my 5 year old said it was "yucky."

I ended up throwing the rest of it away. To paraphrase Kryten in the BBC series, Red Dwarf: "Good bye 5 eggs, goodbye fresh lemons, goodbye perfect pie crust. Bon appetite, bin!"

I'm not including the recipe, but if you'd like a recipe for lemon meringue pie that doesn't fail, look in The Joy of Cooking. Check out how the rest of the Daring Bakers did with this challenge at the Daring Baker's Blogroll.

Tuesday, January 15, 2008

Heritage Pie

When I won a contest recently with a recipe, my proud husband sent out an announcespam to everyone we know. I got back an interesting congratulations from my aunt. She is a lovely woman, a mother, grandmother, an accomplished quilter who has one of her quilts hanging in city hall, and a business woman who ran a successful coffee shop. She said that it was wonderful that the home arts are finally receiving recognition. My grandmother and her mother-in-law (who happened to be next-door neighbors) were the best cooks in town. There was no competition, no accolades, no prizes, but it was generally acknowledged that Mrs. O and Mrs. C were the best.

This set me to thinking about my grandmother. She raised a family in farm country, making ends meet through the Great Depression and World War II, keeping the family fed and clothed through thriftiness and hard work. Convenience appliances that I rely on weren't in her house. No dishwasher. No microwave. Not even an automatic ice maker, unless you count the way icicles automatically formed in the winter. I'm sure her menu did not include fresh mangoes, chimichangas, or sushi, but she certainly knew her way around a bin of flour and a stick of butter!

Pecan pie is my father's favorite pie and since I have my grandmother's recipe, I think of both of them whenever I make it. A wonderful, hard-working lady who loved making treats in the kitchen and her lucky little boy who raised me to see how blessed I am with what I have, however little or much that is.

Grandma's Pecan Pie

1 unbaked 9" pie shell
3 eggs
1 cup sugar
1 cup light corn syrup
1 tsp vanilla
1/8 tsp salt
1/4 lb (1 stick) butter, melted
1-1/2 cups broken pecans

Preheat oven to 350 degrees F.

Mix all the ingredients in a large bowl. Pour into the unbaked pie shell.

Bake at 350 deg. F. for 45 - 55 min. Check to see that the crust is not browning too rapidly. If it is, cover the edges with foil or a pie crust shield.

When you remove the pie from the oven it will still be slightly wobbly in the center, but will set up as it cools. Cool on a wire rack to room temperature.

Store leftovers covered in the refrigerator.