Showing posts with label Raspberries. Show all posts

Monday, August 17, 2009

Berry Nice


The first food blog I ever read was Orangette. I was still on my quest for the elusive chocolate covered macaroon and I googled it. One of the hits was this Orangette post. It wasn’t exactly what I was looking for, but her amazing description of the macaroons made me want to try them, even though no one in my family but me will eat coconut.

I was such a foodie newbie at the time that I didn’t know what ganache was, other than it sounded fancy. Molly’s macaroons introduced me to ganache and opened up new food vistas to me.


I had a question about the cooking process of the macaroons and I wrote to her with my question. She wrote back, warmly and personably, answering my question and encouraging me. I was so impressed that she’d take the time to do that. I was hooked. On Molly, her food, and her blog. She was what inspired me to start my own blog. Writing stories, cooking, and sharing recipes. I wanted to do that!

As a nod to Molly and her new book, A Homemade Life, I made her Summer Berry Poundcake. The recipe is in her book as well as on her blog. It embodies all the qualities I love about Molly’s stories and recipes - simple, unpretentious, approachable, and most of all, delicious.


This cake is like a big hug from mamma on a plate. It’s got blueberries and raspberries wrapped up in a delicate, buttery pound cake, moist and tender. If the berries are homegrown, like mine, even better. And, according to Molly, you can wrap it tightly and freeze it to pull out and enjoy after the berry season is over and savor the flavor of summer past.

Monday, August 10, 2009

Overdue Birthday


24 years ago, it was a very hot summer and I was very pregnant. And overdue. Everyday stretched into a eternity of sweaty discomfort. I prayed daily that this might be the day the baby would come. It didn't. On my birthday I said that the only gift I wanted was to have the baby come. It didn't. A week, exactly, after my birthday, she finally came. She's always had her own ideas about the right way to do things.

We had a birthday dinner for my daughter last week and, as tradition dictates, she got to pick out her cake. True to herself, she picked out something with berries. And ice cream. And pound cake. It was delicious - Good call, Sarah!

I used the pound cake recipe from Baking. Even though Dorie clearly stated that the loaf pan was to go onto a cookie sheet, I forgot. The cake burbled over and dribbled onto the floor of the oven, producing a bit of smoky flavor to the cake.


I forgot to clean up the spillage, and when I preheated the oven for the birthday dinner pizza, I started smelling smoke. Clouds of smoke. Well, for pizza that's a good thing. We enjoyed the taste of a smokey, wood-stove pizza with only the minor annoyance of smarting eyes and fans going full bore to clear out the smoke.

I adapted a recipe I found on the internet to make the cake. It called for pre-made ice cream, sherbet and pound cake. For a birthday cake, it needed a smidge more lovin' than that, so I made all the parts. I'm only giving the recipe for the sherbet as you probably have Baking or can find a bazillion copies of the pound cake recipe on food blogs.


Frozen Raspberry Birthday Cake

1 batch of Raspberry Sherbet (recipe to follow)
1 batch of Vanilla Bean Ice Cream (The Perfect Scoop)
1 9 x 5-inch loaf of pound cake (recipe in Baking)
1 pint fresh raspberries, rinsed and picked over
3 Tbsp Chambord

1- Prepare Raspberry Sherbet and place in the freezer. This can be done days ahead of time.

2- Make the Vanilla Bean Ice Cream custard a day ahead of time and refrigerate.

3- Bake the pound cake according to the directions in Baking.

4- While the pound cake is cooling, put the Vanilla Bean Ice Cream in your ice cream machine to freeze.

5- Place a 9-inch circle of parchment paper in the bottom of a 9-inch springform pan. Cut a 3 x 27-inch strip of parchment paper and fit it around the inside edge of the pan. Tape to secure the ends.

6- Remove the crusts from the pound cake and slice it into 1/4-inch thick slices. Cover the bottom of the prepared pan with a single layer of slices.

7- Spread a thick layer of the fresh Vanilla Bean Ice Cream over the cake and place the pan in the freezer to harden, about 25 minutes. Put the ice cream in the freezer, as well.

8- Measure 2 cups of the sherbet into a bowl and allow that to soften for the last 5 minutes or so of the freezing time (depending on the temp of your kitchen). Spread the softened sherbet over the frozen cake. Add another layer of pound cake slices and return to the freezer for another 10 minutes.

9- In a small bowl, combine the fresh raspberries with the Chambord. Allow them to sit for 10 minutes. Take the Vanilla Bean Ice Cream and the sherbet out of the freezer to soften for about 3-5 minutes.

10- Remove the cake from the freezer and spread the berries evenly over the cake. Place dollops of the softened Vanilla Bean Ice Cream over the raspberries and use a rubber spatula to spread it smooth.

11- Place a final layer of pound cake slices over the cake. Spread the remaining sherbet over the top and smooth it out. Wrap tightly with plastic wrap and freeze till firm - about 4 hours.

12- For presentation, remove the sides of the springform pan and slide the cake onto a platter. Garnish with additional raspberries, if desired. Allow the cake to soften slightly to make it easier to slice. Tightly wrap any remaining cake and put it back into the freezer.

Raspberry Sherbet
- adapted from The Perfect Scoop

4 cups fresh raspberries
2 cups whole milk
1 cup sugar
1-1/2 tsp freshly squeezed lemon juice

Place the first 3 ingredients into a blender or food processor. Puree until smooth. Strain the mixture to remove the seeds, then add the lemon juice. Freeze in ice cream maker according to the manufacturer's directions.

Thursday, July 9, 2009

Berry De-Lite

I've been pregnant through 3 summers and I must say that on every hot day I am profoundly grateful that I'm not pregnant now. My first pregnancy I wore a bikini. I was young and cute and could pull it off. My second pregnancy I bought a huge, black maternity bathing suit and a kiddie wading pool. My toddler was excited about the pool, but got a pouty lower lip when he saw that mammoth mommy took up the whole pool.

The last time around I was a pro at keeping cool. Stay in the mall. Lurk near the frozen foods section. And above all else, do not turn on the oven to bake!

Luckily for those who don't enjoy sweltering, as well as a heat wave, summer also brings a bounty of fresh fruit that tastes fabulous without any cooking necessary. This berry dessert was originally intended as a pie filling, but I was not about to turn on the oven to make a pie crust, so it became parfaits. Beautiful parfaits, heady with splash of wine flavor, topped with a generous dollop of whipped cream. Cool, fruity, and easy. What better summer dessert could you ask for?

Berry De-Lite Parfaits
- adapted from Have Your Cake and Eat It, Too

2 cups fresh blueberries, rinsed and dried, or frozen unsweetened whole blueberries
2 cups fresh raspberries or frozen unsweetened whole raspberries
2/3 cup granulated sugar
1/4 cup dry white wine
2-1/2 Tbsp fresh lemon juice
1/4 cup water
2 tsp unflavored gelatine
2 Tbsp creme de cassis
Whipped cream to top
Fresh berries to top


1- In a 1-1/2 quart nonreactive saucepan, combine 1 cup of the blueberries, 1 cup of the raspberries, the sugar, wine, and lemon juice. Set over low heat and cook gently, crushing the fruit with a potato masher or the back of a large spoon, until the sugar dissolves. Remove from heat and set aside.

2- Pour the water into a small saucepan. Sprinkle the gelatine over the water and allow it to sit for about 3 minutes to soften. Stir the mixture over low heat just until the gelatine dissolves. Do not boil.

3- Stir the dissolved gelatine into the berry mixture, then stir in the remaining berries and the creme de cassis.

4- Transfer the hot berry mixture to a heatproof bowl and set it in a larger pan of ice water. Cool, stirring on and off, for about 5 minutes, until the mixture thickens to the consistency of raw egg whites. Carefully spoon the mixture into parfait glasses. Cover the glasses with plastic wrap and refrigerate until set, at least 3 hours, or overnight.

5- Top the parfaits with whipped cream and fresh berries just before serving.


Monday, July 14, 2008

Summer Pleasures


One of my favorite childhood summertime pastimes was playing in the laundry. My mother had a clothes line that folded out like an umbrella and in the summertime all the laundry went outside to air dry. The laundry load with the highest play value was sheets. On a hot summer day I would play house inside the cool, shady walls of the damp sheets hung out to dry.

For years after we bought our own house I wished for an umbrella-style clothes line. My husband had issues with it, though. I believe he thought a clothes line looked a bit ghetto. After about 15 years, my mother-in-law figured out that my husband wasn't going to get me one, so she bought me one and I love it.

It makes me happy to hang out my laundry. I feel like I'm cheating a bit, like I'm getting away with something. I get my clothes dry and don't have to pay for the electricity to dry them. Shhhh, don't tell! Plus, no fabric softener on earth can make sheets smell as delicious as drying them in the warm sun.

It's such a great feeling to find something so easy and so satisfying. Making raspberry sherbet is like that, too. I picked raspberries from my neighbor's yard, threw them into a blender with milk and sugar, poured that into my ice cream freezer and had fabulous sherbet, bursting with fresh raspberry taste in 20 minutes! Life is rarely this simple and pleasing, so intend to make the most of it while it is.


Raspberry Sherbet
- adapted from The Perfect Scoop by David Lebovitz

4 cups raspberries
2 cups whole milk
1 cup sugar
1-1/2 tsp freshly squeezed lemon juice


Put the raspberries, milk, and sugar in a blender. Puree until smooth, then strain the mixture through a coarse sieve to remove the seeds. Stir in the lemon juice.

Freezer right away to preserve the beautiful taste and color of the raspberries. Follow the instructions for your ice cream maker to freeze. (Mine was quite soft when the freezing time was done, so I put it into the freezer to harden up.)

Wednesday, February 20, 2008

Life Pull-Aparts

My sister and I were recently talking, commiserating over the trials of life, and agreed that this wasn't the life we'd signed up for. In browsing through the catalog of life, I definitely don't remember circling this page! But, as stressed as I get at times, I wouldn't trade my life for the "perfect" one I thought I'd ordered. I love my family and the messy chaos that accompanies us. And if I could get into that glossy, picture perfect life, I suspect I'd find it...boring.

Somedays baking mirrors life. I start out to make one delicious thing, hit a frustrating brick wall, take a turn, and end up with something totally different, but also delicious.

When Peabody and Helen announced their doughnut challenge, I immediately thought of raspberry filled doughnuts. They are my all-time favorite doughnut and I'd never made them before. I looked at recipe after recipe and found the perfect one in In The Sweet Kitchen. Strawberry-Filled Brioche Doughnuts. Mmmmm. Substitute raspberry for strawberry and it sounded like doughnut perfection. Since Peabody had earlier helped me overcome my fear of brioche, I plunged into this recipe confidently.

It yielded a silky-smooth dough and I was salivating as I cut out round of brioche, spooned jam onto the rounds, and pinched them closed to form perfect little brioche jam balls, ready to rise and fry.

I covered my tray of rising dough with a towel, placed it in a gently warm oven to rise, eagerly anticipating the wonderful doughnuts they'd make. At the end of the rising time, I pulled out the tray, expecting to see puffy balls of doughnut goodness.
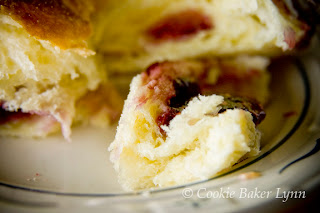
Heavens! What had happened? Instead of seeing contented doughnuts, ready to take a dip in the fryer, I was looking at a crime scene! CSI Kitchen, with the little dough corpses sprawled all over the pan, spewing their raspberry guts all over each other.

I may not be the sharpest knife in the block, but even I knew that to try and fry these massacre victims could only mean black smoke and curses. So I scraped the whole thing into a buttered 9x13 pan, sprinkled it with vanilla sugar, and baked it. When I took it out of the oven, the top was browned and inside was all moist, buttery, jammy goodness. I don't think frying would have improved these a bit. I was embarrassed at how quickly we gobbled up the whole pan. Since the brioche dough is made the night before, you can easily put this together for a breakfast or brunch.

It might not be what I signed up for, and I did have to make more doughnuts for the challenge (oh, darn), but these were even better than what I'd hoped for.

Raspberry Brioche Pull-Aparts
adapted from In The Sweet Kitchen

Brioche dough - makes 2 loaves or 2 pans of pull-aparts, or 1 of each

2 pkgs (about 5 tsp) active dry yeast
1 cup warm (105 to 115 deg. F) whole milk
1-1/2 tsp granulated sugar, to activate yeast
5-1/2 cups all-purpose flour
2 tsp salt, preferably sea salt or kosher salt
6 Tbsp granulated sugar
6 large eggs, at room temperature
1-1/2 cups fresh unsalted butter, never frozen, at room temperature but not overly soft (this is a good time to pull out the really good butter!)
1 egg lightly beaten with 1 Tbsp milk, for glaze on loaves
Raspberry jam
Vanilla sugar or plain granulated sugar for dusting the pull-aparts


1- In a large bowl with a mixer sprinkle the yeast over the warm milk. Stir in the 1-1/2 tsp of sugar and let the yeast proof for 5 to 7 minutes, until foamy and bubbling. Add 1 cup flour and the salt, beating with the paddle attachment (or with a wooden spoon, if working by hand) to make a soft, smooth batter, about 5 minutes.

2- Beat in the remaining 4-1/2 cups flour and the 6 Tbps sugar in three additions, beating in 2 eggs after each addition of flour. Mix well between additions, making sure you scrape down the sides and bottom of the bowl. Beat until a smooth, soft and elastic dough is formed, about 10 minutes with the dough hook attachment, or 20 to 25 minutes by hand. Doing it by hand is great stress therapy. Slap the dough onto the counter, then with the heel of one hand push it through the middle into the counter. With the other hand, fold the far side of the blob towards you, over onto itself, and rotate the dough about 90 degrees. Repeat this pushing, folding and rotating cycle several times, then give the dough another good hard slap onto the counter. (Don't add an extra flour at this point, even if the dough feels sticky; just use a dough scraper to gather the dough off the work surface. As the dough becomes more elastic, it will lose its gumminess and become smooth.) Do a stretch test: pinch some of the dough and pull it upwards. When the dough is ready, it should feel springy and elastic.

3- If you have removed your dough from the stand mixer, return it to a clean mixer bowl. If you're preparing the dough entirely by hand, you may find the next step easier in a large mixing bowl with a wooden spoon. Knead or beat the butter into the dough in small portions, fully incorporating each addition before adding the next. This process is definitely easier with a dough hook, but it is not impossible by hand. Squeeze the first few additions of butter through the dough, kneading until it is absorbed, then use a wooden spoon to beat in the remaining additions to prevent the dough from getting greasy and slippery, a sign that the butter is melting and not getting properly incorporated. The butter should be malleable, but not overly soft, and the dough should not get too warm during this process.

4- When the last of the butter has been beatin in, continue beating the dough until it is very smooth, glossy, and elastic, about 5 minutes with the dough hook, or 10 minutes by hand. The dough should now have reached the stage where it comes aaway from the sides of the bowl in a smooth entity, or should neatly rool on the counter, no longer sticky or tacky. Transfer the dough to a large, lightly buttered bowl and cover the bowl with a sheet of plastic wrap. Leave to rise at warm room temperature, away from any drafts (75 deg. F is perfect), until doubled in bulk, about 1-1/4 to 2 hours.

5 - Punch the dough down and lip it over, deflating it completely. The buttery side should now be facing up. Cover again with plastic wrap and refrigerate for 2 to 3 hours. Punch the dough down, flip it once more, cover the bowl with plastic and weigh it down with a plate (I had 3 plates on mine, to be on the safe side). You don't want the dough to escape and try to take over your refrigerator. It's a pain to clean up and a waste of good butter!

Return the bowl to the coldest part of your refrigerator and leave there overnight. If the dough is left longer than 8 hours, check periodically to make sure it has not risen above the bowl; gently punch it down as necessary. The broche dough may be frozen at this point, wrapped very securely. Allow the dough to thaw in the refrigerator for 4 to 7 hours, then proceed with the shaping, final rising and baking.

6- Several hours before you plan to bake the brioche, remove the dough from the refrigerator, punch it down and turn it out onto a very lightly floured surface. Invert the bowl over the dough and let the dough rest for 10 minutes.

7 - Divide the dough in half, setting aside one half and covering it loosely with plastic wrap. This will either be a loaf or another pan of pull-aparts. Gently roll out the dough 1/2 to a rough rectangle, 1/3 to 1/2 inch thick. Be kind to the dough, and patient. If it seems to be resisting the rolling, don't force or stretch it, but cover it with a piece of plastic wrap and let it relax for a few minutes.

8- Butter a 9 x 13-inch baking dish and set aside. Using a 3 to 4 -inch round biscuit cutter dipped in flour, cut the dough into rounds. Place a teaspoonful of the jam into the center of each round. Dip your finger into a little water and moisten the rim of dough around the filling, then pinch the edges together like a dumpling or a turnover to form a good seal. Place the dough rolls into the baking pan and cover it with plastic wrap and let them rise in a warm, draft-free place for 30 minutes.

9- Repeat the process with the other 1/2 of the dough, or make a loaf.

10 - Preheat the oven to 375 deg. F. Take the plastic off the pan and sprinkle vanilla sugar over the top of the dough rolls. Bake for about 30 minutes, or till the top is golden brown.

11- Remove from the oven and cool on a rack. Warm, they are moist, gooshy, and heavenly. As they cool they will become firmer and less delicate, but still wonderful.



Monday, December 3, 2007

Life On The Treadmill


My parents didn't approve of television. I remember when we got our first television set. I was probably 4 or 5 years old. The set was black and white. And my parents didn't upgrade to color till I moved away to college. It blew my mind when I found out Star Trek was in color.

We were limited to one hour of TV time a day, so we had to plan and prioritize our shows that we wanted to watch. As an adult I can see the advantage of limiting the brain rot, but as a child I resented having to choose between The Flintstones and The Jetsons.

One scene in The Jetsons has stayed in my mind. George Jetson goes out to walk the dog on the treadmill, the dog chases the cat, the treadmill goes haywire, and George is running for his life on the treadmill, getting sucked into it, and coming out running, over and over, screaming, "Jane, stop this crazy thing!"

For me, December is that treadmill. I always seem to hit December 1st running, with a to-do list a mile long. Shopping, wrapping, mailing, cards to make, write, address and send, and, of course, baking. And baking in December means cookies. Lots of cookies. Cookies for neighbors, cookies for the office party, cookies for the cookie exchange, and cookies for my family to snork up. I'll be posting all (or mainly) cookies in December, so today is my last pie post for a while. (This also fits in nicely with the writer's strike since there will be no new episodes of Pushing Daisies until that's resolved.)


This is a fabulous pie. It's easy to put together, it's dressy enough for company, and it's totally delicious. If you choose to use a pre-made crust it's even faster to make. When I made my glut of Thanksgiving pies I had enough pie dough left over to roll out a single pie crust. Dorie's instructions for making a single pre-baked crust were different than I'd ever used before and I had such good success with them that I'll include them for you.

Raspberry Ribbon Pie
Adapted from Taste of Home

1 pre-baked pie shell
1 package (3 oz.) raspberry gelatin (Jello)
1 cup boiling water
1/4 cup sugar
1 cup fresh or frozen raspberries
1 Tbsp lemon juice
3 oz. cream cheese, softened
1/3 cup confectioners' sugar
1 tsp vanilla extract
Dash salt
1 cup heavy whipping cream

To make a pre-baked pie shell, use a 1/2 recipe of Dorie's Good For Almost Everything Pie Dough from Baking and chill, wrapped in plastic, for an hour or more. Roll out the dough and place into a 9-inch, buttered pie plate. Trim and finish the edges. Refrigerate the crust, covered with plastic wrap, while you preheat the oven to 400 deg. F.

Butter the shiny side of a piece of aluminum foil, fit the foil, buttered side down, tightly against the crust and fill with dried beans or pie weights. (I use old kidney beans and store them in a jar labeled "Pie Beans." You don't want to try cooking those beans afterwards.)

Put the pie plate on a baking sheet and bake for 25 minutes. Carefully remove the foil and beans. If the crust has puffed, gently press it down with the back of a spoon. Return the pie plate to the oven for another 10 minutes, till the crust is golden brown. Transfer to a rack and cool to room temperature before filling.

To make the pie filling, place the gelatin in a bowl and dissolve it with the boiling water. Add the sugar, raspberries and lemon juice and stir till the sugar is completely dissolved. Refrigerate until partially set, about 1-1/2 hours.

In a mixing bowl, beat cream cheese and confectioners' sugar until smooth. Add vanilla and salt. In another mixing bowl, beat whipping cream until stiff peaks form. Fold into cream cheese mixture. Spread 1/2 of this mixture over the bottom of the crust.

Spread 1/2 of the raspberry mixture over the top. Repeat the layers. Refrigerate for 8 hours or overnight before serving. Refrigerate leftovers.

Yield: 8 servings.

Thursday, August 16, 2007

Think Hink Stink

Summer is the time for family vacations and family vacations are all about making memories. Unfortunately, not all of them are wonderful, cherished memories. In my family a vacation did not involve hotels with swimming pools or amusement park rides. They did not involve dining out at fancy restaurants or even seeing the world's biggest ball of twine. Almost all of our vacations involved packing up the car with foul-smelling camping gear, driving on dusty, bumpy roads to some remote, baking hot site, and setting up our tent. Those were the deluxe-edition vacations.

The no-frills vacation did not entail putting up a tent by the car. No, for one of these thrill-packed adventures I got to strap on a pack as big as myself and trudge for endless hours to get to some remote, mosquito-infested site to pitch our tent.

Are you getting the sense that I'm not a big nature gal? And quite a whiner?

My parents revel in the great out-of-doors and tried patiently and persistently to woo me with the spectacular vistas and fresh, pine scented air. All I got out of it was blistered heels, sore shoulders, and a propensity for bad puns. As we hiked along the endless trails we played word games to pass the time. I Spy got old quickly. I spy something brown - dirt; something blue- sky; something green - scrubby trees. Then you'd worked through every available landscape feature.

My favorite was a game called Hink Stinks. Trudging along you could have your brain engaged in thinking up a story and when you had it perfected you announced to the others that you had a Hink Stink. You told your story and it had to end with, "and the next day the newspaper headlines read...." And the others had to guess the headline that you'd dreamed up for you story, and, this is the challenging bit, all the words had to rhyme. There were bonus points for the more words you incorporated into your headline. 2 words was easy peasy, 9 words was really hard to make up and even harder to guess.

For example, you could tell a story about an amazing scientific study proving that howler monkeys living in close proximity to peach trees adversely affected the fruit's color. The headline would read (in 3 words) "Screeches Bleaches Peaches."


I was horrible at playing Hink Stinks and my family hated my stories because I was so focused on nobody guessing my headline that my stories were convoluted and stuffed with more red herrings than a fish market. When I finally revealed my headline, everyone would get angry. "What about the puffin? What did the carpet bag have to do with it? Why did you put in a albino, long-maned female horse? (fair, hair, mare)"

So now that I'm an adult in charge of my own life I no longer go camping or back-packing. Life is too short to torture yourself with things you hate. But the word games are irretrievably stuck in my head. When I made this lovely clafouti, I couldn't help myself. It just happened. From the warped recesses of my brain came:

Tooti Fruity Clafouti Beauty

Only four words, but extra bonus points because it tastes fabulous and it's low-fat, too!

adapted from Have Your Cake and Eat It, Too by Susan Purdy


Use a generous pie dish or a 10-inch tart pan.

6 Tbsp, plus 1 tsp granulated sugar, divided
1 cup thinly sliced peeled fresh or frozen unsweetened peaches
1 cup fresh blueberries, rinsed and patted dry, or frozen, unsweetened blueberries
1 cup fresh raspberries or frozen unsweetened whole raspberries
3 Tbsp dark rum or fruit-flavored liqueur (optional) - I used Chambord
1 cup 1% milk
2 large eggs plus 1 large egg white
2 tsp vanilla extract
2/3 cup unsifted all-purpose flour
Pinch of salt
1/8 tsp. nutmeg
Confectioners' sugar

1- Position a rack in the center of the oven and preheat it to 350 deg. F. Coat the pie plate with cooking spray, then sprinkle it with 1 tsp sugar.

2- Peel peaches. I used a vegetable peeler, but you can blanch the peaches for about 2 minutes in boiling water then place them in cold water. Then the skins will slip off easily.

3- In a large bowl, combine the fruit, 3 Tbsp sugar, and the rum or liqueur, if using. Toss to blend. Set aside while you prepare the batter.

4- In a food processor or blender, combine the milk, eggs and egg white, vanilla, the remaining 3 Tbsp sugar, the flour, salt, and nutmeg. Process until smooth.

5- Spread the fruit mixture in the prepared plate, and pour the batter over the top. Bake for about 35 minutes, or until the top is puffed up and golden brown. Allow to cool for about 5 minutes, then sift on some confectioners' sugar and serve warm. Or set aside at room temperature and reheat before serving.

This recipe serves 8 and has 150 calories, 4 g. protein, and 2 g fat per serving. Unless you put whipped cream on top or vanilla ice cream with it. Like I did.


Thursday, August 9, 2007

Fit For A Princess

22 years ago I had a little girl. She was 9 lbs, 14 oz. with a shock of black hair and sweet, pink cheeks. We named her Sarah, because in Hebrew, Sarah means Princess. This past week we celebrated that occasion. It wasn't anything big, just a nice dinner with her fiancee over. Some champagne. And a cake. Of course a cake.

I was slicing the cake when my husband said, "This is the last birthday of Sarah Craig." What?? Was he having an evil premonition? It took a moment for my champagne-adled brain to register that next year at this time she won't be a Craig, she will be married. She'll be in her own place with her own wonderful husband. I'll still bake her a cake, if she wants, but it won't be the same.

I'll no longer be able to rouse her out of bed to come out on the deck and take pictures of food because the morning light is just perfect. She is the reason my blog looks so good. She is a professional photographer who does my food pics out of love.

She won't be here to do a yoga video with me. Or tell me that my outfit is dowdy and needs to be changed. Or say, come snuggle in bed and let's watch an episode of The Office together.

She won't be moving far. Not out of state or out of the country. But it won't be the same.

She won't be here to tell me, "Mom, you look so hot!" and make me laugh. I know we'll be on the phone together a lot, but that's not the same as watching the entire 6 tapes of Pride and Prejudice while we have the flu together.

I'm so happy for her to be marrying a terrific young man who loves her whole-heartedly. They will have a wonderful life together. But I will miss her. Even though I'll see her often, it won't be the same.

When I asked her what birthday cake she wanted, she said, "Something fruity. And pretty - so you can blog it."

So I picked a recipe that combined ladyfingers with a sweet, tangy raspberry mousse and topped it with a crown of raspberries. It was delicious and we all gobbled up our pieces. Here is the recipe . I need to go get a tissue.

Sarah's Raspberry Princess Mousse Cake
adapted from Taste of Home

1 6-oz package raspberry gelatin
1-3/4 cups boiling water
2 packages (12 oz. each) frozen sweetened raspberries, thawed
2 cups heavy whippping cream, plus extra for garnishing
23 ladyfingers
Fresh raspberries for garnish


1- In a large bowl, dissolve gelatin in boiling water. Stir in raspberries. Refrigerate until partially thickened. (I had to go do an errand at this point and when I returned, my gelatin had set. I just let it warm up a bit and broke it up with a fork.)

2- Whip cream till it holds semi-firm peaks. Fold whipped cream into gelatin mixture.

3- Arrange the ladyfingers with rounded sides out around the sides of an ungreased 9-inch springform pan. Carefully spoon raspberry mixture into the pan.

4- Cover and refrigerate until firm. Garnish with whipped cream and raspberries.

Makes about 12 servings.


Thursday, August 2, 2007

Top Ten

I know it's been done before, but here are my personal top ten signs that you're spending too much time on your food blog.

#10 - You spend outrageous sums on specialty foods and don't blink because it's "for the blog."

#9 - When you set a hot dog down for your 5-year-old's lunch, he says, "Aren't you going to take a picture first?"

#8 - You plan your menu based not on nutrition, but on what's photogenic.

#7 - You know more about people who live in Australia, Singapore, and England than your next-door neighbors.

#6 - You can't remember the last fiction book you read. All the books you check out from the library are cookbooks. Likewise, when you log onto Amazon, all the "suggestions" are cookbooks.

#5 - You check for comments on your blog more often than you check for emails.

#4 - You have your blog URL put on your business cards

#3 - It feels like a waste of time to make something you've already blogged about.

#2 - When telling a story you make a mental note to work that into a blog post.

And, the #1 sign that you spend too much time on your food blog - You can't fit into your pants because of blogger's bloat!

Because of the last one, I've revisited a very good cookbook that's been gathering dust for a while. I can only do a non-stop diet of ice cream, scones, and cake for a little while before I feel the need to lighten up a bit. Have Your Cake and Eat It Too by Susan Purdy is the perfect way to cut out calories, fat, and cholesterol and yet still feel like you're having dessert.

With a bounty of fresh blueberries and raspberries on my counter and a refrigerator full of egg whites from making multiple batches of ice cream, I set out to make this luscious, light dessert. A pudding, in my experience has always been a custard. This was my first experience with, what I'd guess is, a bread pudding. Instead of bread, though, I used my egg whites to make an angel food cake, then the berries made a thick, slushy syrup for the cake to soak up. It's a tangy, sweet dessert, not too heavy, perfect for summer. If you want to feel extra good about yourself, top it with a blop of vanilla yogurt. Or, you can put on a dollop of whipped cream (like I did) or pair it with a little scoop of vanilla ice cream. Shhh - I won't tell!


Very Berry Summer Pudding
adapted from Have Your Cake and Eat It, Too

7 cups fresh berries or frozen whole unsweetened berries (blueberries, raspberries, blackberries, or any combination, divided
2 Tbsp water
1/2 to 2/3 cup granulated sugar, to taste (I used 1/2 cup)
2 to 4 Tbsp dark rum or Framboise, to taste (this is optional. I used 2 Tbsp Chambord)
1 angel food cake

1- Combine 6 cups of the berries, the water, and sugar in a large heavy saucepan and set it over medium-high heat. Cook, mashing and stirring the berries with a potato masher or the back of a wooden spoon, for about 3 or 4 minutes, until the sugar dissolves and the berries release their juice. Remove the pan from the heat. Stir in the rum or Chambord, if using, and set aside to cool.

2 - Line a 1-1/2 quart (or slightly larger) bowl with a sheet of plastic wrap large enough to overhang the edges. Cut the cake into 15 thin slices (about the thickness of a piece of store-sliced bread. It's OK if you have cake leftover - set it aside for later use). Cut 11 slices of the cake in half on the diagonal. Arrange 9 or 10 trangular pieces of cake in a pinwheel pattern, slightly overlapping, to cover the bottom of the bowl completely. Cut 3 or 4 slices of cake into 1- to 2-inch-wide strips and stand them on end, side by side, to line the sides of the bowl. Add extra cake, cut to fit, as needed to line the bowl right up to the rim.


3- Stir the berry mixture, and spoon about half into the cake-lined bowl. Smooth the top, and arrange 6 or more cake triangles in a pinwheel pattern to cover the berries. Spoon on the remaining berries and arrange 6 or more cake triangles in another pinwheel covering the berries. Cut small pieces of cake to patch any holes. The pattern does not matter; this will be the bottom when the pudding is unmolded. Fold the flaps of the plastic wrap over the cake.

4- Cover the pudding with another piece of plastic wrap slightly larger than the diameter of the bowl, then top it with a plate or cardboard round that fits just inside the bowl (it should not rest on the rim). Set a 2 lb weight on top, and refrigerate the pudding for at least 12 hours.

5 - To unmold, remove the weight and uncover the top of the pudding. Fold back the flaps of the plastic wrap and top the pudding with a flat serving plate with a lip. Invert, and peel off the plastic wrap. Cut into wedges and garnish each serving with a few of the remaining fresh berries.