Monday, August 31, 2009

Violet, You're Turning Violet


Next week we start back to school. For most people that means sending the kids off to school and breathing a sigh of relief as the calm descends over the household. Not for me. I homeschool my kids. That means that while other moms eagerly anticipate the start of school, I dread it. I'm not organized enough to do a good job. Will my children end up holding cardboard signs on freeway off-ramps because I didn't do a good enough job? Will they still be living at home when they're 35 because they can't get a job that doesn't involve a paper hat? These are the fears of a homeschooling mother.

One of the choices that I've made in schooling my children is to read to them. A lot. I have a huge list of books that I consider indispensable for a happy childhood. Whatever other mistakes I make with my children, at least they will have happy memories of The Little House in The Big Woods, Taran Wanderer, My Father's Dragon, Half Magic, The Snowy Day, and, of course, Charlie and The Chocolate Factory.

What child hasn't dreamed of visiting Willy Wonka's fabulous factory, sipping from the melted chocolate river, and coming away with a truckload of chocolates? But when you grow up, and you've had a stressful day, what do you dream of? Probably still chocolate, but perhaps also a little something for happy hour.

I fell in love with this cocktail when I saw it in Elizabeth Faulkner's Demolition Desserts. The name alone is fantastic, but I loved the beautiful violet color, too. I ran out and bought a bottle of vodka (she says use a best quality vodka. I have no clue what a quality vodka is, since they all taste like lighter fluid to me), removed a cup of vodka, and filled it with blue berries. (The remaining cup I put into a mason jar and filled that with raspberries. Perhaps I'll post something fabulous with raspberry vodka sometime.) Within days it started to turn a lovely reddish-purple.

The cocktail turned out beautifully. I carefully measured out the blueberry vodka, holding a spoon over the bottle's opening to keep the blueberries from spilling out, and mixed in the other ingredients, shook it with the ice, poured into a chilled glass, and reverently sipped. Mmmm, lusciously fruity. I tasted the orange, lemon, and blueberry and then....lighter fluid. Rats. It's still vodka. I guess I'm never going to be a vodka fan. I gave the rest of my glass to my husband who doesn't mind vodka at all. He gave it a definite thumbs up.

Violet Beauregard

For the infused vodka:

1 bottle (750 ml) premium vodka
1 cup (about 5 oz) blueberries


To infuse the vodka, pour out 1 cup of the vodka into another container and save for another use, like making raspberry vodka or vanilla extract. Wash the blueberries and dry them on a clean kitchen towel. Drop the berries one at a time into the vodka bottle, cap the bottle, and set it in a cool, dark place for at least 2 weeks or up to 1 year. Leave the blueberries in the bottle and the vodka will just get better.

For the cocktails:

3/4 cup (6 oz) blueberry-infused vodka
1/4 cup plus 2 tbsp (3 oz) Cointreau
1 Tbsp (1/2 oz) fresh lemon juice
Ice Cubes
6 Blueberries


1- Chill two cocktail glasses in the freezer for at least 30 minutes.

2- In a cocktail shaker, combine the vodka, Cointreau, and lemon juice. Fill the shaker with ice, cover, and shake.

3- Strain into the chilled glasses. Drop 2 or 3 blueberries into the bottom of each glass and serve immediately.

A Week of Blueberries


I really need to apologize. I've been a bad blogger and I know it. It's not like I've been on vacation in Hawaii (I wish), packing up my house for a move (so glad I'm not), or anything tremendous. Blogging has just been a lower priority this summer, so I've spent less time at the computer, both working on my own blog and visiting other blogs.

This situation isn't likely to change soon. There's a lot going on, nothing major or negative, just life with a husband, two kids at home, two grown kids within hollering distance, school, and, of course, the ever-growing list of things I want to bake.

But, since I do feel like I've disappointed you, my loyal readers, both of you, I will give you a gift. A week of blueberry posts.

My blueberry bushes performed magnificently this year. We've had the most amazing crop and I've spent a lot of time picking blueberries and figuring out what to do with all them. Since I've been so slow in getting up posts, I've accumulated a week's worth for you to enjoy.


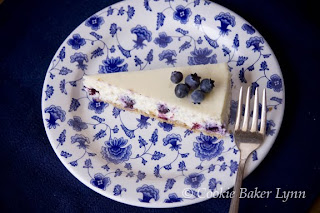
First up is a blueberry cheesecake. A friend gave me the book 500 Cakes for my birthday and this was the first thing I picked to make from it. This is really a summertime cheesecake. The tartness of lime keeps it from being overly sweet and it's a light cheesecake that doesn't sit like a brick in your stomach. It's creamy and smooth, with fresh blueberries bursting in every bite. I can't think of a better way to round off a meal (or my thighs).


Creamy Blueberry Lime Cheesecake
- adapted from 500 Cakes by Susannah Blake

1-2/3 cup finely ground graham cracker crumbs (about 1 packet of crackers)
1/2 stick (4 Tbsp) butter, melted
1 lb cream cheese
3/4 cup superfine sugar
2 tsp cornstarch
2/3 cup sour cream
3 extra-large eggs
finely grated zest and juice of 1 or 2 limes
1 cup fresh blueberries, plus 1-1/4 cups to decorate

1- Grease a 10-inch (23-cm) round springform cake pan. Stir the crumbs into the melted butter, then spread over the bottom of the prepared pan, pressing down to make an even base. Chill for 30 minutes. Wrap the base and sides of pan in two layers of foil to make a watertight seal. Use wide foil, so that it comes all the way up the side of the pan all the way around.

2- Preheat the oven to 350 deg. F (180 deg. C). Put a tea kettle full of water on to boil.

3-Beat the cream cheese until creamy, then beat in the sugar and cornstarch. Stir in the sour cream until smooth and creamy, then beat in the eggs followed by the lime zest and juice. Fold in 1 cup blueberries. Pour filling into the cake pan, tapping the sides of the pan to level the surface.

4- Place the pan inside a roasting pan and pour boiling water around it to about 1 to 1-1/2 inches deep, shielding the cake so you don't spatter boiling water onto it. Bake for 45 minutes until set (but still with a wobble in the middle).

5- Let the cake cool in it's pan on a wire rack, then chill for at least 4 hours or overnight. To serve, carefully remove the outer ring and top with remaining fresh blueberries.

Friday, August 28, 2009

Out Of The Rut


I am such a creature of habit. I love routines and structure. When I was a child we got to pick a restaurant to go to on our birthdays. I always picked the one seafood restaurant in town and always ordered the same thing - a 1/2 a crab with drawn butter and a cup of clam chowder. When my sisters or parents would try to talk me into trying something new, I'd stubbornly dig in my heels and stick with my favorite. Why order something different and risk being disappointed when I can order something I know I'll love?

As I've gotten older, I've realized that approach to life can limit my experiences. If I never try anything new, I might be missing out on something fabulous. So, every once in a while, I force myself to climb out of my rut and try something new.

I love hamburgers. A standard hamburger on a bun, with cheese, pickles, onions, tomato slices, ketchup, and mustard is a treat I could eat once a week forever. So why change? I saw a recipe in a foodie magazine for a Thai-style burger and thought that it was worth a try. And I tried a new bun recipe, too. I had my old favorite, but this one sounded good, too.

The verdict? Going out on a limb payed off big time! These burgers were spicy, delicious, and different enough to wake up the palate and shake up the routine. The buns are easy to make, soft, moist, with just a hint of tang from the yogurt. This combo is a keeper and will definitely be part of my new routine.


Thai-Style Burgers

1-1/2 lbs ground chuck
1/2 cup creamy or crunchy peanut butter
2 Tbsp sour cream
2 Tbsp soy sauce
1 Tbsp fresh lime juice
1 Tbsp minced fresh cilantro leaves
2 Tsp peeled and grated fresh ginger
2 tsp light brown sugar
1 tsp crushed red pepper
1/2 tsp fine sea salt
1/2 tsp finely ground black pepper
6 hamburger buns, grilled or toasted
Lettuce, sliced tomatoes, and sliced onions
Barbecue sauce of your choice


1- Prepare a medium-hot fire in your grill.

2- Combine the beef, peanut butter, sour cream, soy sauce, lime juice, cilantro, ginger, brown sugar, red pepper, salt, and black pepper in a large bowl, blending well with your hands. Shape into six patties 1/2 to 3/4 inch thick.

3- Place the burgers directly over the coals, cover and grill to your desired degree of doneness, 5 to 7 minutes for medium rare.

4- Place the burgers on the buns ad top with lettuce, tomato, onion, and barbecue sauce.

Makes 6 servings.

Soft Yogurt Rolls
adapted from Baking Bites

5-1/2 to 6-1/2 cups all purpose flour
1 tbsp active dry yeast
3 tbsp honey
1 cup water, warm (100-110F)
1 cup yogurt (nonfat/lowfat is fine; I used Greek-style)
1 tbsp vegetable oil
1 1/2 tsp salt


1-In a large mixing bowl, combine 1/2 cup flour, the active dry yeast, the honey and the warm water. Stir well and let sit for 10 minutes, until slightly foamy.

2- Stir in yogurt, vegetable oil, salt and 2 cups of the remaining flour. Gradually stir in more flour until you have a soft dough that sticks together pulls away from the sides of the bowl (This can all be done in a stand mixer with the dough-hook attached, as well).

3- Turn out dough onto a lightly floured surface and knead, adding additional flour if necessary to prevent sticking, until dough is smooth and elastic, or about 5 minutes. Place in a lightly greased bowl, cover with plastic wrap and let rise for 1 hour or until doubled in size.

4- Preheat oven to 375 deg. F with racks in the upper and lower thirds of the oven. Line 2 baking sheets with parchment paper.

5- Turn risen dough out of bowl and onto a lightly floured surface. Gently deflate, pressing into a rectangle. Divide dough into 12 even pieces with a board scraper or a pizza cutter. Shape each piece into a round roll. To do this, take all the corners of one of the squarish pieces you just cut and pull them together, pinching them to create a seal. This will pull the rest of the dough “tight” across the top of your roll, giving you a smooth top. Place on prepared baking sheet. Repeat with remaining dough.

6- Once all rolls have been formed, press down firmly on each one to flatten. Cover with a clean dish towel and let rise for 25 minutes.

7- Bake for about 20 minutes, until rolls are deep golden on the top and the bottom.
Cool on a wire rack.

Store in an airtight container.

Makes 12 rolls.

Monday, August 24, 2009

Baker in the Rye

Baking is one of my favorite things to do, but it's even more fun to bake with a friend. You can laugh together at silly mistakes, comfort each other over frustrating failures, challenge each other to try more than you thought you could do, and encourage each other when life is too tough to even get to bake. That's what baking with the Bread Baking Babes is like.

This month we gathered around Görel's virtual kitchen table. She had cookbooks stacked up and scraps of paper with bits of recipes flying around. While we elbowed for room around the table, she explained that she wanted us to bake a Russian Black Bread this month, but was having trouble deciding on a recipe. So, with a little bit of this and a little bit of that, she made up her own! And it's a doozy. The ingredients include ground coffee, shallots and old bread. You make a soaker out of that and leave it overnight, along with a sourdough starter. Combine in the morning with lots of rye flour and you get the stickiest dough ever.

When I described the process of making the bread to my neighbor, her eyes widened, possibly with terror. The next day I brought her some to try and she smiled, "Oh, the dump bread!" She reported back that she was pleasantly surprised with how nicely it turned out. I was too. You couldn't pick out any of the mystery ingredients - they just melded together to make a fragrant, moist dark bread.

Be sure to check out how the bread turned out for the other BBB's (blogs listed on the sidebar). And if you'd like to try your hand at this funky bread, bake it before September 7th, blog it, and send a link to Görel, and she'll send you a handsome Baking Buddy badge to proudly display on your website!


Görel's Russian Black Bread

SOURDOUGH

300 g (10.6 oz) Medium rye flour
350 ml (1.5 cup) Water
2 Tbsp Active sourdough culture*

SOAKER

100 g (3.5 oz) Old bread**, toasted
15 g (0.5 oz) Coffee, ground
25 g (0.9 oz) Vegetable, neutral oil
60 ml (1/4 cup) Molasses
2 tsp Caraway seeds
1 tsp Fennel seeds
1 Tbsp Minced schallots
400 ml (1-2/3 cup) Water, hot

FINAL DOUGH

300 g (10.6 oz) Medium rye flour
400 g (14.1 oz) High gluten bread flour
20 g (appr. 1 Tbsp) Salt
Yeast -
Fresh: 15 g (0.5 oz) OR
Instant dry: 1.5 tsp
Soaker All of the above
Sourdough All of the above

* If you don’t have any active starter at hand, you can cheat by using a small amount (say 5 g fresh or 0.5 tsp instant dry yeast) instead.

** I used sourdough ciabatta bread, but I guess any old unsweetened bread will do, or any old bread in general.


Sourdough

Mix the ingredients to the sourdough, cover the container with plastic and leave for 12–14 hours at room temperature.

Soaker

Toast the old bread in a toaster or in the oven. The bread should be browned, but absolutely not blackened. Dice the bread or just tear it in pieces and put it in a bowl. Add the rest of the soaker ingredients except the water. Heat the water to near boiling and pour over the soaker ingredients. Cover and leave for the same duration as the sourdough.

Final dough

Mix the two flours in a separate bowl.

If using fresh yeast: Take a small amount of the soaker liquid and dissolve the yeast in it. Add the yeast mixture OR the instant dry yeast, soaker, sourdough and salt to a mixing bowl.

Add half of the flour mixture and work the dough by hand or in machine. Continue to add about 100 ml or ½ cup of the flour mixture at a time and work until the flour is completely absorbed before you add the next round. The dough shall be firm but still quite sticky. You might not use all the flour, or you might need to add more flour, all depending on the flour used.

Place the dough in an oiled container, cover with plastic and leave for 2–3 hours or until doubled in size.

Shaping and proofing

Drizzle some rye flour on the table top and place the dough on top. If the dough is very sticky, pour just enough rye flour on top of it to make it possible to handle.

Divide the dough in two and shape the parts into oblong loaves. (I placed them on parchment paper to make it possible to just slide the loaves into the oven.) Stretch the surface using both hands to get a tight loaf. Use more rye if the dough is too sticky to handle.

Cover with a tea towel and leave for 60 minutes. Don’t over-proof! (Fire up the oven after 30 minutes to have it ready.)

Baking

Place an empty metal container in the bottom of the oven. Put in your baking stone or an empty baking sheet. Heat the oven to 225 °C/435 °F.

Put 3–4 ice cubes in the metal container.

Move the loaves to the hot stone or sheet. Bake for 10 minutes.

Open the oven door to vent out some moist. At the same time, lower the temp. to 200 °C/400 °F. Bake another 30-40 minutes or until they sound hollow when tapped underneath, or when the inner temperature has reached appr. 97 °C/207 °F.

Let the loaves cool down before you slice them. Eat with butter and maybe some sharp cheese!

Thursday, August 20, 2009

If You Auto-translate, You Probably Won't Get It


If I told you a joke that began with "Two guys walked into a bar..." you'd know exactly what kind of bar I meant. Although they could have walked into a chin-up bar, clonked their foreheads and passed out, it's much more likely that they walked into an establishment that serves alcoholic beverages. Bar is a potentially confusing word because it has so many meanings. Bar the way into a room. A steel bar. A sand bar. A bar of light. Bar exams. A ballet bar. If you read music, you know what the bar lines are. A salad bar. Bar none. See what I mean?

When I found a recipe in a cookbook for Strawberry Rhubarb Bars, I felt I was on pretty firm footing. Obviously, a bar in a cookbook is going to be a cookie. That's a given. Even in a cookbook with no pictures. And since I'm all about cookies and I had some rhubarb gifted to me from a kind neighbor, I set about making them. Easy enough - a shorbready base, a fruit layer, and then crumbles on top. They smelled heavenly cooking, and I pulled them out of the oven and let them cool to room temperature.


But when I tried to slice my bars, what the hey? These are not cookies, people. This is a crumble. Or a slump, or a grunt, or a cobbler, or whatever you'd like to call it. But please do not call these bars! They just aren't. They're delicious, fruity, gooey, sloppy, oozy, but you would never mistake them for a bar cookie. You can't neatly slice and serve a bar of these. You just have to scoop some of the fragrant, tart-sweet fruity mess on a plate, preferably with a scoop of vanilla ice cream, and dig in with a fork. Or a spoon. Just don't expect a cookie and you won't be disappointed.


Strawberry Rhubarb Bars
- adapted from Pure Flavor by Kurt Beecher Dammeier

1-1/2 cups plus 3 to 4 Tbsp all-purpose flour
1/4 cup plus 2 Tbsp powdered sugar
1/2 tsp table salt
12 Tbsp (1-1/2 sticks) cold, unsalted butter, cut into 8 pieces
3/4 cup plus 1/3 cup granulated sugar
1/8 tsp ground cloves
1/8 tsp orange extract or 1 tsp grated orange zest
1/2 tsp vanilla extract
1-1/2 lbs rhubarb, cut into 1/2-inch pieces (about 6 cups)
1-1/2 cups straberries, hulled and sliced, or frozen strawberries, thawed and sliced


1- Preheat oven to 350 deg. with a rack in the center of the oven.

2- In a large bowl, combine 1-1/2 cups of the flour and the powdered sugar and salt. Cut the butter inot the flour mixture using a pastry blender or fork. The mixture should resemble coarse crumbs and clump together when squeezed lightly in your hand. You can also do this in a food processor.

3- Put 2 cups of the mixture into an 8-inch square baking dish and press evenly into the pan with your fingers. Bake in the oven for 25 minutes, or until golden brown on the edges and light golden in the middle.

4- While the crust is baking, add 1/3 cup granulated sugar to the remaining butter-flour mixture and toss (or pulse in food processor) to combine. Set aside.

5- In a large bowl, combine 3/4 cup granulated sugar and the ground cloves. Stir in 3 to 4 Tbsp flour (adding more flour will make the filling firmer when cool), the orange extract or zest, and the vanilla. Add the rhubarb and straberries, mixing well to coat the fruit. Pour the mixture onto the hot crust, spreading the filling to the edges of the dish. Sprinkle the reserved sugar mixture over the fruit. Bake for 50 minutes or until bubbling around the edges and light brown on top.

6- Let the bars cool to room temperature before cutting and serving.

Monday, August 17, 2009

Berry Nice


The first food blog I ever read was Orangette. I was still on my quest for the elusive chocolate covered macaroon and I googled it. One of the hits was this Orangette post. It wasn’t exactly what I was looking for, but her amazing description of the macaroons made me want to try them, even though no one in my family but me will eat coconut.

I was such a foodie newbie at the time that I didn’t know what ganache was, other than it sounded fancy. Molly’s macaroons introduced me to ganache and opened up new food vistas to me.


I had a question about the cooking process of the macaroons and I wrote to her with my question. She wrote back, warmly and personably, answering my question and encouraging me. I was so impressed that she’d take the time to do that. I was hooked. On Molly, her food, and her blog. She was what inspired me to start my own blog. Writing stories, cooking, and sharing recipes. I wanted to do that!

As a nod to Molly and her new book, A Homemade Life, I made her Summer Berry Poundcake. The recipe is in her book as well as on her blog. It embodies all the qualities I love about Molly’s stories and recipes - simple, unpretentious, approachable, and most of all, delicious.


This cake is like a big hug from mamma on a plate. It’s got blueberries and raspberries wrapped up in a delicate, buttery pound cake, moist and tender. If the berries are homegrown, like mine, even better. And, according to Molly, you can wrap it tightly and freeze it to pull out and enjoy after the berry season is over and savor the flavor of summer past.

Monday, August 10, 2009

Overdue Birthday


24 years ago, it was a very hot summer and I was very pregnant. And overdue. Everyday stretched into a eternity of sweaty discomfort. I prayed daily that this might be the day the baby would come. It didn't. On my birthday I said that the only gift I wanted was to have the baby come. It didn't. A week, exactly, after my birthday, she finally came. She's always had her own ideas about the right way to do things.

We had a birthday dinner for my daughter last week and, as tradition dictates, she got to pick out her cake. True to herself, she picked out something with berries. And ice cream. And pound cake. It was delicious - Good call, Sarah!

I used the pound cake recipe from Baking. Even though Dorie clearly stated that the loaf pan was to go onto a cookie sheet, I forgot. The cake burbled over and dribbled onto the floor of the oven, producing a bit of smoky flavor to the cake.


I forgot to clean up the spillage, and when I preheated the oven for the birthday dinner pizza, I started smelling smoke. Clouds of smoke. Well, for pizza that's a good thing. We enjoyed the taste of a smokey, wood-stove pizza with only the minor annoyance of smarting eyes and fans going full bore to clear out the smoke.

I adapted a recipe I found on the internet to make the cake. It called for pre-made ice cream, sherbet and pound cake. For a birthday cake, it needed a smidge more lovin' than that, so I made all the parts. I'm only giving the recipe for the sherbet as you probably have Baking or can find a bazillion copies of the pound cake recipe on food blogs.


Frozen Raspberry Birthday Cake

1 batch of Raspberry Sherbet (recipe to follow)
1 batch of Vanilla Bean Ice Cream (The Perfect Scoop)
1 9 x 5-inch loaf of pound cake (recipe in Baking)
1 pint fresh raspberries, rinsed and picked over
3 Tbsp Chambord

1- Prepare Raspberry Sherbet and place in the freezer. This can be done days ahead of time.

2- Make the Vanilla Bean Ice Cream custard a day ahead of time and refrigerate.

3- Bake the pound cake according to the directions in Baking.

4- While the pound cake is cooling, put the Vanilla Bean Ice Cream in your ice cream machine to freeze.

5- Place a 9-inch circle of parchment paper in the bottom of a 9-inch springform pan. Cut a 3 x 27-inch strip of parchment paper and fit it around the inside edge of the pan. Tape to secure the ends.

6- Remove the crusts from the pound cake and slice it into 1/4-inch thick slices. Cover the bottom of the prepared pan with a single layer of slices.

7- Spread a thick layer of the fresh Vanilla Bean Ice Cream over the cake and place the pan in the freezer to harden, about 25 minutes. Put the ice cream in the freezer, as well.

8- Measure 2 cups of the sherbet into a bowl and allow that to soften for the last 5 minutes or so of the freezing time (depending on the temp of your kitchen). Spread the softened sherbet over the frozen cake. Add another layer of pound cake slices and return to the freezer for another 10 minutes.

9- In a small bowl, combine the fresh raspberries with the Chambord. Allow them to sit for 10 minutes. Take the Vanilla Bean Ice Cream and the sherbet out of the freezer to soften for about 3-5 minutes.

10- Remove the cake from the freezer and spread the berries evenly over the cake. Place dollops of the softened Vanilla Bean Ice Cream over the raspberries and use a rubber spatula to spread it smooth.

11- Place a final layer of pound cake slices over the cake. Spread the remaining sherbet over the top and smooth it out. Wrap tightly with plastic wrap and freeze till firm - about 4 hours.

12- For presentation, remove the sides of the springform pan and slide the cake onto a platter. Garnish with additional raspberries, if desired. Allow the cake to soften slightly to make it easier to slice. Tightly wrap any remaining cake and put it back into the freezer.

Raspberry Sherbet
- adapted from The Perfect Scoop

4 cups fresh raspberries
2 cups whole milk
1 cup sugar
1-1/2 tsp freshly squeezed lemon juice

Place the first 3 ingredients into a blender or food processor. Puree until smooth. Strain the mixture to remove the seeds, then add the lemon juice. Freeze in ice cream maker according to the manufacturer's directions.

Monday, August 3, 2009

Birthday Cupcakes

I just had another birthday. It was a good birthday - my daughter took me out for lunch and shopping, my husband showered me with gifts, and we got to have the whole family here for my birthday dinner. The best gift of all, though, was from God - a cool day.

I had planned an elaborate, beautiful cake for my birthday cake, but it's been so stinking hot that there was no way it was going to happend. I was resigned to a cakeless birthday. But when I woke up to a cool breeze, hope sprang up within me. It might not be the cake I'd planned, but by golly, there would be birthday cake!

What there actually was was cupcakes. One of the gifts from my splendid husband was the Martha Stewart cookbook, Cupcakes. And since I have an abundance of blueberries on hand, the Blueberries and Cream cupcakes were a natural choice. And a delicious choice.

I loved this recipe. It was easy to put together and gave lovely, light cupcakes studded with big juicy fresh blueberries. The frosting is simply sweetened whipped cream, garnished with more blueberries. A perfect way to close out a very happy birthday.

Note: the only odd thing about this recipe was that it makes 30 cupcakes. I have pans that add up to 24 cupcakes, so I used the extra batter to make 12 mini cupcakes. Good thing my sister gave me a big stack of mini cupcake papers for my birthday!

Blueberries and Cream Cupcakes
- adapted from Cupcakes by Martha Stewart

1-1/2 cups all-purpose flour
1-1/2 cups cake flour, sifted
1 Tbsp baking powder
1/2 tsp salt
1 cup (2 sticks) unsalted butter at room temperature
1-3/4 cups sugar
4 large eggs at room temperature
2 tsp pure vanilla extract
1-1/4 cups milk at room temperature
2 cups fresh blueberries, plus more for garnish
2 cups heavy cream
1/4 cup confectioner's sugar, sifted


1- Preheat oven to 350 deg. F with racks in the upper and lower thirds of the oven. Line muffin tins with cupcake papers. Place metal bowl and beaters of electric handheld mixer in the freezer.

2- Whisk together the flours, baking powder and salt. Set aside.

3- Cream together butter and sugar with an electric mixer on medium-high speed until they are pale and fluffy. Add eggs, one at a time, beating after each addition, scraping the sides of the bowl as needed. Beat in the vanilla.

4- Reduce speed to low. Add the flour mixture in three batches, alternating with two additions of milk, beating until combined after each. Fold in the blueberries with a rubber spatula.

5- Divide the batter evenly among the lined cups, filling each three-quarters full. Bake, rotating tins halfway through, until pale golden, about 25 minutes for standard and 15 for minis. Transfer tins to wire racks to cool completely before removing cupcakes.

6- Using the mixing bowl and beaters from the freezer, beat the cream just until soft peaks form. Add the powdered sugar and beat just until combined. (You can store it covered in the refrigerator for up to 3 hours, if you're not using it immediately.)

5- To finish, dollop cupcakes with whipped cream, and garnish with berries. Serve immediately.

Cupcakes can be stored unfrosted in an airtight container at room temperature for up to 3 days.