Showing posts with label main meal. Show all posts

Tuesday, April 30, 2013

More Notes From Gapslandia

When I work out I'm a terrible clock watcher. I know you're not supposed to do that; you're supposed to focus on your workout and be mentally present. Well, some days being physically present is the best I can do. And I look to the clock to help me get through the workout. I break things into fractions.

My mental conversation for the cardio portion of my workout goes something like this:
  " It's only 5 minutes in. I can't quit yet! I know my calves hurt, but they always hurt 5 minutes in. It'll get better. Keep going."
  " Oh boy, 10 minutes in. I'm a third of the way through!"
  " That particular move (bang, bang) means we're halfway through. Hooray!"
  " I'm tired, but there's only 10 minutes left. I know I can do 10 more minutes."
And then, I'm done. Sweaty and weary, but I made it all the way through!

It was something of a shock when I counted it out on my fingers to realize that we're already 6 months into GAPS. If we go the full 2 years, that means we're 1/4 of the way through. Hooray! I think we can do this thing!

Here are a few thoughts for those who are interested in GAPS, contemplating doing GAPS, or know someone who is on GAPS.

1- GAPS is not a "gosh I need to lose 10 lbs for swimsuit season" diet. It's a tough life-style change and not to be undertaken capriciously. Read up. Get all the information. If possible, talk to others who've done it. That might need to be online, as not a lot of people have heard of GAPS. My naturopath hadn't. (I'm no longer seeing that naturopath.)

And if you know someone who's on GAPS, please don't say things like, "Oh, you're so skinny, you don't need a diet!" "You can eat anything you want and not gain a pound." "Go ahead and live a little. You know you want it....." That's not helpful.

The decision to go on GAPS is motivated by serious health issues. Unless you want to hear a whole rundown on how that seemingly healthy person isn't, don't ask. It's a big decision that they've made for big reasons. Respect that.

2- If you've been convinced that you or your family would really benefit from doing the GAPS diet, look at where you are now and be realistic. If you're eating the Standard American Diet (aka, crap), then it will be brutal to jump to go right into the Intro Diet. Take some baby steps. Work towards it. Start reading labels and eliminating all the junk from your food. Clean out your pantry. Make the choice to stop buying soda, candy, chips, and junk. You know, if it's not there, you can't eat it.

After you've purged the pantry, start cooking. For some folks, this is no big deal. They already cook everything. But for some people, this is huge. There are families that never cook. Never. They either eat out, go get fast food, or pull something out of the freezer. The oven and stove are not used, other than for reheating. For that kind family, the intro diet would make their heads explode.


If you are that kind of family, start by making chicken broth. Broth is the backbone of the GAPS diet and you'll be making LOTS of it. And it's not hard at all, but if you've never made it it might seem daunting. I'll break it down for you below. Try it! Once you see how easy it is, you'll be motivated to try making other things.

3- Keep your reasons in front of you. It's easy to have a pity party about all the things you can't have, but you can change your attitude and be grateful for all the positive changes you are seeing. When the pounds come off on the Intro Diet, rejoice in that. When your picky eater husband tries green vegetables and likes them, get excited about that. When your picky eater child says, "I love this! Can you make it again?" to a dish he previously wouldn't have touched, throw a party! And when your skin clears up, your hair stops falling out, and your chronic stomach ache disappears, shout it from the rooftops!


Chicken Bone Broth

1 organic whole chicken
1-2 onions
4 (or so) organic carrots
4 (or so) organic celery stalks
4-6 peppercorns
Filtered water
Organic apple cider vinegar

What goes into a bone broth is really subject to what you have on hand. The only non-negotiable items are the organic chicken and the filtered water. The chicken needs to be organic as arsenic is routinely added to chicken feed to keep parasites away. That arsenic ends up in the non-organic chickens. Ick. And the water needs to be filtered so you don't make broth that tastes like a swimming pool.

Prior to making the broth, you can keep a scraps bag in the freezer. Bits and bobs of vegetables can go in there to save for broth - carrot shavings, the last 1/4 of an onion, etc. Then when you get around to making broth, you can dump it all in. If you don't have that bag in your freezer, no worries. You can still make great broth.

1- Pull the chicken out of the packaging, removing the giblets (the neck and organs, usually stuffed into the cavity of the chicken) and any non-chicken bits (the little chicken Pampers that soak up blood). If this sounds too icky to you, recruit a child to help. They'll think it's cool in a gross kind of way. Set the giblets aside.

2- Place the chicken in a stock pot. At least 4 quarts in size. Roughly chop up the vegetables and throw them in with the chicken. Cover the chicken with water (cold or room temperature) and set the pot over medium heat.

3- Bring the water to a boil, then place a lid on the pot and turn off the heat. Let the residual heat continue to cook the chicken for 15-20 minutes. Turn the chicken over, replace the lid, and let it sit for another 15-20 min.

4- Take the chicken out of the water (carefully, so you don't burn or scald yourself!) and remove it to a cutting board. If you poke it with a knife, the juice should run clear. Pat yourself on the back. You just poached a chicken!  Remove the meat from the bones and toss the bones back into the pot. Save the meat for other meals (chicken salad, chef salad, enchiladas, etc).

5- Add the giblets to the pot. Add more water, if necessary to bring up the water level.

6- Pour in 1/4 cup (or so) of apple cider vinegar or lemon juice. You need to ad an acid to draw the minerals out of the bones. Bring the broth to a boil over medium heat and turn it down to just simmering. Simmer for 24 hours. (This part can be done in a crock pot for safety and convenience)

7- Strain your lovely broth. It should be a dark, golden brown now and smell amazing. The bones should be soft and the cartilage dissolved. Toss all of the chunky bits your strained out and put your lovely broth into quart containers to freeze. Be sure to label the contents and put the date on it. It will keep in your freezer for at least 6 months, but if you're on GAPS, it won't last that long!

Monday, February 13, 2012

Baby Step #2

It was about 8 years ago that I first heard the words High Fructose Corn Syrup . A friend was complaining to another friend that she was sick of finding it in everything. My response was "Huh? WTF (What The France?) is HFCS?"

In case you've been in a cave and haven't heard about High Fructose Corn Syrup, here are a couple of things to know.

  1- Because the corn industry is heavily subsidized, a lot of corn is grown. Corn is the 4th cheapest ingredient in processed food after air, water, and salt. That's why it's in everything.

  2- Most of that corn is genetically modified. (If you're unsure what GMO means to your health, there's a lot of information out there about how bad GMO foods are for you .)

  3-  HFCS is made from corn syrup by an enzymatic process that changes glucose into fructose, which is sweeter. But the man-made fructose is not the same as that found in nature. In the body, the industrial fructose metabolizes into triglycerides and adipose tissue. Even though it's a sugar, it turns into fat.

  4- HFCS is the number one source of calories in the US diet.

  5- HFCS is linked to diabetes, obesity, and a host of other ailments. If you care about your health, you should not put this into your body.

This is just an overview. If you want to know exactly what HFCS does in your body, go ahead and do the research. Just be aware that when you Google it, the first hit you get is paid for by the corn industry and, not surprisingly, tells you what a vital part of a healthy diet HFCS can be.

So what do you do about it? Baby Step #2 is to start reading the label of everything you buy at the grocery store. You will be amazed. HFCS is really in just about every product out there. Breakfast cereals, yogurt, bread, canned ravioli, sausage......and on, and on, and on.

After you read the label, what then? Refuse to buy any product that has HFCS in it. And if there isn't a single brand without HFCS, either make it yourself or do without. I know this is kind of a big Baby Step. It may take you a while to get in the habit of label reading and to clear your pantry out of foods containing HFCS. I still occasionally will find a bottle of salad dressing or a can of something tucked in the back of my pantry that I sigh wistfully and pitch because it's contaminated with HFCS.

So what's the reward for taking your second baby step? A recipe! Lindsey at Northwest Backyard Veggie Patch was the first in line with her request, so here is the grain-free pizza recipe.

I adapted this recipe from Recipe Girl. Her's served 2-3 people and we love to have leftover pizza, plus often have a guest over on Saturdays, so I reworked it to make a larger pizza.


Cauliflower Crust Pizza
 - adapted from Recipe Girl
   makes 1 large pizza

Crust:
1 large head cauliflower
2 large eggs
2 cups finely shredded mozzarella cheese (or for a spicier pizza, try pepperjack)
2 tsp dried oregano
3 cloves garlic, minced (more if you love garlic)
1 tsp onion salt (which I don't have, so I used sea salt and threw in some extra garlic)

Toppings:
Pizza sauce (Your favorite recipe, or from a jar. Read the label to be sure there's no HFCS in it!)
1 cup finely shredded mozzarella cheese
Your favorite meat toppings (sausage, ham, bacon, etc.)
Your favorite veggie toppings (mushrooms, green peppers, olives, etc.)

1- Preheat oven to 450 deg. with a rack in the center of the oven. Spray your pizza pan with olive oil. Mine has holes in the bottom, so I covered it with aluminum foil and sprayed it with olive oil. If you'd rather avoid aluminum foil, parchment paper would probably work well, too.

2- In food processor with the grating disk with the larger grater holes, grate the cheese. (Or grate by hand.) Put the cheese into a bowl and set aside.

3- Using the grating disk with the smaller holes, grate the head of cauliflower.

4- Put the cauliflower crumbles into a microwave-safe bowl and microwave for 8 minutes on high, stirring once. Allow it to cool a bit. You can use this time to prep your pizza toppings.

5- Combine the cooled cauliflower crumbles with the eggs, 2 cups of shredded cheese, and spices. You can do this with a spoon or with your hands. Dump the mixture onto your prepared pizza pan. Spread and pat the mixture into a round crust. It will be thin. Don't fret if there are small cracks.

6- Spray or brush the crust with olive oil and bake for 15 minutes (or until golden). Remove the crust from the oven and turn the heat up to broil.

7- Spread the sauce on top of the baked crust, leaving a 1/2-inch border around the edge. Sprinkle the shredded cheese over the sauce and cover with your favorite toppings.

8 - Broil the pizza 3-5 minutes, until the toppings are hot and the cheese is melted and bubbly. Cut into 12 slices and serve immediately.

Because the crust isn't sturdy like a bready crust, you'll need to eat the pizza with a fork. Small price to pay for something that's so delicious and grain-free to boot!

Thursday, January 19, 2012

What To Eat

One of the hardest parts about going grain-free is menu planning. I'm such a creature of habit that it's hard for me to think outside of my standard menu go-to's: hamburgers, tacos, and pizza.

Pizza is particularly hard as we've had a tradition in our house of having pizza every Saturday night.  Ever since I learned how to make a good pizza dough, we've had pizza and a show on Saturdays. We had pizza with Star Trek- The Next Generation. We had pizza with The New Adventures of Lois and Clark. And now we have pizza with whatever we've Tivo'd (that's a verb, right?) You can see that pizza is firmly entrenched in our family culture.

So after our initial foray into grain-free eating, we approached the coming weekend with dismay. No pizza? How's that supposed to work? What do other people eat on Saturday? And what do they eat on Sundays after church with football? You have to have cold pizza for lunch! I think that's like the 11th commandment or something.


It was my grown daughter who came to our rescue. She offered up her recipe that gives full pizza pleasure without grains - pizza in chili. It's an interesting concept - take a bowl of chili and stuff all of your favorite pizza toppings into it, smother it with cheese, and enjoy it with abandon (or with a bottle of wine). It was a hit! You can easily make it to suit your tastes and preferences by changing up the toppings. And really, you don't have to wait until Saturday to have it; that's just us.

Pizza Chili

1 Tbsp olive oil
1 green bell pepper, diced
1 small onion, diced
1 clove of garlic, minced

1 lb. ground turkey, chicken, or beef
1 lb. spicy Italian sausage, sliced (optional)

1 15 oz. can tomato sauce
1 cup marinara sauce
1 28 oz diced tomatoes
1 16 ox can kidney beans, drained and rinsed

Favorite pizza toppings (olives, mushrooms, pineapple, ham, pepperoni, etc.)
sea salt, basil, oregano, thyme (to taste)
Grated mozzarella cheese

1- In a large pot, cook the bell peppers, onions, and garlic in the olive oil until they begin to sweat. Add the ground meat  (and optional sausage, if using) and cook until browned.

2- Stir in the tomato sauce, marinara sauce, diced tomatoes, kidney beans, pizza toppings, and spices. Bring to a boil. Reduce heat; simmer uncovered for about 30 minutes or until chili reaches desired thickness. If it is too thick, add water.

3- Reduce heat and serve in bowls, topped with mozzarella cheese (optional but strongly suggested!).

Friday, July 1, 2011

It's For The Children


Long ago, when I was pretty new at parenting, I bought my son a can of Chef Boyardee ravioli as a treat. It wasn't something I would normally buy, but I thought as a special splurge I'd get it for him. He wouldn't eat it and I initially was angry. I'd bought it as a treat, why wouldn't he eat it? Then I tried it and I could see why. It was nasty!

For some reason we, as a society, reserve some of our nastiest foods for our children, and then we package them up as special treats. Canned, frozen, packaged, or fast food - if you look at the ingredients list you realize that we are feeding the least developed and most vulnerable bodies the most repulsive and often harmful foods.

I used to purchase food (or foodlike items) without a thought as to the ingredients and the effect they might have on my kids. After all, if it wasn't safe for kids, it wouldn't be sold for kids, right? Right?


Actually, the onus is on parents to safeguard their kids. It's up to us to read labels, be informed, and make good choices for our children. The companies who sell snacks loaded with hydrogenated fats, high fructose corn syrup, and artificial flavors and colors aren't going to go out of their way to let you know the health threat their products pose to your kids. They are in business to make money, not to do your job for you.

With cartoon characters (you wouldn't believe some of the stuff I've bought just because it had Mickey or Donald on it!), catchy jingles, toys, and ads with cute, laughing kids, advertisers try to lure unwary parents into buying foodlike products for their tykes. And if you're not convinced that it will make your children happy, they show you how much easier your life will be if you just open a can, pull it out of the freezer, or go through the drive-thru.

But what are you really buying? Is it nutritious? Is it going to help their growing bodies? Or is it even food? This short (about 4 minutes) clip shows how to make chicken nuggets and also how advertising has brainwashed our kids.


So what's a mama to do when her chilluns clamor for fast food? Make her own, of course!

My daughter is doing her best to meet the nutritional needs of her daughter in the healthiest way possible. Her research has shown her that including organ meats in the diet of a toddler is extremely important for growth and development. That's good to know, but how on earth do you get a toddler to eat liver? Hide it in nuggets! If it works for nasty chicken paste, it works for healthy chicken livers, too.


See how much my granddaughter loves them? Seriously, she gets so excited when her mommy makes her chicken nuggets. She'll yum up three in a meal (and she's a tiny person). Because it's chicken liver, not beef, it's got an easy texture for a person with three teeth to handle. It's good for her, it's easy to fix, and she loves it. What could be better?

Now if you're inspired to try this for yourself, just be sure you get organic chicken livers. The liver is a filter organ and you don't want to eat what's in a non-organic chicken's body!

Real Food Chicken Nuggets

Organic chicken livers
Organic psyllium husks
Grated Parmesan cheese
Pepper
butter


1- Cut the livers up in to baby hand holding size. Rinse them off.

2- Combine the psyllium and cheese on a plate. Sprinkle some pepper over the mixture. Dredge the livers in the psyllium mixture.

2- Melt the butter in a frying pan over medium heat. Fry the nuggets, turning to cook on all sides.

How easy is that? Lots less trouble than getting in the car, driving to a take-out place, and then having lots of trash to deal with. Plus look at the happy consumer! That's advertising that doesn't lie.

Tuesday, April 19, 2011

Cookbook Fail


It's been said that the best way to succeed is to fail. That seems kind of counter-intuitive. If you want to succeed, shouldn't you succeed? The thing is, nothing teaches as firmly and thoroughly as failure.

Raise your hand if you have ever
* Put in baking powder instead of baking soda
* Put in tablespoons instead of teaspoons
* Burned something
* Underbaked something
* Left out an ingredient
* Omitted a step in recipe
* Failed to read a recipe all the way through before starting and only midway into the baking realized you were missing either a key ingredient or tool.

I've done all of those. Some of them more than once.

Each time you fail you learn more. And I have failed a lot. If you've read my blog for any length of time you know that. I ought to be a genius by now! I'm not, but what I am is able to spot some obvious bloopers and pause to evaluate.

Recently I got suckered into buying a new cookbook. I knew nothing about the author, but it had beautiful pictures, so I gave in. Hey, it was at the thrift store, so I only paid $2 for it. Perhaps that should have been a clue. If there was nothing wrong with it, why get rid of it?


After getting it home and thumbing through it, stroking the pretty pictures (yes, I do that. Don't you?), I decided the panini sandwiches needed to go on the menu. Because I'm into making my own bread, I liked that the recipe included directions for making flat bread.

I started by putting the warm water into a bowl with the sugar and then I paused to read out much yeast to add. 30 g or 1-1/4 oz. Hmmm. I'm much better with teaspoons and tablespoons for yeast. My kitchen scale isn't good with teeny measurements, but I dragged it out to see if it would cooperate. Let's see.....scooping, scooping, scooping.....30 grams - holy cow, that's a lot of yeast! Maybe the 30 grams was a misprint and I'd do better to follow the ounces. Start over.....scoop, scoop, scoop..... again - a huge amount of yeast.

Wait a minute, the jar I store my yeast in says it holds 4 oz of yeast. That means that this recipe which makes 10 small flatbreads (ie, not very puffy and risen) calls for over 1/4 of the jar of yeast???? That's insane!

So, I guessed at an amount that seemed appropriate, and it turned out beautifully. Thank you years of experience!

The flat bread has ground fennel, which lends it an interesting flavor, and the sandwich has arugula, which adds a fabulous peppery note. Fresh, oozy, melty mozarella and salty tangy proscuitto round out the flavor parade. If you like sandwiches, you've got to give it a try. You could buy flatbread at the store, but really it is simple. And I've fixed the recipe, so there's no fear of failure here. Trust me, I've made the mistakes for you.

Mozzarella and Proscuitto Panini
- adapted from Coffee & Bites

1-1/3 cups lukewarm water
1/2 tsp sugar
1-1/4 tsp active dry yeast
1 tsp fennel seeds
1 lb (4 cups) bread flour
1 tsp salt
1 Tbsp extra virgin olive oil


For the filling:
extra virgin olive oil to drizzle
8 oz fresh mozzarella, thinly sliced
4 oz (2-1/2 cups) arugula
8-12 wafter-thin slices proscuitto
salt and freshly ground
black pepper


1- In a small bowl combine 2/3 cup of the lukewarm water with the sugar and yeast. Stir, cover, and leave in a warm place for 5- 10 minutes, until it's bubbly and about doubled in size.

2- While the yeast is growing, roast the fennel seeds in a dry, hot pan (a cast iron skillet is ideal) until you can just smell the aroma and the seeds begin to pop. Grind the seeds with a mortar and pestle until quite fine. Mix the fennel seeds with the flour and salt in a large bowl. Make a well in the centre of the dry ingredients and pour in the yeast and oil. Start to mix into the flour, adding the remaining 2/3 cup of water.

3- Turn the dough out onto a lightly floured surface and knead for 10 minutes until the dough is elastic. Place the dough in the bowl, cover with a towel and leave in a warm place for 45 minutes until almost doubled in volume.

4- Turn the risen dough out onto your work surface and divide it into 8 pieces. Using a rolling pin, roll each out to about 6 inches in diameter, about 1/2-inch thick. Prick all over with a fork.

5- Heat a cast iron skillet until really hot. Place the dough into the pan (I could fit two at a time in my pan). When the bottom of the bread is dotted with dark spots (check after 2-3 minutes), turn the bread over and cook for a further 4 minutes. Stack the rounds of bread and cover with a clean kitchen towel while cooking the remaining rounds of dough.

6- For the sandwiches, split 4 rounds of bread horizontally with a bread knife. Place the halves cut-side up on your work surface and drizzle them with olive oil. Top 4 halves with mozzarella, arugula, and ruffles of prosuitto. Season with freshly ground black pepper and sandwich with the other halves of flat bread.

7- Toast the panini in a panini maker or a cast iron skillet, with the top weighted down, just till the mozzarella melts. Halve each panini to serve.

Makes 4 paninis. You can double the sandwich ingredients to make 8.

Sunday, March 6, 2011

Puppy Love

When I was small I really wanted a dog. My sisters also wanted a dog and together we launched a campaign of whining, pleading, reckless promises, and Bambi eyes that eventually got us a puppy. At six weeks old Max was adorable and all he wanted was to be loved, held, and petted. He'd go to sleep in our laps and was the cutest thing ever.


The person who gave (palmed off) the puppy to my parents told them that the dog's mother was a border collie and the father was unknown. A border collie is a pretty small dog and I'm sure my parents thought that they could handle something the size of a bread box.

As Max grew, it became pretty apparent what his father was and which parent had the more dominant genes. It was German Shepherd all the way, baby. He grew much larger than a bread box, approaching a bread truck in size. And in temperament he was just a huge, leaping, galumphing, slobbering, fiend for fetch, tug-of-war, or any other game that involved showing off his speed and strength.

One of his favorite games was escaping out the front door. When the doorbell rang, he'd bound to the front door, tail wagging eagerly, anticipating the coming contest. The person answering the door had to hold onto his collar and try to gracefully open the door while preventing Max from lunging at the visitor. Woe to both of them if a package was involved, because then Max was released from the restraining hold and would fling himself into the gap, shouldering his way to freedom, and run down the sidewalk in a flash of brown fur and wagging tail. My father had to go retrieve Max from the pound so often that I think he had a frequent stay punch card.

The reckless promises that we made to get a dog involved the usual: walking, feeding, and cleaning up after him. We were actually pretty good about the walking and feeding part, but were abysmal at the cleaning up part. In his frequent sallies on the town he'd ingest who knows what and when he was safely back at home he'd head to his favorite clump of grass in the back yard and raze it like a hungry sheep. Then, at night, when we were all blissfully, ignorantly sleeping upstairs, he'd creep out of the kitchen (any area with carpeting was forbidden territory to him) and hork up a load on the carpet.

I might be misremembering, but he seemed to vastly prefer the carpet for his midnight gullet evacuations. Perhaps because the smell lingered much longer in the carpet and he could savor his freedom memories for weeks. Or, more likely, he didn't want to mess up the kitchen floor because that was where he slept.

My father had a very strict rule about hork mounds: "The one who finds it has to clean it." Well, come on. We became extremely adept at pretending we'd seen nothing, nothing at all, as we sidestepped the pile and quickly dashed into the kitchen. My father would be the one grumbling and cleaning up the mess. There is nothing fun, enticing, or glamorous about a heap of dog vomit.


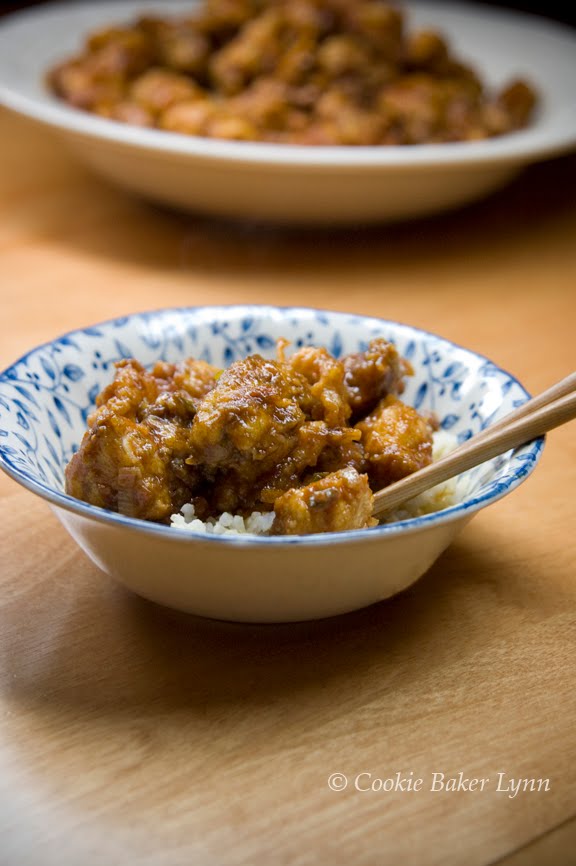
Which brings me to today's recipe. It was delicious. Really. Chicken with a strong smack of orange, fried, with a tangy sweet-citrus sauce. But honestly, I can't look at the pictures without seeing dog barf. Sorry, but it's the truth. I just don't have the mad hot photography skills to make this look good.

You can go out on a limb and trust me that it tastes and smells good. Try it. Make it, then dim the lights to serve it. Dim them a lot. Then serve a gorgeous dessert.

Orange Peel Chicken

SAUCE

1 Tbsp vegetable oil
2 Tbsp minced garlic
4 green onions sliced
1 cup tomato sauce
1/2 cup water
1/4 cup granulated sugar
2 Tbsp chili garlic sauce
1 Tbsp soy sauce


CHICKEN

1/2 cup vegetable oil
4 chicken breast fillets
1 egg beaten
1 cup milk
1 cup flour
Peel from 1/4 orange julienned (into 1/8"-thick strips)


1- For the sauce, heat 1 Tbsp of oil in a medium saucepan over medium heat. Add the garlic and green onions, then quickly, so the garlic doesn't burn, add the tomato sauce and water. Add the sugar, chili garlic sauce and soy sauce and bring to a boil. Simmer until the sauce thickens, about 5 to 6 minutes, then turn off the heat.

2- Heat 1/2 cup oil in a wok over medium heat. Slice the chicken breast fillets into bite-sized pieces.

3- Combine beaten egg with milk in a medium bowl. Pour the flour into another medium bowl. Coat chicken pieces by dropping then into the flour, then dipping in the egg mixture, then dredging in the flour again. Arrange the coated chicken on a plate until all the chicken is coated.

4- When the oil is hot (about 360 deg. F), add about half of the chicken to the oil and cook for a few minutes, until brown on one side, then flip the chicken over. When the chicken is golden brown, remove the pieces to a rack or paper towels to drain. Repeat with remaining chicken. When all of the chicken is cooked, rinse the oil out of the wok and place it back on the stove over medium-high heat.

5- When the wok is hot, add julienned orange peel and chicken. Heat for 20 to 30 seconds or so, stirring gently. Add the sauce to the pan and cook for about 2 minutes. Gently stir the dish a couple of times, being careful not to knock the coating off the chicken. Cook until the sauce thickens, then serve with brown rice on the side.

Serves about 4

Monday, January 31, 2011

Crossed Greenish Eyes


I have a child that has very firm ideas about the way life should be. There is a right way and a wrong way. Period. No room for discussion.

One day he had my face in his hands and he was gazing into my eye. Do you know what he said? Did he say how much he loved me? Did he say that he loved my cookies more than life itself? No, he said, "Mama, your eyes are kind of greenish. All of our eyes are brown. So we will have to find a new house for you to live in." Well, geez, I get kicked out for my eye color?!

I myself get unhappy when things aren't precisely right. Like these pictures. I will straight up confess that it's painful for me to post these pics. They're so bad they make me want to burn the negatives (good thing they're digital). But the chimichangas are delicious and I really wanted to share the recipe. This is one of my favorite ways to use up the chicken leftover from a roast chicken dinner.

So can you forgive me for the bad pics? I promise I'll reward you for your leniency with a lovely cookie next time. Because I really need the grace. I'm already searching out homes for slightly ditzy, greenish-eyed bakers. There aren't that many that allow me to come with a kitchen full of appliances and a freezer stocked with unsalted butter, nuts, and 16 different kinds of flours.


Roast Chicken Chimichangas
- adapted fromCooking Light

2-1/2 cups shredded roasted skinless, boneless chicken breasts (or just buy a roasted chicken and shred up that much meat)
1 cup (4 oz) crumbled queso fresco cheese (or shredded Monterey Jack cheese)
1/4 cup chopped green onions
1 tsp dried oregano
1/4 tsp ground cumin
1 garlic clove, minced
1 (4.5 oz) can chopped green chiles, drained
1 (16 oz) can fat-free refried beans
6 (8-inch) flour tortillas
Cooking spray
1/2 cup bottled green salsa


1- Preheat oven to 500 deg. F.

2- Combine first 7 ingredients (chicken through chiles) in a large bowl; toss well.

3- Spread 1/4 cup refried beans down center of each tortilla. top each tortilla with 2/3 cup chicken mixture; roll up. Place rolls, seam sides down, on a large baking sheet coated with cooking spray. Coat tops of chimichangas with cooking spray. Bake for 7 minutes. Serve with salsa.

Yield: 6 servings (1 chimichanga and about 4 tsp salsa)

PS - As I was going to post, I chickened out and just couldn't publish the full-on ugly pictures. Instead you get the semi-ugly peep show shots. Can you trust me that they're good and try them anyway?

Monday, July 26, 2010

What a Grill Wants


One of the best things about summer is the built in excuse for getting out of making dinner. "It's too hot to cook!" I whimper plaintively, with the lower lip quivering ever so slightly. My husband, good guy extraordinaire and winner of the Sweet Husband award, 27 years running, will quickly recognize his cue and say, "Sure, honey, I'd love to grill something."

When I gave him grilling planks, a barbecue cookbook and a barbecue magazine for his birthday, he knew it wasn't just selfless love motivating the gifts. I was hoping to see a lot of nights off when I could kick back on the chaise lounge by the pool, sipping a margarita, while he slaved away over his stainless steel baby, smoking up the back yard with the sweet perfume of charred meat.

Well, we haven't yet inflated the wading pool, the chaise lounge is still in the shed, and if any margaritas are to happen, I'll be in charge of the blender, but we have had some awesome barbecue.

When I went on the Seattle Food Tour, one of my fellow bloggers that I met was Don of Sortachef. He built a wood-fired oven in his backyard and his site is filled with mouthwatering pictures of the amazing food he produces both in his kitchen and his back yard. One of the recipes that grabbed me by the throat and wouldn't let go was for teriyaki chicken kabobs. We've made them twice. Sooooo good. The husband and kids even fight over who gets the leftovers the next day, it's that good.

I'll give you the recipe as I made it. You can read the original, plus Don's excellent grilling tips here. So the next day when it's looking to be a scorcher, plan ahead and get your meat marinating early in the day. Then when it's time to fix dinner, it's as easy as tossing it on the grill.


Sortachef Fabulous Teriyaki Chicken Kabobs
- adapted from Sortachef

makes 6-8 skewers, but that can be stretched by including more fruits and veggies

1/4 cup soy sauce
1/4 cup white wine
1/4 cup water
3 Tbsp brown sugar
2 tsp shaved fresh ginger
2 cloves garlic, pressed
1 tsp white vinegar
2-1/2 lbs chicken thighs, cut into chunks
1/2 large onion (red or yellow both work), cut into chunks
Pineapple chunks (optional)
Green and or red bell pepper chunks (optional)
Baby corn cobs (optional)


1- Place the first 7 ingredients in a small saucepan. Bring to a boil and simmer for 5 minutes. Let it cool for 10 minutes.

2- Put the chicken chunks into a bowl and pour the sauce over them. Cover and refrigerate for at least 3 hours.

3- If you're using wood skewers, soak them in water 15 minutes before you plan to use them.

4- Thread the chicken chunks onto the skewers, alternating with pieces of onion, peppers, and whatever else you choose to use.

5- Brush the kabobs with the marinade.

6- Grill the kabobs about 3 minutes on each side, brushing with marinade once.

It's a delicious meal served over a bowl of brown rice.

Tuesday, July 6, 2010

MRE's


Whoever wrote the line "lazy days of summer" obviously didn't have children. There's nothing lazy about summer when it involves taking kids to swim practice, going to swim meets, working in Vacation Bible School, teaching a child to ride a bike and to swim, ferrying children to friends' houses, or putting together birthday parties for the summer babies. Where in that tangled web of to-do's is there time to have a family sit-down dinner?

Sadly, often there is no time. But rather than grab a meal to go at the drive-through, with a little forethought you can take your sit-down meal along. Crowded schedule does not have to equal empty calories.

I was sitting in the waiting room at the orthodontist (another of my summer to-do's, getting braces on my daughter) and found this recipe in a Family Fun magazine. I was taken with the concept of dinner to go - pizza all wrapped up in a tidy bundle. Simple to make, easy to pack, eagerly eaten. Just what I need for swim meets or spur of the moment picnics.

Pizza Scones
- adapted from Family Fun

1 cup all-purpose flour
1 cup white whole wheat flour
1/2 cup fine cornmeal
1 Tbsp baking powder
1 tsp basil
1/2 tsp oregano
1/4 tsp salt
1/2 cup cold butter, cut into small pieces
1/2 cup diced sun-dried tomatoes
1 cup (4 oz) shredded mozarella
1/3 cup finely chopped pepperoni (optional)
2 large eggs
3/4 cups buttermilk


1- Heat oven to 375 deg. F. Line a baking sheet with parchment paper.

2- Place tomatoes in medium bowl and cover with boiling water. let Stand for 30 minutes, then drain the water and stir in the cheese and pepperoni.

3- In a food processor, mix the flour, cornmeal, baking powder, basil, oregano and salt. Add the cold butter and pulse until the mixture resembles coarse crumbs. Pour the mixture into a large bowl and set aside.

4- In a small bowl, whisk together the eggs and buttermilk. Add the tomato mixture and stir.

5- Pour the wet ingredients into the flour mixture and stir until it forms a sticky dough. Turn the dough onto a lightly floured surface. Gently knead the dough until it holds together, about 5 times. Divide the dough in half and pat each half into a 1-inch thick disk. Slice each disk into 4 wedges.

6- Place the wedges on the prepared baking sheet, about 1 inch apart. Bake 15- 20 minutes, until golden brown. Serve warm or at room temperature.

Note: To make 12 smaller scones, reduce bake time to 10-15 minutes.

Friday, January 15, 2010

Weighty Tomes


Reading is one of my favorite pastimes. I can get away from my humdrum routine and escape to a mystery, a tropical island, another galaxy, or just find someone who's life is worse than mine and take comfort in that.

One of the problems I have with reading, though, is that I'm very suggestible. Particularly about food. When a character sits down to a dinner of lobster bisque, I start drooling. When the character pours a glass of crisp chardonnay, I wonder whether there's any wine in the house. Heaven help me if the character is handed a dense, decadent chocolatey brownie with a crackly top and moist interior studded with chunks of dark chocolate. I'm off to the kitchen in a heartbeat to whip up a pan of brownies I don't need but suddenly want very much.


One author in particular has this power over me. Martha Grimes, in The Hotel Paradise, has as her protagonist a 12 year old girl who spends a great deal of time thinking about food. Her mother is the hotel cook and the girl rhapsodizes over the foods served. One dish in particular, the girl's favorite, Ham Pinwheels, was so lavishly described I knew that I had to have it. But where to find it? It's an old-fashioned dish (the book is set about 70 years ago), so I turned to my old faithful tattered copy of Joy of Cooking. Based on the description in the book of ground ham wrapped in a flaky crust with a cheese sauce poured over the top, I came up with something pretty close.

Being an instant gratification kind of gal, I didn't want to make the pastry, so I used the kind from the freezer. I'm OK with that. It leaves me more time to read.


Ham Pinwheels with Cheese Sauce
- makes 12 rolls,

1/2 pkg (1 sheet) frozen puff pastry, thawed
6 oz. cooked ham, ground (about 1-1/2 cups)
2 Tbsp minced fresh onion
1/2 cup minced mushrooms (optional)
Salt and Pepper to taste
Dash of hot sauce (optional)
Cheese Sauce (recipe follows)

1- Preheat the oven to 400 deg. F. Prepare a baking sheet with parchment paper or cooking spray.

2- In a medium bowl combine the ham, onion, mushrooms and season to taste.

3-- Lay one of the thawed puff pastry layers flat on your work surface. Spread half of the ham mixture over it, leaving one inch uncovered on the side farthest from you.

4- Roll the pastry up, beginning with the side nearest you, so you have a long tube. Brush a bit of water on the uncovered pastry on the far side to seal up the edge. Slice the tube in 12 segments, like cinnamon rolls.

5- Lay the rolls on the baking sheet.

6- Repeat with the other sheet of puff pastry and the rest of the ground ham mixture.

7- Place the baking sheets in the oven. Bake for 15-20 minutes, until golden brown. Make cheese sauce while rolls are baking.

8 - Place the pinwheels on plates and drench them in cheese sauce. Serve immediately.

(If you'd like to double the recipe, you can freeze half of the pinwheels. Place them in a ziploc freezer bag without the cheese sauce. Allow them to thaw in the refrigerator, then reheat in the microwave or briefly in the oven.)

Cheese Sauce

2 Tbsp butter
2 Tbsp flour
1/2 tsp salt
Dash of pepper
1 cup grated cheddar cheese
1 cup milk


1- Melt butter in saucepan. Whisk in the flour, salt and pepper. Mix until smooth.

2- Gradually stir in the milk. Bring to a boil. Reduce heat and simmer 1 minute.

3- Remove from heat and stir in the cheese, whisking till all the cheese is melted and the sauce is smooth.

(If you have extra sauce leftover, save it to pour over broccoli. You'll be a hero to your kids.)

Friday, September 18, 2009

Tuna's Second Chance


One of the big decisions in high school was whether to buy a lunch in the cafeteria or to bring a lunch. Because my parents were the definition of thrift, part of my daily routine was making my lunch. Since I am a creature of habit, I made the same brown bagger every day. A peanut butter and jam sandwich plus an apple in the fall or an orange in the winter.

There were other sandwich options, of course. Lunchmeat and cheese with Miracle Whip. That strange creation of my father's - jam and cheese. Or tuna fish. Tuna fish was right out. It was disgusting as a brown bag sandwich. The moisture from the pickles and mayonnaise seeped into the fluffy white bread, turning it into mush, leaving the tuna dry and nasty. Plus, it smelled up my whole locker.

With that background, it's hardly surprising that I haven't been a big fan of tuna. Then I made an amazing discovery. There are differences in tuna. No, you say, reeling in surprise. Yes, I say, it's true! The cheapest can at the grocery store is not necessarily a bargain if nobody will eat it. Invest in a nice white albacore, packed in oil, and you'll see why some people actually like tuna.

I got a grill pan last year and I've been playing with it, trying new sandwich combo's. This one was so good I needed to share it with you. First of all, the bread is my new go-to favorite for panini sandwiches. It's Sourdough Ciabatta and the recipe is on King Arthur's website. It's really just about foolproof. A couple of times I've had to leave the house in mid-bread preparation and my husband has shaped and baked the loaves and they've turned out just great. Not that I'm calling my husband a fool, but showing that the instructions are clear enough for an engineer to follow.


For the sandwich innards, I wish the pictures could show you how amazing it is. This is not the boring tuna sandwich of my youth. It delivers an amazing flavor punch from the combination of artichoke hearts, sundried tomatoes, capers, onions, and fresh herbs.


If you think of yourself as a tuna hater, this might be the sandwich to persuade you otherwise. Give it a try. Lunchtime will never be the same.

Tuna Artichoke Panini
- adapted from love and olive oil (blog)

1/3 cup mayonnaise
1 tsp lemon zest
1 small jar marinated artichoke hearts (about 1/3 cup), liquid reserved
1 tbsp capers, drained and rinsed
1/4 cup grated parmesan cheese
Salt and pepper to taste
1 tsp fresh oregano leaves or 1/2 tsp dried oregano
1 can albacore tuna, packed in oil, drained
1/4 cup red onion, diced
1/4 cup sundried tomatoes, chopped
Sourdough Ciabatta Bread
olive oil

1- Preheat the panini maker.

2- Combine the mayonnaise, lemon zest, capers, parmesan cheese, oregano, and 2 Tbsp of the artichoke liquid in a food processor. Pulse 4 to 5 times till well combined. Taste and season with salt and pepper as needed.

3- Chop the artichoke hearts and combine in a bowl with the tuna, red onion, tomato. Stir in the mayonnaise mixture.

4- Slice a loaf of the ciabatta in half horizontally. Cut pieces as big as you want for your sandwiches.

5- Spread the mixture over the bread. Brush top and bottom of the sandwich with olive oil. Cook until filling is heated and both sides are golden brown.

Friday, August 28, 2009

Out Of The Rut


I am such a creature of habit. I love routines and structure. When I was a child we got to pick a restaurant to go to on our birthdays. I always picked the one seafood restaurant in town and always ordered the same thing - a 1/2 a crab with drawn butter and a cup of clam chowder. When my sisters or parents would try to talk me into trying something new, I'd stubbornly dig in my heels and stick with my favorite. Why order something different and risk being disappointed when I can order something I know I'll love?

As I've gotten older, I've realized that approach to life can limit my experiences. If I never try anything new, I might be missing out on something fabulous. So, every once in a while, I force myself to climb out of my rut and try something new.

I love hamburgers. A standard hamburger on a bun, with cheese, pickles, onions, tomato slices, ketchup, and mustard is a treat I could eat once a week forever. So why change? I saw a recipe in a foodie magazine for a Thai-style burger and thought that it was worth a try. And I tried a new bun recipe, too. I had my old favorite, but this one sounded good, too.

The verdict? Going out on a limb payed off big time! These burgers were spicy, delicious, and different enough to wake up the palate and shake up the routine. The buns are easy to make, soft, moist, with just a hint of tang from the yogurt. This combo is a keeper and will definitely be part of my new routine.


Thai-Style Burgers

1-1/2 lbs ground chuck
1/2 cup creamy or crunchy peanut butter
2 Tbsp sour cream
2 Tbsp soy sauce
1 Tbsp fresh lime juice
1 Tbsp minced fresh cilantro leaves
2 Tsp peeled and grated fresh ginger
2 tsp light brown sugar
1 tsp crushed red pepper
1/2 tsp fine sea salt
1/2 tsp finely ground black pepper
6 hamburger buns, grilled or toasted
Lettuce, sliced tomatoes, and sliced onions
Barbecue sauce of your choice


1- Prepare a medium-hot fire in your grill.

2- Combine the beef, peanut butter, sour cream, soy sauce, lime juice, cilantro, ginger, brown sugar, red pepper, salt, and black pepper in a large bowl, blending well with your hands. Shape into six patties 1/2 to 3/4 inch thick.

3- Place the burgers directly over the coals, cover and grill to your desired degree of doneness, 5 to 7 minutes for medium rare.

4- Place the burgers on the buns ad top with lettuce, tomato, onion, and barbecue sauce.

Makes 6 servings.

Soft Yogurt Rolls
adapted from Baking Bites

5-1/2 to 6-1/2 cups all purpose flour
1 tbsp active dry yeast
3 tbsp honey
1 cup water, warm (100-110F)
1 cup yogurt (nonfat/lowfat is fine; I used Greek-style)
1 tbsp vegetable oil
1 1/2 tsp salt


1-In a large mixing bowl, combine 1/2 cup flour, the active dry yeast, the honey and the warm water. Stir well and let sit for 10 minutes, until slightly foamy.

2- Stir in yogurt, vegetable oil, salt and 2 cups of the remaining flour. Gradually stir in more flour until you have a soft dough that sticks together pulls away from the sides of the bowl (This can all be done in a stand mixer with the dough-hook attached, as well).

3- Turn out dough onto a lightly floured surface and knead, adding additional flour if necessary to prevent sticking, until dough is smooth and elastic, or about 5 minutes. Place in a lightly greased bowl, cover with plastic wrap and let rise for 1 hour or until doubled in size.

4- Preheat oven to 375 deg. F with racks in the upper and lower thirds of the oven. Line 2 baking sheets with parchment paper.

5- Turn risen dough out of bowl and onto a lightly floured surface. Gently deflate, pressing into a rectangle. Divide dough into 12 even pieces with a board scraper or a pizza cutter. Shape each piece into a round roll. To do this, take all the corners of one of the squarish pieces you just cut and pull them together, pinching them to create a seal. This will pull the rest of the dough “tight” across the top of your roll, giving you a smooth top. Place on prepared baking sheet. Repeat with remaining dough.

6- Once all rolls have been formed, press down firmly on each one to flatten. Cover with a clean dish towel and let rise for 25 minutes.

7- Bake for about 20 minutes, until rolls are deep golden on the top and the bottom.
Cool on a wire rack.

Store in an airtight container.

Makes 12 rolls.

Friday, May 15, 2009

Good Boy Sandwiches


When I was newly married I made my husband a brown bag lunch every day. It typically included a sandwich, chips, a beverage, and sometimes a little love note. One day, the honeymoon ended. I don't even remember what the argument was about, but I remember I was steaming mad. Fuming, I packed the lunch.

One of my husband's odd, favorite sandwiches is peanut butter and mayonnaise. I know. Ugh. But, if you put dill pickles in there, it's actually, strangely good. But I digress.


Angry though I was, I made the lunch. Peanut butter and mayonnaise. Heavy on the peanut butter. Whisper light on the mayonnaise. On dry bread. And a half a cup of juice. No chips.

He called me at lunchtime. I expected a repentant apology. No, he hadn't even noticed! So I pointed it out to him. Then he apologized. And now he knows the warning signs of an angry outburst on the horizon - dry bread with lots of peanut butter, little mayonnaise, and 1/2 a cup of juice. No chips.

This sandwich is kind of the antithesis of the "I'm pissed" sandwich. This is a "good boy, you deserve a biscuit sandwich." My daughter and I saw this on Everyday Food and knew we had to make this for our wonderful, deserving husbands. We call it - The Amazing Sandwich. Which it is. By some strange kitchen alchemy it takes 5 ingredients and transforms them into something, well, amazing!


Notes: I couldn't find round, crusty loaves of the right size. Obviously, I could have made them, but I didn't have the time. So I went to Great Harvest and bought two round loaves there. It wasn't till I got them home that I realized they weren't crusty. Plus they're a bit larger than one pounders. Working with smaller, one pound loaves will yield slightly smaller sandwich slices.

The recipe says this serves 8. Ha! We served 6 and had a loaf and a third leftover. You could easily halve this recipe if you don't need to feed a crowd.

Amazing Sandwich
- adapted from Everyday Food

2 round or oval loaves country bread (1 pound each),
1 jar (12 ounces) oil-packed roasted red peppers
12 ounces salami, thinly sliced
12 ounces provolone cheese, thinly sliced
2 bunches arugula, (about 6 ounces each), washed well and thick stems removed (about 10 cups)


1- Slice the tops off the bread, about 1/4 of the way down.

2- Scoop out the bread with your fingers, leaving a rind of about 1 inch of bread inside the crust, including the top. Save the scooped out bread to make bread crumbs.

3- Brush inside the loaves on the bottoms and inside the tops with oil from the roasted red peppers.

4- Dividing evenly, layer bottom bread halves with roasted peppers, salami, cheese, and arugula; top with remaining bread halves. You can alternate layers of the salami and cheese to make it more stripey looking. Really press the layers in firmly. When you put on the arugula, some might fall out. Just tuck it back in.

5- Wrap each loaf completely in plastic wrap securing the top to the bottom.

6- Lay wrapped sandwiches on a baking sheet. Position another baking sheet on top, and weight with heavy canned goods, a large skillet, or workout weights. Let stand for at least one hour, pressing down occasionally with hands. You can put the whole thing in the refrigerator and let it squash down overnight.

7- To serve, cut each sandwich in wedges.

Thursday, April 2, 2009

Refuge From The Storm


Spring is so fickle. I looked out my kitchen window yesterday and saw pink blossoms on my neighbor's tree, yellow blossoms on the forsythia, and snow coming down in gentle but relentless waves. This is the kind of insane weather that makes me want to go back to bed, curl up under the covers, and read a book. So I did. But when I finished the book, it was still snowing. Euwww. I'm done with winter - I want shorts and tank tops and flip flops!

Oh well, while it's cold and dreary out, I might as well make the most of it and bake up something warm, gooey, delicious, and comforting. I tried out a new recipe from Fine Cooking and it was everything that was promised and more. Comfort food at its finest!


Note: I have to explain that I don't do well with pictures of dinner foods. Baked treats I can take photos of anytime, but dinner has to be while it's warm, which is also when my family is hungry and they're circling me like a pack of hyenas waiting to pounce on a carcass, whining, "Mutherrrrr, when can we eat? I'm staaaaaarving!" So, I lay the blame for poor photos squarely on them. And someday I'll learn to take better photos and let them off the hook.


Baked Penne with Tomato, Mozzarella, and Sausage
- adapted from Fine Cooking

Olive oil
1 large onion, diced
2 cloves garlic, minced
1 lb sweet Italian pork sausage, removed from its casing and crumbled
Kosher salt and freshly ground black pepper
1/4 cup dry red wine
28 oz can whole plum tomatoes, chopped, with their juice
1/4 cup chopped fresh marjoram or oregano, or 1-1/3 Tbsp dried oregano
1 cup fresh ricotta cheese
1 cup freshly grated parmesan cheese
Pinch nutmeg, preferably freshly grated
1/3 cup chopped fresh flat-leaf parsley
1 lb. dried penne pasta
1/2 lb fresh mozarella, cut into small cubes


1- Heat oven to 425 deg. F. Lightly oil a large, shallow baking dish. Bring a large pot of salted water to a boil.

2- In a large skillet, heat about 2 Tbsp olive oil over medium heat. Add the onion and saute until soft, about 5 minutes. Add the garlic and crumbled sausage and saute until the sausage starts to brown. Season with salt and pepper. If the sausage gives off a lot of fat, pour off most of it, but leave a little to add flavor to the sauce.

3- Add the red wine and let it boil until it's almost gone. Add the tomatoes with all of their juices and cook, uncovered, at a lively simmer for about 10 minutes. The sauce will thicken slightly. Add the marjoram or oregano and taste for seasoning.

4- Meanwhile, cook the penne until al dente. Drain well.

5- In a large bowl, mix the ricotta, about 1/2 the grated parmesan, the nutmeg, and the parsley. Season with salt and pepper.

6- Toss the penne with the ricotta mixture until well coated. Add the sausage and sauce and mix again. Add the mozzarella and toss gently. Pour everything into the baking dish and sprinkle the remaining parmesan on top. Bake uncovered until lightly browned and bubbling, about 20 minutes. Serve right away.

Makes 4 generous servings.

Thursday, October 9, 2008

A Meal In Need Is a Meal Indeed


When my first child was born my mother came up to help out. I needed that help badly. Since my son was born two weeks before the due date I missed out on the section of the childbirth classes that dealt with what to do after the birth. I had no idea how to pin a cloth diaper or what to do with a crying baby.

My mother stayed with us, made meals for us, and got up in the middle of the night with the baby. She'd change him, bring him to me to nurse, then take him away and put him back to bed. It was wonderful.

Of course, like all good things, it had to come to an end and she had to return home and I had to learn how to do it all on my own. After about 3 weeks, when I wasn't certain I could make it through another day, a sweet friend brought over dinner and a pan of homemade cinnamon rolls. What a wonderful gift! She had a little one of her own and told me she'd learned that the best time to bring a dinner is not right after the baby's born. That's when mom gets all the help and attention. It's several weeks after the birth, when all the helpers have gone home and mom is a sleep-deprived zombie, that the gift of a dinner means the most.


I've taken her words to heart and have now perfected my "in time of need" dinner, Easy Enchiladas. When I make the dinner for my family I double the recipe and put into zip-lock bags a meal's worth, then I have extras in the freezer for a dinner later, or I can grab one and take it to a family who's had a baby, a hospitalization, or been down with the flu and haven't been able to get to the grocery store in a week. And if they've been flooded with casseroles, they can stick the enchiladas into the freezer and pull them out when they need them.

These are not "authentic" by any stretch of the imagination, but they're quick to fix, don't call for any obscure ingredients, and my family gets happy every time these are on the menu. Even my 6 year old, who dissects his food, gobbles them up.

Easy Enchiladas
- adapted from Good Housekeeping Illustrated Cookbook

1-1/4 lbs ground turkey
2 cups shredded Jack cheese
3/4 cup sliced green onion
3/4 cup sour cream (low-fat is OK)
3 Tbsp snipped parsley
1-1/2 tsp. salt
1/4 tsp pepper
24 oz. canned tomato sauce
3 Tbsp canned chopped green chilies (optional - I usually do without)
1 Tbsp chili powder
1/4 tsp ground cumin
Flour tortillas
Olives (optional)
Guacamole (optional)

1- Preheat oven to 350, if you're going to cook the enchiladas today.

1- Cook and stir the ground turkey in a skillet until light brown: drain. Remove from the heat.

2- In a large bowl combine 1-1/2 cups of the cheese, the green onion, sour cream, parsley, salt, and pepper. Add the cooked meat and gently toss to combine.

3- Heat remaining ingredients, except tortillas, olives and guacamole, to boiling. Reduce heat. Simmer uncovered for 5 minutes.

4- Spoon about 1/4 cup of meat mixture onto each tortilla, roll the tortilla. If you're preparing the meal to eat today, place the rolled tortillas into a rectangular baking dish (11 x 7 works well). Spread the sauce over the top and sprinkle with the remaining 1/2 cup of cheese.

5- Bake uncovered for 20 minutes. Garnish with sliced olives and guacamole before serving.

To save enchiladas in the freezer, place as many as you need for a meal into a gallon zip-loc bag. In a snack-size bag, place the half cup of cheese for garnish. In a sandwich size zip-loc bag put enough sauce for topping. Seal both bags in with the enchiladas. Write baking instructions on the bag with a sharpie.

To cook, thaw the enchiladas,then follow cooking instructions above.

Monday, October 6, 2008

Dinner Is All Rolled Up


I'm not a fan of horror movies. The heart pounding tension of not knowing what the next horrific disaster will be - it's too much like the hour before dinner time at my house. If I haven't menu planned and prepped my ingredients for the day, 4:00 is a terrifying time. What's for dinner? What to cook? I pace the floor muttering the meager contents of the refrigerator as a mantra. "Cheese, mayonnaise, leftover rice, cheese, mayonnaise, leftover rice," as if the incantation would somehow produce a palatable meal for my family.

I try to be good and menu plan for the week, but inevitably I forget to pull meat out of the freezer to thaw or forget to run to the grocery store for a crucial ingredient and then my wonderful and infinitely patient husband says, "Sure, honey, I'd love pancakes for dinner."

There is a secret weapon in my arsenal, though, to help me avoid this kind of scenario. It's the freezer. And just a little bit of forethought.

One of the books that really influenced how I cook for my family is Once-A-Month Cooking. I was floored by the concept behind the book - if you're already spending the time and energy to make dinner, why not double the ingredients and put half the dinner in the freezer for another dinner later. The book outlines how to do a huge day of cooking once a month and then have meals to pull out of the freezer all month long. I tried that a couple of times, but figured out my family was happiest and it worked best for us if I just applied the principles on a smaller scale. My family loves variety and having to eat the same casserole 4 times in a month made for some dinner time crankiness, especially if they didn't like it that much the first time around. But if I had had a busy day and wasn't even home till 4:00, what a blessing to have a dinner ready to go in the freezer.

This is one of the recipes that I adapted from the book and my family never got tired of it. It's a versatile recipe that you can tailor to your family's tastes and what is on hand or on sale. It takes barely any more time to make a huge batch of these rather than a single dinner, and you'll feel so proud that you're serving your family homemade, tasty food on those hectic days, rather than resorting to the drive-through at McGrease.


Pizza Roll-Ups
adapted from Once-A-Month Cooking
by Mimi Wilson & Mary Beth Lagerborg

1 recipe of pizza dough
or 2 loafs frozen bread dough
1 lb ground turkey (I use 1.25 because that's how it's packaged here)
1 lb. bulk Italian sausage
2 tsp salt
1 tsp pepper
4 cups grated mozzarella cheese
2 tsp Italian seasoning
2 Tbsp chopped fresh parsley
Your favorite spaghetti or marinara sauce
Olives (optional)

1-Make or thaw the dough.

2- While the dough is rising or thawing, cook the turkey and sausage together. Drain the grease.

3- Place the cooked meat in a large bowl with the rest of the ingredients except the spaghetti sauce and olives. Mix well.

4- Preheat oven to 400 deg. F.

5- Divide the dough in half. Roll one half out into a large rectangle about 1/4" thick. Spread 1/2 of the the meat mixture on the rectangle. Roll up the dough lengthwise like a jelly roll, and cut into 2" slices. You can cut them thicker or thinner depending on your preference and how many roll-ups you'd like to have. I cut mine into 14 slices.

6- Place the rolls, evenly spaced, on a baking sheet treated with baking spray. Let the rolls sit for 10 minutes.

7 - Bake for 20 to 25 minutes or till golden brown. While the first batch is baking prepare the second half of the dough into rolls.

8 - Remove the rolls to a cooling rack to cool. Bake the second batch.

9- Once the rolls are cooled, place enough for a meal into a gallon zip-lock bag, smooshing as much air out as you can and sealing it. Stack the bags in the freezer. You can label the bag at the top with a sharpie to tell the contents or the cooking instructions, if your sweetie will need to be the one pulling it out of the freezer and getting dinner on the table.

To serve the rolls, thaw and warm in a pre-heated oven for 10 minutes and top each roll with a dollop of warmed spaghetti sauce and sprinkle olives on, if you'd like. Or you can top with the sauce and microwave on high for 1 to 2 minutes (check to see if it's warm - microwaves vary). Ta da! Dinner on the table in under 15 minutes! Throw a green salad on the side and your family will adore you. Well, they probably already do, but this might prompt them to mention it.