Thursday, January 31, 2008

Celebration Cake

Just before Christmas. a friend was rushed to the hospital. It was a sudden emergency and there was a much anxiety and many prayers before we heard that he was getting better and coming home. To celebrate I wanted to make him a welcome home cake, but obviously a standard, boring cake would not suffice for an occasion of this magnitude. This had to be a champagne corks popping, fireworks going off in the sky kind of cake. I knew peanut butter and chocolate rocked his world, so I had an excuse to make this wonderful, extravagant cake I'd had in my files for a couple of years. It's got a brownie base, creamy peanut butter filling, and decadent dark ganache covering it all. What's not to love?

It's actually not that difficult to make and the steps can be stretched out over a couple of days, so I made it again for a bridal shower party for my daughter. It was a huge hit and many of the guests asked, "Is this on your blog?" Well, it is now, ladies. So get out your mixers, loosen your belts and get ready for:

Peanut Butter Celebration Cake!
adapted from a recipe on the Nestle website

Brownie base-
6 Tbsp unsalted butter
3 oz bittersweet or unsweetened chocolate
2 large eggs
1-1/4 cups granulated sugar
3/4 cup all-purpose flour
1/2 tsp vanilla extract
1/8 tsp salt

PB layer-
3/4 cup creamy peanut butter
1/4 cup unsalted butter, softened
1/4 tsp vanilla extract
3/4 cup powdered sugar

Ganache-
12 oz bittersweet or semisweet chocolate*, chopped
1 cup heavy whipping cream
3 Tbsp peanut butter chips
3 Tbsp milk chocolate chips

1- Click here to get into the proper mood.

2- Preheat oven to 350 deg. F. Grease a 9-inch round cake pan. Line bottom of pan with parchment paper; grease.

3- Put butter and 3 oz chocolate in a microwave-safe bowl. Microwave for 1 minute on high and stir to melt. Set aside to cool.

4 - Combine the eggs and sugar in a large bowl. Stir in the flour, melted butter and chocolate, vanilla extract and salt. Stir till smooth and pour into prepared pan.


5 - Bake for 25 minutes or until a wooden pick inserted in the middle comes out clean. Cool on wire rack for 5 minutes. Run knife around edge of cake; cool for an additional 10 minutes. Invert cake onto serving platter. Remove pan and parchment; cool completely.

6- For peanut butter layer beat peanut butter, butter and vanilla extract in medium bowl until combined, either by hand or with an electric mixer. Gradually beat in powdered sugar. Spread mixture on cake. Cover loosely with plastic wrap. Refrigerate for 30 minutes or longer.

7 - For the ganache, heat cream in small saucepan to boiling; remove from heat. Add semi-sweet morsels; let stand 5 minutes. Stir; refrigerate for at least 30 minutes or until mixture is spreadable. Spread chocolate on top and sides of cake. It will seem like a lot, but pile it on and smooth it out. It'll work.

8 - Melt peanut butter and milk chocolate chips in a small microwave-safe bowl in the microwave on high in intervals of 30 seconds, stirring after each interval. When the chips are melted and combined, spoon the mixture into a zip-loc plastic bag, close the bag, and snip off a tiny piece from one corner. Drizzle this mixture over the cake in a decorative pattern.

* I used bittersweet chocolate. The peanut butter layer is sweet and I liked the bittersweet and sweet playing off each other. If you're not a fan of bittersweet, use semi-sweet.


This is my entry for the Death By Chocolate Contest. If you like it, please vote for me!


Monday, January 28, 2008

Bittersweet Pie


When I was dating my husband-to-be, he told me about his grandparents who lived in sunny, southern California. They lived in a sprawling old farmhouse that had once been in the middle of an orchard. The orchard had been sold off and developed into business real estate, so the house sat, an island of history in the stream of commerce.

The house had a pecan tree, a lemon tree, an apricot tree, and gardenia bushes lined the drive. Whenever my husband's family made the trek to visit, his grandmother would give him a big hug and say, "I'm gonna make you a pie, honey. Go pick some lemons." The scent of gardenias and the taste of lemon meringue pie are links to his grandmother.

She passed away before we were married so I never got to meet this sweet woman. But in her honor I had gardenias in my wedding bouquet and one of the first pies I ever made for my husband was lemon meringue.

I've made several lemon meringue pies over the years, but it's been awhile since the last one. My husband's palate has changed and though he has sweet memories of his grandmother's pies, the reality is a bit too sweet for him now.


When the Daring Bakers announced that the challenge for January was a Lemon Meringue Pie, I was pleased to revisit this old favorite and to have something that wasn't too difficult. So I thought. But what I thought would be easy as pie.....wasn't.

The pie crust turned out quite nicely for me and I was looking forward to the pie coming together without a hitch. The custard was another story. It never set up. I let it cool then swathed it in a turban of meringue, then baked it to a perfect golden brown.

I knew I was in trouble when I took my lovely pie out of the oven and the center wobbled ominously. I took the picture, hoping for the best, but when I cut into it, I found I'd baked Lemon Meringue Soup. We each tried a piece, but I knew it was doomed when my 5 year old said it was "yucky."

I ended up throwing the rest of it away. To paraphrase Kryten in the BBC series, Red Dwarf: "Good bye 5 eggs, goodbye fresh lemons, goodbye perfect pie crust. Bon appetite, bin!"

I'm not including the recipe, but if you'd like a recipe for lemon meringue pie that doesn't fail, look in The Joy of Cooking. Check out how the rest of the Daring Bakers did with this challenge at the Daring Baker's Blogroll.

Friday, January 25, 2008

Redemption Cookies

There's something in my kitchen. I can't locate the source or pinpoint what it is. It's not a bad smell or anything like that, just an amorphous, hovering cloud that dooms my baking projects. I'll wake up in the morning full of enthusiasm for a baking idea and then when I try it, I am stymied and frustrated.

In the past month I've made a disastrous pie, cookies that shattered into crumbs when I tried to remove them from the baking sheet, and another brilliant idea for cookies had to be scraped off the baking sheets in curling rinds of sad, misshapen failures.

The last cookie was an idea I'd had simmering since Christmas. I had picked up a package of Hershey's candy cane flavored kisses at the store. I dreamt up a riff on my favorite, the peanut butter kiss cookies - chocolate cookie base, rolled in crushed candy canes, and topped with a candy cane kiss. How perfect! In theory. What I didn't know was that in practice, crushed candy canes, when you bake them, become sugar shellac. And the dough that I'd made for the cookie base flattened out into a limp pancake. I'd plopped the kisses onto them when I took them out of the oven, then when I attempted to remove them to the cooling rack, they rolled up into sticky, cookie tacos and the melting kisses slid off and through the cooling rack. That was a language enrichment moment.

Amazingly, I'd been wise enough to make up just one sheet of cookies as a trial run. Normally, me being all for efficiency, I would have done up three baking sheets and then would have had three times the headache, three glasses of wine, and then probably thrown the cookie sheets off the back deck, sticky cookies still attached. Would that make me three sheets to the wind?


When my first batch failed so miserably, I was angry. I said, "Enough is enough! I'm not letting this go down in the books as another failure! I will redeem this batch of pathetic cookies!" So I doctored up the dough with extra flour to give it some body, added mint chips that I'd had sitting in my cupboard for a while, and voila (French for This had better not fail!), a new family favorite. I liked them warm when the chips were sort of oozy and melty. My husband likes them cool when the chips have more of a snap to them but the cookie is still soft. Chocolate and mint are always delicious together, and I love them even more because I didn't have to scrape them all into the garbage.

Notafailure Mint Chip Chocolate Cookies

1 cup butter, softened
1-1/2 cups sugar
2 eggs
2 tsp vanilla extract
2-1/2 cups all-purpose flour
1/2 cup cocoa powder
1/2 tsp salt
1 cup (or so) Mint Baking Chips*

1 - Preheat oven to 350 deg. F.

2- In the bowl of an electric mixer beat together the butter, sugar, eggs, and vanilla until fluffy.

3- Combine the flour, cocoa, and salt. Gradually add the flour mixture to the butter mixture, beating until well blended. Stir in the mint chips.

4 - Drop the cookie dough by tablespoonfuls onto an ungreased cookie sheet.

5 - Bake 8 to 10 minutes, just until the tops set. Don't overbake, as this will make your cookies hard and dry. Remove the sheet from the oven, allow the cookies to rest on the sheets for 1-2 minutes, then remove to a cooling rack.

* If you don't have access to Mint Baking Chips, play around with your favorite flavors and add-ins. You can add some peppermint extract to the dough and use chocolate chips. Butter brickle bits, peanut butter chips, or even chopped up candy cane Kisses that you happen to have lying around would all be good. Just stay away from crushed candy canes.

Tuesday, January 22, 2008

Fluffernutter Cake


My husband has an addiction. He has a compulsion to look at certain kinds of pictures on the computer. No, not that kind of picture!! His favorite leisure time activity is trolling the internet for interesting tech factoids, cool videos of jet engine flame-outs, and gossip about the newest Macintosh products. He will even cover up the scantily clad, buxom women in the side bar advertisements so he can better focus on the latest PIXAR movie trailer.

The other day he sheepishly turned the laptop around to me and said, "Look what I found. Don't you have some bananas on the counter?" He showed me a totally drool-worthy cake on Slashfood, the Elvis cake from Foodaphilia. "Would you make me this, please, honey?"

Well, how can I turn down such a nice guy?

I made the cake and as I was putting it together I thought about Elvis. Amazing music, jumpsuits, and hey, wasn't he a big fan of fluffernutter sandwiches? With this brain spark, I added marshmallow fluff to the frosting in between the layers. Wow, it tastes just like my Killer Crack Peanut Butter Fudge! The cake is super moist with gooey filling and mounds of frosting, and it tastes even better the next day as the flavors meld. Perfect for banana lovers, peanut butter addicts, and Elvis fans alike!

Elvis Fluffernutter Cake

2 cups all-purpose flour
1-1/2 cups white sugar
1/2 cup butter
1 cup milk
3-1/2 tsp baking powder
1 tsp salt
1 tsp vanilla extract
3 eggs
2 mashed bananas, about 1 cup
2/3 cup mini chocolate chips, plus more for sprinkling on the cake

1- Preheat the oven to 350 deg. F. Grease the bottom of two 9-inch round cake pans. Fit the bottoms with rounds of parchment paper. Grease and flour the whole pan.

2- In a small bowl whisk together the flour, baking powder and salt and set aside.

3- In a large bowl, cream together the sugar and butter until light and fluffy. Add eggs one at a time, beating thoroughly after each addition. Add flour mixture alternately with milk, beating just to combine. Stir in vanilla and mashed bananas.

4- Pour batter evenly between the two cake pans. Sprinkle the mini chips over the top of the batter. Bake for 35 minutes, or until a toothpick inserted into the cake comes out clean.

5- Let pans cool for 10 minutes on a rack. Carefully invert layers onto a plate, peel off the parchment paper, then carefully put back on the rack to finish cooling. If the cake cracks at all, don't fret as there will be plenty of gooey frosting to fill in the gaps.

Frosting

2 sticks of butter at room temperature
1 cup of smooth peanut butter
4 cups of powdered sugar
2 Tbsp milk
1 cup marshmallow fluff

With an electric mixer cream together the butter and peanut butter until it's smooth. Add the powdered sugar a cup at a time. Add as much of the milk as you need to achieve the consistency you want.

Place 1/3 of the frosting into a separate bowl and fold in the marshmallow fluff till completely incorporated.

Frost the top of the first layer with the marshmallow frosting. Top with the second layer. Frost with the rest of the frosting and sprinkle mini chips over the top, pressing them into the frosting slightly.


Saturday, January 19, 2008

Our Daily Bread


Bread is really a staple of life for me. There's a lot I can pass over, many foods that I'd be able to give up, but not bread. I cannot resist the smell of warm, freshly baked bread. Even more than the smell of chocolate chip cookies in the oven, fresh bread makes me drool.

When the no-carb phase came I just laughed. There was no way I was hopping on that bandwagon. While those all around me were eschewing bread for....meat, I guess, I would chuckle a throaty laugh, saw off a big, warm slice of fresh carbs and wiggle my toes with the sheer delight of soft, moist bread with melting butter dripping into it.

One of my favorite loaves is this wheat recipe. It's a dense, moist, flavorful loaf that is perfect for sandwiches, fabulous for toast, and pairs up beautifully with some butter and jam or Nutella. Plus, it makes two loaves so you've got one for today and one for tomorrow!

Whole-Wheat Bread
adapted from The Good Housekeeping Illustrated Cookbook

3 Tbsp sugar
4 tsp salt
2 pkgs active dry yeast
4 cups whole-wheat flour
3 to 3-1/2 cups all-purpose flour
2-1/4 cups milk
1/3 cup butter
1/3 cup molasses
 
1- In the large bowl of a heavy duty mixer combine sugar, salt, yeast, 2 cups whole-wheat flour and 1 cup all-purpose flour. In 2-quart saucepan over low heat, heat milk, butter, and molasses until very warm (120 to 130 deg. F). Or you can microwave it for about 3-1/3 minutes, stirring after 2 minutes.

2- With mixer at low speed, gradually beat liquid into dry ingredients. Increase speed to medium, beat 2 minutes, occasionally scraping bowl with rubber spatula. Beat in 1/2 cup whole-wheat flour and 1/2 cup all-purpose flour or enough to make a thick batter; continue beating 2 minutes, occasionally scraping bowl with rubber spatula.

3- With spoon, stir in 1-1/2 cups whole-wheat and additional all-purpose flour (about 1-1/2 cups) to make a soft dough.

4- Turn dough onto lightly floured surface and knead until smooth and elastic, about 10 minutes. Shape dough into ball and place in greased large bowl, turning dough to grease top. Cover with towel; let rise in warm, draft-free place (80 to 85 deg. F), a mildly pre-heated oven is good, if you're in a chilly climate. Leave it till it's doubled in volume, about 1 hour, but you should go by the doubling, not the clock.

5- Punch down the dough; turn onto lightly floured surface; cut it in half; cover with the bowl and let the halves rest 15 minutes for easier shaping. Grease two 9 x 5-inch loaf pans.

6- With lightly floured rolling pin, roll one dough half into a 12 x 8-inch rectangle. Starting at a narrow end, roll dough up tightly and pinch the edge with your fingers. Seal the ends by pinching them and folding them under. Place the roll, seam side down, in loaf pan. Repeat with the remaining dough.

7- Repeat step 6 with remaining dough. Cover loaves with towel; let rise in warm place, away from drafts, until loaves are doubled, about an hour. But again, go by the rising, not by the clock.


8-Adjust oven rack to the middle of the oven and pre-heat oven to 400 deg. F. Bake loaves 30 to 35 minutes. If the loaves are browning too quickly, you might need to put an aluminum foil tent over the loaves after about 15 minutes. Loaves should be golden and sound hollow when top is tapped lightly with fingers. Remove from pans immediately so bottoms don't become soggy, and cool on wire racks. I like to brush the tops with a little butter. It makes it pretty and softens the crust a bit.


Tuesday, January 15, 2008

Heritage Pie

When I won a contest recently with a recipe, my proud husband sent out an announcespam to everyone we know. I got back an interesting congratulations from my aunt. She is a lovely woman, a mother, grandmother, an accomplished quilter who has one of her quilts hanging in city hall, and a business woman who ran a successful coffee shop. She said that it was wonderful that the home arts are finally receiving recognition. My grandmother and her mother-in-law (who happened to be next-door neighbors) were the best cooks in town. There was no competition, no accolades, no prizes, but it was generally acknowledged that Mrs. O and Mrs. C were the best.

This set me to thinking about my grandmother. She raised a family in farm country, making ends meet through the Great Depression and World War II, keeping the family fed and clothed through thriftiness and hard work. Convenience appliances that I rely on weren't in her house. No dishwasher. No microwave. Not even an automatic ice maker, unless you count the way icicles automatically formed in the winter. I'm sure her menu did not include fresh mangoes, chimichangas, or sushi, but she certainly knew her way around a bin of flour and a stick of butter!

Pecan pie is my father's favorite pie and since I have my grandmother's recipe, I think of both of them whenever I make it. A wonderful, hard-working lady who loved making treats in the kitchen and her lucky little boy who raised me to see how blessed I am with what I have, however little or much that is.

Grandma's Pecan Pie

1 unbaked 9" pie shell
3 eggs
1 cup sugar
1 cup light corn syrup
1 tsp vanilla
1/8 tsp salt
1/4 lb (1 stick) butter, melted
1-1/2 cups broken pecans

Preheat oven to 350 degrees F.

Mix all the ingredients in a large bowl. Pour into the unbaked pie shell.

Bake at 350 deg. F. for 45 - 55 min. Check to see that the crust is not browning too rapidly. If it is, cover the edges with foil or a pie crust shield.

When you remove the pie from the oven it will still be slightly wobbly in the center, but will set up as it cools. Cool on a wire rack to room temperature.

Store leftovers covered in the refrigerator.

Saturday, January 12, 2008

Brown Bag Cookies


In high school my friends used to mock me because my lunches were so predictable. I almost always brown-bagged it and in the fall I'd bring a peanut butter and jam sandwich and an apple. In the winter, as the good apples disappeared and got replaced by the mealy ones, I'd switch to peanut butter and jam sandwiches and an orange. For a sleep-deprived teen trying to get out the door in the morning, there's nothing easier to slap together than peanut butter and jam. Plus it doesn't need refrigeration and it's delicious.

You might think after all those peanut butter sandwiches I might have grown weary of peanut butter. Not so. It's one of my favorite food groups. In fact, replacing that whole dodgy "green things" portion of the food pyramid with peanut butter would work for me. Peanuts are legumes. Health food right there. Plus the oils they contain are terrifically beneficial. So it's even better! When you factor in how many flavors pair wonderfully with peanut butter, it's hard to think of a more versatile food.

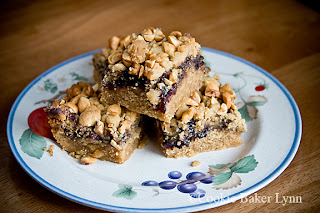
But the classic is, of course, pb & j. How could you improve upon a classic? Well, turn it into a cookie! This cookie is the ultimate in take-me-back-to-childhood comfort food. It has the sweetness of jam sandwiched between two moist, peanut butter layers. They're fabulous the day you make them, but they continue to get moister and better as the jam sinks in. It's dangerous for me to have a pan of these sitting on the counter because I cannot walk by without taking a square. And then another one to keep the first square company.


Peanut Butter and Jam Bars
adapted from Barefoot Contessa At Home

1 cup (2 sticks) unsalted butter, at room temperature
1-1/2 cups sugar
1 tsp pure vanilla extract
2 extra-large eggs, at room temperature
2 cups creamy peanut butter, such as JIF (18 oz)
3 cups all-purpose flour, plus more for dusting the pan
1 tsp baking powder
1-1/2 tsp kosher salt
1-1/2 cups favorite jam (I used blueberry here)
2/3 cups salted peanuts, coarsely chopped

Preheat the oven to 350 degrees. Grease and flour a 9 x 13-inch baking pan.

In the bowl of an electric mixer, cream the butter and sugar on medium speed until light yellow, about 2 minutes. With the mixer on low speed, add the vanilla, eggs, and peanut butter and mix until well combined.

Sift together into a small bowl the flour, baking powder, and salt. With the mixer on low speed, slowly add the flour mixture to the peanut butter mixture. Mix just until combined.

Spread two thirds of the dough in the prepared pan, using a knife to spread it evenly. Spread the jam evenly over the dough. Drop small globs of the remaining dough evenly over the jam. Don't worry if all the jam isn't covered; the dough will spread when it bakes. Sprinkle with the chopped peanuts and bake for 45 minutes, until golden brown. Cool and cut into 24 squares.

Tuesday, January 8, 2008

It's Diet Time

With the start of a new year, there is the promise of starting fresh. But, unfortunately, I still drag along the remnants of last year's excesses. Specifically, all the cookies I made and, more specifically, all the cookies I ate. I know I'm not alone in this boat. I've been seeing many bloggers posting their New Year's resolutions, which invariably include something along the lines of eating more healthily.* So it would be cruel of me to taunt and tempt you with mega-calorie taste sensations of cream, butter, and chocolate, knowing that you're trying to lose weight. Instead I offer you my wisdom and counsel from my years of experience in observing and participating in diets.

Dieting tips you don't find in diet books:

1. The calories don't count if you're standing. If you eat sitting down, you're closer to the floor, hence gravity pulls those calories straight to your hips and thighs. Stand up and the calories slide straight down and off.

2. The calories don't count if you eat from the container. Never, ever plate your food. That's where the calorie compounding occurs. Take bites straight from the container. Bonus points if you don't finish the whole thing and put it back in the refrigerator (or freezer, if you're eating ice cream).

3. If you eat from the container while standing, you're actually burning calories. Eating standing up and pacing is equivalent to a 20 minute aerobic workout.

3. The calories don't count if you eat off someone else's plate. That's just tasting or sharing, so those calories totally don't count.

4. Tidying calories don't count. If you wipe up stray frosting or straighten the edge on a pie, a pan of fudge, or a cake, that doesn't count.

4. If you take a chocolate from an assortment and don't like the one you get, those calories don't count. It's just not fair that you should pay the freight for a pineapple cream when you were thinking it was maple cream. And it would be gross to spit it out. So it's only good manners to eat it. And having the discipline to practice good manners with a mouthful of pineapple cream burns calories. So you're almost at a negative calorie situation.

5. Grapefruit has the effect of negating calories, so whatever you eat at the same time as a grapefruit doesn't count. The same for Diet Coke.

6. Food eaten in the car doesn't count. You know you're not really enjoying it.

8. Broken food has no calories. The half a cookie left on a plate is calorie free, as is the chip shards in the bottom of the potato chip bag.


There, hopefully those tips will help. And if you've still got some room after all that dieting, you might try these muffins. They're low calorie and low fat, but I like them anyway. They are deliciously moist, flavorful, with the added zip of cranberries. The only problem is eating just one. Well, if you're standing up, you could probably handle two.


Pumpkin-Cranberry Muffins
adapted from Cooking Light magazine

1-1/2 cups all-purpose flour
1 tsp baking soda
3/4 tsp ground ginger
1/2 tsp baking powder
1/2 tsp ground cinnamon
1/4 tsp salt
1/8 tsp ground cloves
1 cup granulated sugar
1 cup canned pumpkin
1/2 cup low-fat buttermilk
1/4 cup packed light brown sugar
2 Tbsp canola oil
1 large egg
2/3 cup Craisins, sweetened dried cranberries

1- Preheat oven to 375 deg. F.

2 - Place 12 paper muffin cup liners in muffin cups; coat liners with cooking spray. I used my new silicone cupcake holders on a baking tray, giving each a hit of cooking spray. They released beautifully.

3 - Lightly spoon flour into dry measuring cups; level with a knife. Combine flour, baking soda, and next 5 ingredients (through cloves); stir well with whisk and set aside.

4 - Combine granulated sugar and next 5 ingredients (through egg) in a large bowl; beat with a mixer at medium speed until well blended (about 3 minutes). Add flour mixture to sugar mixture; beat at low speed just until combined. Fold in the cranberries.

5 - Spoon batter into prepared cups. Bake at 375 deg. F. for 25 minutes or until muffins spring back when touched lightly in center. Remove muffins from pan immediately; place on a wire rack.

Makes 1 dozen muffins, but my muffin cups overflowed when I made just 12, so when I made this recipe again and doubled it, I had 3 extra muffins (27 total when doubled).

~ 199 calories, 3.2 g. fat, 2.8 g protein, 1.5 g fiber 1.3 g iron, and 38 mg calcium. (There, don't you feel virtuous?)


* Here's the part where Grammar Girl goes on a rant. "Healthy" is an adjective. It is not a person, place or thing. You cannot eat Healthy, unless you named your pet goat Healthy and are now going to grill her. Healthily is an adverb, modifying a verb. So you can you use that word to describe the way you eat. If Grammar Girl sees another magazine article about "eating healthy" she will go round the bend and take her side-kick, Adverb Boy, and go slap someone upside the head with a healthy brick of tofu. Please don't force an adjective to do the heavy lifting that an adverb was made for!

Saturday, January 5, 2008

Raspberry Delight


Fictional food always makes me hungry. When I read a good book, I become engrossed in the story, relating to the hero (or heroine), so that when they sit down to a meal in a Mexican restaurant, the description of warm plates filled with gooey, melty cheese and the smell of fresh tortillas fried in sizzling lard gives me the urge to leap up and make a plate of nachos. But what I eat is never as good as it sounds in the book.

One fictional food that has intrigued me since childhood is in The Lion, The Witch, and The Wardrobe. One of the boys, Edmund, has met the evil witch and with a drop of her magical potion in the snow she makes Turkish Delight, a sweet, sticky, utterly addictive confection. I always wondered what this delightful treat looked and tasted like. Then one day I found a recipe in The Joy of Cooking for Turkish Delight and, naturally, had to try it.

It is sweet, sticky, and hard to resist. Something like a fruit jelly candy, but with nuts, and rolled in powdered sugar. Yumm. Joy has two different methods for making it. I've made it with pectin, which turned out well, but is a bit pricey, considering the amount of liquid pectin needed. This year I noticed that the second method calls for gelatin, which I happen to have in abundance for spur of the moment marshmallow making. I also had some raspberries from the freezer which had thawed into an unattractive lump of mush. I decided to use their juice and my Turkish Delight turned out so pretty, like sparkling raspberry jewels in the snow! I'm confident Edmund could not have resisted it.

Turkish Delight
adapted from The Joy of Cooking

Raspberry juice, simmered over low heat and reduced to 1/3 cup
2 Tbsp cold water
1 Tbsp lemon or lime juice
Grated rind of 1 lemon
2 Tbsp gelatin
2/3 cup water
2 cups sugar
1 cup coarsely chopped walnuts
Confectioners' sugar


Lightly oil an 8 x 8 inch pan. Scatter the chopped nuts in the bottom.

Combine the first five ingredients in a glass measuring cup and let stand at least 5 minutes.

Place the water and sugar in a large heavy pan over moderate heat. Stir until the sugar is dissolved. When the solution starts to boil, cover and boil 2 to 3 minutes. Uncover and cook without stirring to the soft-ball stage, 234 deg. F on a candy thermometer. Remove from heat and add the gelatin mixture. Return to heat and stir until thermometer registers 224 deg. F.

Pour the mixture over the nuts in the pan. Let stand for 12 hours. When the mixture is very firm dust it with the confectioners' sugar.

Cut into squares by pressing down with a buttered or sugared knife. Dust a work surface or baking sheet with confectioners' sugar and turn the candies onto it, turning the candies so that all sides are coated. If you plan on packing these candies, let them stand sugared 12 hours or more on a rack. Redust on all sides and pack, then store tightly covered.


**Another interesting discovery I made was that a popular local confection, Aplets and Cotlets, is actually Turkish Delight. At the turn of the century two Armenian young men emigrated to the United States and bought an apple orchard in Cashmere, Washington. Apples grew well there and when they had a surplus on their hands they decided to recreate the candy of their childhood, Rahat Locoum, also known as Turkish Delight. Aplets and Cotlets, made from apples and apricots, are very popular and we always buy a box at Christmastime then have wars about who gets the last piece.

Wednesday, January 2, 2008

Surrogate Baking

Growing up I always felt lucky that I had 2 sets of living grandparents. Even in elementary school, few of my friends could make this claim. Three of my grandparents lived into their nineties. I wrote to them often, but our relationship was not a close one because we were separated geographically. I got to see them only every 5 years or so.

Feeling a lack in our lives, my sisters and I adopted a neighbor lady as our grandmother. Mrs. G was a wonderful woman. Her back fence bordered our backyard and frequently she'd meet us at the fence to hand over a squash, a jar of jam, or just to chat. Better still was being invited to play over at her house.

Being a retired couple with a large house to themselves, several rooms were shut with the furniture covered in dust sheets. This lent a delicious air of mystery and possibilities to the house. There was a large landing in the stairs that was perfect for putting on puppet shows and a porch over the garage that was just right for tea parties. On a dull day I could entertain her and myself (and quite possibly annoy her husband) by counting all her African violet plants and all the owls in her owl figurine collection.

When I got married and had children my kids were in the same situation. 4 grandparents, but no one close enough to see on a daily, or even weekly basis. But when we bought our house we really got lucky. Not only a nice house with a great backyard, but nice neighbors. Though there has been quite a bit of shift in the neighborhood over the years, our one constant has been our neighbor, K.

As her kids have grown up, she's taken on my youngest daughter as her baking buddy. Although K has a hectic work schedule, when she finds the time, K will have my daughter come over and bake cookies, muffins, or other treats with her and then send her home with a plate of goodies to share. I love that she does this. Although I'm perfectly capable of baking with my daughter, and frequently do, I know she loves her time with this wonderful lady.

One of the first things they made together was a quick bread. It was so good that I asked for the recipe and now I make it every year as soon as cranberries hit the grocery store. It is moist, tangy, not too sweet, and the little loaves make perfect gifts for friends and very special neighbors.

Cranberry Orange Nut Bread

2 cups flour
1 cup sugar
1/2 tsp baking powder
1/2 tsp salt
1/2 tsp soda
2 Tbsp vegetable oil
Grated zest of 1 orange
Juice of 1 orange plus enough water to equal 3/4 cup liquid
1 beaten egg
1-1/2 cups raw cranberries, cut in half
1 cup coarsely chopped walnuts

Grease either a 9" loaf pan or two mini loaf pans. Preheat oven to 350 deg. F.

Sift together the first five ingredients into a large bowl. In a small bowl combine the oil, orange zest, liquid and egg. Add this mixture all at once into the dry ingredients. Stir just until combined.

Fold in the cranberries and nuts. Pour the batter into the prepared pan(s).

Bake at 350 for 1 hour for a large loaf or 45 minutes for 2 small loaves.

Do not double the recipe. You'll have to stir the batter too much and will get tough loaves.