Thursday, October 29, 2009

In Which I Get Creative and Learn About Pans


When I received my copy of You Made That Dessert? I went through and put in sticky notes to mark all the stuff I wanted to make. Then my husband did the same thing. And my daughter. The poor book looks like it got ambushed in a Post-it note war!

When I had a pile of bananas going south on my counter I remembered the promising recipe in there for Peanut Butter Banana bread. Except I didn't want to make bread. I wanted to make muffins. I love how muffins are just hand-sized; perfect for grabbing on the way out the door, sitting by a mug of tea at breakfast time, or as a snack for a child who's knife skills don't extend to non-massacre of a loaf.

As I understand it, basically any quick bread loaf can be converted to muffins. I was unsure, though, about how many muffins the recipe would yield and how long cooking time should be. I greased up my trusty standard muffin tin that my mother-in-law gave me years and years ago and filled the wells two-thirds full. It yielded 17 muffins. Odd number. Which got me to thinking. I've made muffins before and the numbers didn't quite match up. So I went to the source - Martha. According to Cupcakes, a standard-sized muffin tin should hold 4 oz. of batter. Assuming this meant 4 fluid oz (which is the stupidest unit of measure EVER) I poured 1/2 a cup of water into my tin. Well, I tried. My tin would only hold about 2/3 to 3/4 of that amount. What???

Apparently at some time in the last 20 years, the size of standard muffins, not unlike the size of standard Americans, has been revised upward. I've been baking with insufficient muffin tins! That would explain why some muffin recipes work and some come out dry and overbaked, or spill over the tin. Rats. Now I need a new tin to bake new recipes, but I also have to hold onto my old tins for my old recipes? And remember which is which? Way too much brain space to devote to muffins, people.

But some muffins are worth it. Like the ones that I made with the bananas. Banana bread with peanut butter stirred in. With chocolate chips. And nuts. Incredibly moist, amazingly delicious. I promise these will be a new favorite, whatever size you make them.

Peanut Butter Banana Muffins
- adapted from You Made That Dessert?

1-1/4 cups (5.35 oz) all-purpose flour
1 tsp baking soda
1/2 tsp salt
1/2 cup creamy peanut butter (not "natural")
2/3 cup sugar
3 large ripe bananas, mashed
2 large eggs, at room temperature, lightly beaten
1/2 cup chopped walnuts
1/2 cup mini chocolate chips (I used regular chips and chopped them up a bit)

1- Preheat the oven to 350 deg. F. Spray the wells of a muffin tin with cooking spray.

2- In a small bowl mix together the flour, baking soda, and salt.

3- In a large bowl with an electric mixer on medium-low speed, beat together the peanut butter and sugar together until well blended, about 2 minutes. Add the mashed bananas and eggs and mix well. Scrape down the sides of the bowl with a rubber spatula.

4- Stir in the flour mixture with a spoon, mixing just until combined. Stir in the chopped nuts and the chocolate chips.

5- Divide the batter between the muffin tin wells, filling the wells 2/3 full. Depending on the size of your tins, you will get between 12 and 17 muffins.

6- Bake for 17 to 20 minutes, until a toothpick inserted in the middle of a muffin comes out clean.

7- Let the muffins cool in the tin for 10 minutes, then remove them to a cooling rack to finish cooling. Once cooled, the muffins can be stored at room temperature in an airtight container for up to 3 days. You can also tightly wrap the individual muffins in plastic wrap and store in the freezer for up to 1 month.

Monday, October 26, 2009

Making Babies

With my eldest child about to get married and my youngest child well out of diapers (Thank the Lord!), I had thought I was all done making babies. But then Gretchen, the Bread Baking Babes' host kitchen for the month, introduced us to Tanta Wawas, Peruvian bread babies, our assignment for the month.

I was blessed to have Tanna, our founder, come bake with me. She happened to be in town and offered to come make babies with me. And it's a good thing she did, as they were a handful!

The recipe we were originally given made a massive amount of dough - way too much for my mixer, so it was all done by hand. The dough was very dry and shaggy and we ended up adding 300 ml of additional water, just to get all the flour absorbed and the dough in some sort of shape to knead.


Deciding on the right amount of yeast was a brain strain, as I don't stock fresh yeast. We finally agreed on an amount for the instant yeast and proceeded.

The kneading went on and on and on and never seemed to change the characteristic of the dough much. It stayed lumpy, hard, and dense. We let it rest and rise. When we returned, it was still lumpy, hard, and dense.

The shaping of the dough was daunting. We had seen pictures of beautiful, intricately crafted dough creations, but no instructions other than "shape." Tanna and I were not feeling overly creative, so we asked my husband for help. He may seem like a straightforward, no nonsense engineer type, but in preschool he got a ++ Smiley Face in play dough, so he was the man for the job.


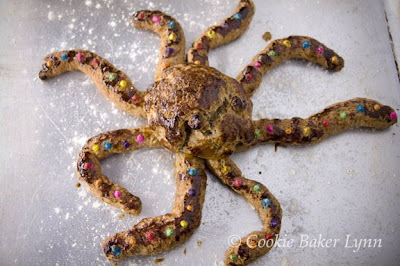
After he'd crafted a fighter jet and a Wallace head (as in Wallace and Grommit), Tanna and I had enough confidence to attempt a fish, a camel, an octopus, and a gun totin' bandallero bambino.

We left the creations to rise for 3 hours (the just barely rose) and then popped them into the oven. The result? Hard to describe. Sweet....ish. Spicy.....sort of. Dry....but moist. And definitely moreish.


Gretchen retooled the recipe and came up with a moister version that is much smaller. You can check out her page for the new and improved version. I'll give you what I worked with. Just in case you've got a preschool class that needs a craft.

If you'd like to bake up some babies, you can earn a Bread Baking Buddy badge. Just send a link to your blog post to Gretchen by November 6th, and she'll send you a badge to proudly display on your website.

And be sure to see what all the other creative Babes did this month! (Links in the sidebar)


Tanta Wawa (Peruvian Bread Babies)
Makes 8

500g of whole wheat flour

2 kilos of bread flour

675g of sugar

125g of shortening

100g of fresh yeast (we used 38 g instant yeast)

25g of salt *note: Peruvian salt is powdery, so we ground it in a mortar and pestle

4 eggs at room temp

25g of ground cinnamon

5g of ground cloves

25g of sesame seeds

125g of butter

200 milliliters of milk

300 milliliters of water

1/2 teaspoon of vanilla

4 egg yolks (for painting)


1. In a bowl, mix the flours, sugar, yeast, salt, cinnamon, cloves, and sesame seeds. Make a well in the center and add in the shortening, eggs, butter, milk, water and vanilla. Mix well then turn out and knead for 10-15 minutes. (Add extra water as necessary to moisten all the dry bits.) Cover and let the dough rest for 20 minutes.

2. Divide dough into 8 portions of 500g each. Form them into ovals the size of your hand. Cover and let the dough rest for 10 minutes.

3. Stretch each dough ball and shape as desired. Place them on baking sheets which have been greased and floured. Cover with plastic and let the dough babies grow to three times their size. (I left mine for 3 hours)

4. Preheat the oven to 180C (350 deg. F)

5. Brush the egg yolks over the dough babies. Bake at 180C for 30 minutes, till an instant read thermometer reads 190 deg. F.

Tuesday, October 20, 2009

Chestnut Inspiration


My elementary school was about 5 blocks from my house, so I'd walk to school every day. In the fall one of the pleasures of the walk was stomping chestnuts. My sisters and I would walk by several large horse chestnut trees and in the fall the prickly fruit would litter the sidewalk and we'd kick them and stomp on them to reveal the lovely nuts within.

I loved the beautiful, glossy nuts inside, but was sad to learn that they couldn't be toasted and eaten, and the gorgeous glossy exterior of the nuts withered and faded over time. I know because I'd kept a handful, thinking to make them into jewelry or something cool. Hey, it was the 60's - it would have been cool! Possibly groovy as well.

My daughter came over the other day with some eating chestnuts. A neighbor of theirs has a huge tree and is only too happy to have volunteers remove the prickly guys. I had never seen the eating kind of chestnut inside it's prickly casing. It's lots spikier (or, porkier, as my son says) than it's horse chestnut cousin. Having never baked with chestnuts, I was challenged by my daughter to come up with something that really showcased fall flavors, so I got busy.

My cookbooks were remarkably silent on the question of what to do with fresh chestnuts. Most of the recipes used chestnut cream. Hmph. I roasted the chestnuts and peeled them, then inspiration struck. What if I could make them into a chocolatey spread? Chestnut + chocolate = delicious, right?

I adapted an online recipe for making your own Nutella and ended up with....creamy chocolatey goodness with a subtle hint of chestnut? Um, not quite. A dough ball that looked like a giant turd. It appears that chestnuts have a lot less natural oil than hazelnuts. It tasted ok, but the chestnut was very subtle, and no one was going to want to spread this on their bread. So now what?

I figured that I could add the chestnutella as a flavor layer in a bar cookie, so went back to the cookbook stash and found - ta da!- pumpkin pie bars. I rolled out the chestnutella ball into a 9 x 13 sheet, pressed it onto the crust layer, and added pumpkin pie on top. And just to thumb my nose at the calories, I added a struesel topping that sank into the pie layer as it baked.

The verdict? Thumbs up from all the judges! I don't know that I'll want to do all this work on a regular basis, but as a special occasion, welcome Fall cookies, this fits the bill perfectly.

Chestnutella Pumpkin Pie Bars
- adapted from America's Best Recipes

Chestnutella

2 cups toasted, peeled chestnuts*, about 10 oz
1 cup powdered sugar
1/4 cup unsweetened cocoa powder
1/4 cup vegetable oil
1/2 tsp vanilla

* to roast the chestnuts, remove the prickly outer layer wearing thick gloved. Cut a small x into the mahogany skin of the nut. Lay the nuts in a single layer on a shallow baking pan. Toast at 350 degrees F. for 8-10 minutes, until the skin peels back from the x.


1-Place the cooled chestnuts into a food processor and process for about 5 minutes till it turns into a fine meal. With regular nuts this would give you a butter, but because the chestnuts don't have as much oil, you'll just get a fine meal that holds together when pinched.

2- Add the sugar, cocoa, and vanilla. The mixture should now clump into a ball. Drizzle in the vegetable oil.

3- Wrap your ball in plastic wrap and store in the refrigerator until you're ready to use it.


Pumpkin Pie Squares

1 cup all-purpose flour
1/2 cup quick-cooking oats, uncooked
1/2 cup firmly packed brown sugar
1/2 cup butter
1 recipe of Chestnutella at room temperature
2 cups cooked, mashed pumpkin
3/4 cup sugar
1 (12 oz) can evaporated milk
2 eggs
1 tsp ground cinnamon
1/2 tsp salt
1/2 tsp ground ginger
1/4 tsp ground cloves
1/2 cup firmly packed brown sugar
2 Tbsp butter
1/2 cup chopped pecans
Whipped cream, for serving

1- Preheat oven to 350 deg. F.

2- Combine the flour, oats, and 1/2 cup brown sugar in a medium bowl. Cut in 1/2 cup butter with a pastry blender until the mixture resembles coarse meal. Press the mixture into an ungreased 9 x 13 x 2- inch baking pan. Bake for 15 minutes.

3- While the crust is baking, place the Chestnutella ball between two sheets of waxed paper and roll it out into a 9 x 13 -inch rectangle.

4- Combine the pumpkin and the next 7 ingredients (through the cloves), stirring well.

5- When the crust is done cooking, remove it from the oven. Carefully peel the top layer of waxed paper from the Chestnutella. Invert the rectangle over the pan and press it into place. Peel off the other layer of waxed paper. Trim off any excess and press any tears in the layer to seal them.

6- Pour the pumpkin mixture over the Chestnutella layer. Bake for 20 minutes.

7- Place the 1/2 cup brown sugar in a small bowl; cut in 2 Tbsp butter with a pastry blender until mixture resembles coarse meal. Stir in pecans. Sprinkle over the pumpkin mixture. Bake an additional 20 minutes or until set (a small amount of jiggle is OK, but not wobbly in the center).

8 - Cool and cut into squares. Serve with a dollop of whipped cream, if desired. Store leftovers covered in the refrigerator.


Monday, October 12, 2009

Recipes Piled a Mile High

My husband and I have been caught up in a flurry of home repair, renovation, and basically doing chores we've been putting off for the last decade or so. Inevitably, when such projects are underway, tempers flare, arguments escalate, and harsh words are tossed around. It came up - the harshest word of all - "packrat."

What? Me? A packrat? Just because we have more bookshelves than chairs, just because we have books in boxes and books in drawers? That doesn't make me a packrat. I neeeeeed those books. The same for all my sewing supplies, fabric stash, unfinished craft projects, kids' kindergarten art work, and, oh, no, not another chocolate stash! Well, I can declutter with the best of them. I'll toss the.....kids' art work. They won't care.

I must confess, though, that I do have a wee bit of a tendency to hoarding when it comes to recipes. Why is it so hard to toss a recipe? Even if I ripped it out of a magazine ten years ago and have never made it. I might make it someday, so I'd better save it, right? Especially if it's got luscious, tempting pictures to go with the recipe.

In the spirit of purge that's flowing in our house right now, I decided to go through my folder of ripped-out-of-a-magazine recipes and do some culling. Calls for a box of pudding? Toss. I'd never get my family to eat it? Toss. I own the cookbook that has that recipe in it? Toss. But then I came to one that had a full page picture of ice cream and blueberries nestled in between halves of a biscuit with a lovely sauce drizzling down over the top. Rather than toss, I'd make it, blog it, and then be able to toss with a free conscience. Plus I still had more blueberries to play with!

The only downside to this excellent plan was that when I looked at the recipe accompanying the gorgeous photo, it was basically a biscuit recipe and you bought ice cream to put in there. Waaaaah! I wanted a blueberry ice cream recipe! So I had to sort of invent my own. And now that I've taken my own pictures I'm totally going to toss that other recipe. Even though their pictures were better. Maybe I'd better hang onto it, just in case I want to try for a redo later....

Blueberry Tallcakes

Your favorite biscuits or shortcakes
Blueberry Ice cream (recipe follows)
Fresh berries
Berry syrup or liquor for drizzling


Blueberry Ice cream

2 cups blueberries
1/2 cup sugar
Juice of 1/2 lemon
2 cups heavy cream
1 cup whole milk
3/4 cup granulated sugar
Pinch of salt
5 large egg yolks
2-3 Tbsp Blueberry or blackberry liquor*


1- Toss the blueberries, sugar, and lemon juice together in a mixing bowl. Cover and refrigerate, stirring every 30 minutes.

2- Place the blueberry mixture into a blender and blend until smooth. Set aside.

3- Pour 1 cup of the cream into a large mixing bowl. Set a fine mesh strainer on top of it. Have an ice bath prepared in a larger bowl (several inches of ice + water) to cool off the custard.

4- In a medium bowl, whisk the egg yolks.

5- In a medium saucepan, mix 1 cup of the cream with the milk, sugar, and pinch of salt. Set the saucepan over medium-high heat and warm the cream mixture, stirring occasionally until the sugar has dissolved and little bubbles begin to form around the edge of the pan.

6- Pour the warmed cream in a steady stream into the egg mixture, whisking constantly. Return the egg mixture to the saucepan and set it over low heat. Cook, stirring constantly and scraping the bottom with a heatproof rubber spatula until the custard thickens slightly and coats the spatula ( drawing a finger through it should leave a line).

7- Immediately pour the custard through the strainer into the cold cream. Set the bowl into the ice bath and stir. Pour in the pureed blueberry mixture and stir till thoroughly mixed and cooled. Cover and refrigerate the custard at least 4 hours or overnight.

8- Stir in the liquor and freeze the custard in your ice cream maker according to the manufacturer's instructions.

* I used Creme de Cassis and it did impart a very distinct blackberry flavor to the ice cream. My next quest - making blueberry liquor from my leftover Blueberry Lighter Fluid!

Friday, October 9, 2009

Turning Over a New Blueberry Recipe


I have a two-sided relationship with Cooking Light. I own many Cooking Light cookbooks and they are my go-to books for salads, main meals, and for when I'm feeling fat. But their dessert sections tend to have weird, fake ingredients like egg substitute, margarine, and non-fat cream cheese. Euwww.

My personal philosophy is that desserts are meant to be enjoyed. Weird, I know, but true. Put in real butter, don't skimp on the quality chocolate, and enjoy that whipped cream on top. That being said, I don't serve very large portions of dessert. If you use great ingredients, you can savor each bite and feel satisfied with a small amount.

When thumbing through my pile of torn-out-of-magazine recipes to find something to do with the abundance of blueberries, my eye was caught by a beautiful picture of an oozing, blueberry turnover. It happened to be from Cooking Light, so I was a bit dubious, but a quick scan of the ingredients showed the only off ingredient was lower fat cream cheese. I could handle that and just substitute real cream cheese.


My turnovers turned out just like the picture. What neither the picture nor the recipe revealed, though, was that in an effort to get the fat statistic below the magical 30%, they apportioned a tiny amount of dough per turnover and it had to be wafer thin. It was sticky, ripped easily, and was a pain in the patoot to work with. Plus, when it came out of the oven, the texture was tough and cardboardy.

It did improve when stored overnight in an airtight container. The dough softened up and the texture improved.

Final verdict? For all the effort, it only yielded 4 turnovers. I'd double the recipe if I made it again. I loved the taste of the filling, but I'd skip this dough and use your favorite pastry dough recipe. Something with a better taste and texture. And if it's got a little more fat? Well, life's short. Splurge once in a while.


Blueberry Turnovers
- adapted from Cooking Light magazine

Crust:

1/2 cup all-purpose flour
2 Tbsp sugar
2 Tbsp 1/3-less-fat cream cheese (or regular, if you don't care about counting fats)
1 Tbsp butter
Dash of salt
1 Tbsp ice water

Filling:
2/3 cup blueberries
1-1/2 Tbsp sugar
1 tsp cornstarch
1 tsp grated lemon rind
1 tsp fresh lemon juice
1 large egg white, lightly beaten
Cooking spray
1 tsp sugar, divided

1- To prepare the crust, place the flour, 2 Tbsp sugar, cream cheese, butter and salt in a food processor; pulse 5 times or until mixture resembles coarse meal. With processor running, add ice water, processing just until combined, but not forming a ball. Empty the mixture onto a sheet of heavy plastic wrap and gently form it into a 3-inch circle. Wrap it tightly and chill for 15 minutes.

2- Preheat oven to 400 deg. F. with a rack in the center of the oven. Prepare a baking sheet with a Silpat or parchment paper.

3- Divide dough into 4 equal portions; place each portion between 2 sheets of plastic wrap. Roll each portion into a 5-inch circle. Place dough in freezer for 5 minutes or until the plastic wrap can be easily removed.

4- To prepare filling, combine blueberries and next 4 ingredients in a bowl. Working with 1 dough portion at a time, remove plastic wrap from dough. Place dough on a lightly floured surface and brush with egg white. Spoon about 2 Tbsp blueberry filling onto half of circle. Fold dough over filling and press the edges together with a fork to seal. Place the turnover on prepared baking sheet. Lightly spray turnover with cooking spray (or lightly brush with melted butter) and sprinkle with 1/4 tsp sugar. Pierce the turnover with a fork. Repeat procedure to form 3 more turnovers.

5- Bake at 400 deg. F for 15 minutes or until lightly browned. Remove from pan and cool on a wire rack. Yield: 4 turnovers.

Monday, October 5, 2009

Still Singing the Blues

After I did a whole week of blueberry posts, no doubt you thought I was tapped out, all done, and had scraped the bottom of the blueberry barrel. Oh, no, my friends. I've got another week's worth, but I think I'll ease them on you slowly and gently rather than bombing you with a whole week at once.

I realize it's the end of the blueberry season, but I face a dilemma here. Do I post the recipes, perhaps a bit out of season and let you bookmark them to make next year? Or do I save them in my files to post next year when the blueberries are ripe, hoping that I can remember which cookbook / magazine / scrap of paper the recipe was on? I think it's more prudent to opt for the former. I doubt I'll be able to remember next month, let alone next year. Plus, I saw blueberries at Costco on my last trip. So let the blueberries roll!

I found this recipe in a kids magazine. I love kid-friendly recipes that are easy, require only a few ingredients, and make children proud of what they've made. I know my kids would have been proud, except they were off doing other things, coming only to help eat up the results.

Easy Peasy Blueberry Fool
- adapted from Family Fun magazine

1 tbsp butter
2 cups blueberries, stemmed and rinsed
1/3 cup sugar
1-1/2 cups cold heavy cream


1- Place a large mixing bowl and the beaters from a hand-held electric mixer in the freezer.

2- In a saucepan over medium heat melt the butter, then stir in the blueberries and sugar. Cover and cook, stirring occasionally, until the blueberries release their juices, about 10 minutes. Set pan aside to cool.

3- Pour the cooled berries into a blender or food processor. Puree until smooth. Refrigerate the sauce until it's completely cooled.

4- Pour the heavy cream into the mixing bowl from the freezer. Using the chilled beaters, beat the cream until soft peaks form.

5- Reserve 1/4 cup of the blueberry sauce, then use a spatula to fold the remaining sauce into the whipped cream until thoroughly combined.

6- Spoon the mixture into 6 small parfait glasses. Spoon some of the reserved blueberry sauce around the edges of each serving, then use a knife to swirl the sauce throughout the dessert. Refrigerate until serving time.

Makes 6 servings

Thursday, October 1, 2009

Buzzin' Along


It may seem strange that I live in the heart of Starbucksland but I don't drink coffee. I'm a tea gal. I never got into coffee. As a child, it was a grown-up's beverage, harsh and bitter. I associated it with cigarette smoke and bad breath.

I know a lot of people start drinking coffee in high school when the late hours of studying combined with the early hours of school make for very groggy students. That was when I discovered tea and began my lifelong romance with Mr. Lipton.

The few hold-outs to the lure of coffee usually succumb in college. The frenetic pace of college life combined with the intensity of finals can make the stoutest of coffee-shunners turn to the urn for the promise of a few extra hours of study time. College was when I caved.

My first quarter of college I took Chem 101. I'd never taken a chemistry class before and I was totally out at sea. The basic, cursory review material given in the first week was all new to me, and since they assumed that everyone had a firm foundation of elementary terms like "mole," they quickly moved on. I was left in the dust wondering, "A mole? What's a mole? Burrowing earth creature? What does that have to do with chemistry?"


Come finals time I decided I needed to buckle down and learn chemistry (Yes, you read that correctly. I decided to learn the subject in the last week of the quarter. Ah, delusional freshman!). The night before the final I was up late, randomly highlighting things in the textbook, thinking somehow this was an aid to memory. Frantic for more cramming time, I got a big cup coffee and put enough sugar in it so that I could choke it down. After swallowing the magic elixir I awaited the increased focus and concentration that I knew would come. What came instead was a feeling like I'd swallowed a swarm of mosquitos - BZZZZZZZZZZZ. Concentration? Learning? Comprehension? Forget it. So I decided to throw in the towel and get some sleep. Ah, again, forget it.

You can imagine how well I did on my final. It was a disaster. And I blame coffee for failing to magically come through for me.

So why on earth would I tell the nice people at POM Wonderful that I'd like to try their line of Iced Coffees? Well, I like getting stuff in the mail. Plus, I know a lot of people who love coffee and I thought it would be fun to let them do some taste testing. Also, in the years since college I've discovered that while I don't like coffee plain, if you mix it into something like coffee ice cream, it becomes amazing.

Thinking about putting coffee into things gave me a brilliant idea. This was a seriously brilliant idea, not brilliant as in "learn chemistry in a week", but brilliant as in put the POM Iced Coffee into mocha cupcakes. I adapted a recipe from Martha Stewart's Cupcakes using the Iced Coffee in place of brewed espresso, which worked out well, since I have no capability to make espresso (or even coffee) in my kitchen. And how did it work? Beautifully! The cupcakes were moist, delicate, and wonderfully mocha-flavored. I iced with a mocha icing, added a chocolate-covered espresso bean on top, and they were heavenly. I may be a genius. Just don't ask me any chemistry questions.


Healthy Buzz Mocha Cupcakes
- adapted from Martha Stewart's Cupcakes

2-1/2 cups cake flour, sifted
2 Tbsp unsweetened Dutch-process cocoa powder
1/2 cup (1 stick) unsalted butter at room temperature
1-1/2 cups packed light-brown sugar
2 large eggs at room temperature
1 tsp vanilla extract
1-1/2 tsp baking soda
1/4 tsp salt
1/2 cup sour cream at room temperature
3/4 cup POMx Chocolate Iced Coffee, at room temperature
1 Tbsp instant espresso powder
Mocha Cream Cheese Icing (below)
Chocolate-covered espresso beans for garnish

1- Preheat the oven to 325 deg. F. with racks dividing the oven into thirds. Line standard muffin tins with paper liners (a total of 24).

2- In a small bowl sift together the cake flour and the cocoa. Set aside.

3- Place the butter in the bowl of a mixer. On medium-high speed, cream the butter until smooth and light. Add the brown sugar and eggs; beat well, scraping down the sides of the bowl as needed. Add the vanilla, baking soda, and salt; beat to combine thoroughly.

4- Reduce mixer speed to low. Add flour mixture in three batches, alternating with two additions of sour cream, and beating until just combined after each addition. Mix together the POMx Iced Coffee and the espresso powder; add to batter, and beat until smooth.

5- Divide the batter evenly between the 24 lined cups, filling each three-quardters full. Bake about 22 minutes, rotating tins halfway through, until a cake tester inserted in centers comes out with only a few moist crumbs attached. Transfer tins to wire racks to cool completely before removing cupcakes. Cupcakes can be stored unfrosted up to 3 days at room temperature or frozen up to 2 months in airtight containers.

Mocha Cream Cheese Icing

1 tsp espresso powder
1 tsp vanilla extract
8 oz cream cheese, softened
3 cups sifted powdered sugar (more or less, to consistency)
1 Tbsp baking cocoa


1- Combine espresso powder and vanilla in small bowl.

2- Beat cream cheese with a mixer until fluffy. Beat in the cocoa, and espresso- vanilla mixture until well blended. Add the powdered sugar a cup at a time until the desired consistency is achieved. As you beat it it will hold beater tracks, but then relax as soon as you stop beating.

* Visit the POM Iced Coffee site to learn all the healthy reasons for making these cupcakes and why they don't taste like pomegranate. Also, the sheep buzzed up on caffeine are very entertaining.