Saturday, November 28, 2009

Pumpkin's Last Hurrah


It's been a very pumpkiny fall for me. I've tried some new pumpkin recipes and baked several old favorites. But I see the end is in sight. My pumpkin binge is waning and the peppermint season is coming on. As a final send off for pumpkin, I would like to share with you the cupcakes I made to use up the leftover maple cream cheese frosting from this cake. They were moist and delicious, perfect thrones for the maple cream cheese topping.

Goodby fall. It's been wonderful. We've shared so much - especially pumpkin. I hope to see you again....in about 9 months.

Pumpkin and Maple Cupcakes
- adapted from Martha Stewart's Cupcakes
makes 15

3/4 cup (1-1/2 sticks) unsalted butter, room temperature, plus more for the tins
1-2/3 cups all-purpose flour, plus more for the tins
2 tsp baking powder
1 tsp salt
1/2 tsp ground cinnamon
1/4 tsp freshly grated nutmeg
1/8 tsp ground cloves
1 cup canned pumpkin puree
1 cup packed light-brown sugar
1/2 cup granulated sugar
2 large eggs
Maple Cream Cheese Frosting

1- Preheat the oven to 325 deg. F. Brush standard muffin tins with butter; dust with flour and tap out the excess.

2- In a small saucepan melt the butter over medium-olow heat. Cook, swirling occasionally, until the butter turns golden brown. Skim foam off the top and pour the butter into a bowl to stop the cooking. Leave any burned sediment in the pan. Let the butter cool.

3- In a medium bowl whisk together the flour, baking powder, salt, cinnamon, nutmeg, and cloves.

4- In another bowl, whisk together the pumpkin puree, both sugars, eggs and browned butter. Add the flour mixture and whisk just until combined.

5- Divide the batter evenly among the prepared tins, filling each three-quarters full. Bake about 20 minutes, rotating the tins halfway through baking. Check for doneness with a cake tester inserted near the center - when it comes out clean, they're done.

6- Transfer the tins to wire racks to cool completely before removing cupcakes.

7- Spread the frosting over each cupcake and, if desired, dust with decorative sprinkles.

Monday, November 23, 2009

Leftover Conundrum


The week of Thanksgiving is always a bit hectic with shopping for, prepping for, and cooking the big meal. This week is shaping up to be no exception. So I'm going to use that as an excuse to be super, über lazy. I'll tell you what I did with my leftovers. Not my Thanksgiving leftovers; I don't have those yet. No, the leftovers from when Peabody came to bake with me.

After making the pumpkin brioche and measuring off two 1-lb hunks, I still had a big blop of dough left. I stuck it back in the refrigerator to wait for inspiration.

When I was typing out the ingredients for the streusel, I figured out (something I wasn't able to do when company was here) that the recipe calls for 5 cups of ingredients and then only uses 1-1/2 cups of streusel. Hellooooo, of course you're going to end up with a bunch of leftover streusel.

So, after I cleaned up the kitchen I had a) leftover pumpkin brioche, and b) leftover streusel. What to do? Cinnamon rolls. Definitely cinnamon rolls.

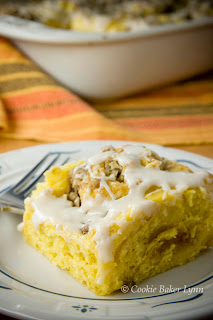
I rolled out the dough into a rectangle, sprinkled the rest of the streusel over the dough, sprinkled extra cinnamon on top and then rolled it up into a log. 12 equal slices were nestled into a greased 9 x 13-inch pan and baked at 350 for 25-30 minutes. Then I drizzled a glaze over the top made from some powdered sugar, a glup of vanilla, and a shlug of milk.

Isn't that the most unrecipe recipe you've ever read? If that stresses you, you can go ahead and make it and write down all the weights, measurements, and directions. Me, I was just really happy to get rid of two leftovers in one go, plus have it turn out to be super tasty!

Happy Thanksgiving, to all who are celebrating this week!

Saturday, November 21, 2009

Baking: From My Kitchen to Yours - Part 2

The second installment of Baking: From My Kitchen to Yours happened this week. The fabulous Peabody of Culinary Concoctions by Peabody made the trek down to bake with me. Since I was the host kitchen, I got to decide what we were baking. I had a short list of 4 or 5 things, but with all the socializing, side tangents of photography, and children demanding attention, we only accomplished one baking project.

I was drawn to this recipe when I saw it on the website for Artisan Bread in 5 Minutes a Day. But when I think of Pea, I think of pumpkin, so naturally I thought of substituting Pea's pumpkin brioche in the recipe. Pumpkin, apple, and pear, all together in a rustic, tasty cake. Yumm.

Since I had a large bowl full of brioche, I decided to double the recipe, making two cakes so there would be enough for everyone. That might have been a mistake, since I was getting so distracted. I ended up with an interesting texture to the streusel topping and an oddly large amount with lots of leftovers. (I'll post later about what I did with that.)

When the recipe calls for an 8 x 3-inch cake pan, apparently it really means it. I realized after I'd put both cakes together that my pans are more like 8 x 2-inch. In the oven the brioche rose, pushing chunks of streusel off to burn on the bottom of the oven because I'd forgotten to put in baking sheets. There's nothing like big clouds of smoke issuing from your oven to really make you feel like a pro baker.

Peabody's kitchen is gorgeous and was spotless when I visited her. My kitchen is more of the "Oh, no, company's coming. Get the snow shovel and clean off the counter!" variety. My cookbooks multiply on the cookbook breeding ground (some people might call it an island) and I have recipes printed off the computer drifting around the kitchen like the first snowflakes of winter.

Peabody's kitchen is also very peaceful. Just Pea and her culinary concoctions. As soon as she got to my house the kitchen was stuffed with people. My oldest daughter, my husband, and my two younger children all wanted to meet her and hang around her. Well, who wouldn't? But it didn't make for smooth, effortless baking.

Why am I telling you all this? Well, it's my excuse for what my oven produced. First, billows of smoke, then a cake that fell in the middle. But it tasted good and we had fun!

Fall Brioche Coffee Cake
- adapted from Artisan Bread In 5 Minutes a Day (go there to see how it's supposed to look)

The Streusel Topping:

1 cup oats
1 cup all-purpose flour
1 cup brown sugar, well packed
1 cup chopped nuts (optional)
1 cup melted butter
1/2 teaspoon cinnamon

The Cake:

1 pound (grapefruit-size portion) Pumpkin Brioche dough (make it the day before baking - this will yield enough for 2 cakes plus leftovers)
2 small apples (1 tart and 1 sweet, thinly sliced)
1 large pear, thinly sliced
3 tablespoons brown sugar
zest of half an orange
1 1/2 cups streusel topping (above)

1- Preheat oven to 375 degrees. Prepare an 8-inch x 3-inch round cake pan with grease, a round piece of parchment and a dusting of flour or sugar.

2-To make the streusel: Place all the ingredients in a bowl and toss until well combined.

3- Divide the pound of dough in two equal pieces, form them into balls and roll them out to be just slightly wider than the cake pan. Place one of the disks of dough in the prepared pan. It should come up the sides just a bit.

4- Combine the apples, pear, brown sugar and zest in a bowl. Spread half of the apple mixture on the first layer of dough.

3- Sprinkle with about 3/4 cup streusel. Repeat with other layer of dough, rest of apples and another 3/4 cup streusel. Let the cake rest for 1 hour and 20 minutes.

4- With a baking sheet beneath the cake to catch drips, bake for about 45 minutes , until tester comes out of the center clean. Run a sharp knife around the edge of the cake.

5-Invert the pan onto a plate. Lift the pan off the cake. Peel the parchment paper off the bottom of the cake and then invert onto a cake plate.


Sunday, November 15, 2009

I Puffy Heart Puffy Pancakes

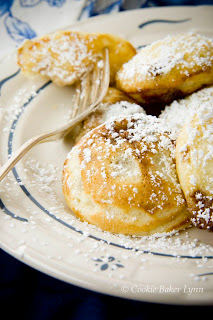
As the temperatures drop lower and lower, and the house gets chillier and chillier, a warm breakfast is something my family appreciates. Most morning that would be oatmeal, but on the weekends, I sometimes splurge and make something special. Recently a good friend gifted me with something delightful that I'd had on my wish list for a long time - an ebelskiver pan.

If you are uninitiated in the joys of ebelskivers, let me fill you in. They're a Danish treat - pancakes cooked in a unique pan that allows them to be turned over to form little puffy pillows that can be filled with whatever tickles your tastebuds, sweet or savory.

To break in my new pan, I naturally opted for sweet (that's just me). I found a recipe for Cinnamon Bun Ebelskivers and figured I couldn't go wrong with that. A pancake with a cinnamon bun inside? Oh, yeah, that's my kind of breakfast!


The batter is easy to throw together. Getting the right amount of batter in each well quickly is a bit of a challenge. A pre-measured batter dispenser would be helpful, but I don't have one, so I just scooped up batter with a measuring cup. It works.

Turning the pancakes takes a bit of practice. I've been told there is a handy wooden tool that's shaped just right for flipping them over. Again, I don't have that, so I used wood skewers. It works.


It's not challenging to make these, just a time commitment to be standing at the stove, pouring, filling, turning, waiting, and serving. If you've got a large family, you could be on your feet for quite a while. Or, you could be more clever than me and have your family take turns making their own. Either way, it's a treat breakfast that will be enjoyed and appreciated.


Cinnamon Bun Ebelskivers
- adapted from Williams Sonoma (who also sell the pans)

For the cinnamon filling:
1/2 cup granulated sugar
2 Tbs. all-purpose flour
1 1/2 Tbs. ground cinnamon
1/4 tsp. salt
4 Tbs. (1/2 stick) unsalted butter, cut into 1/2-inch cubes,
at room temperature

For the pancakes:
2 cups all-purpose flour
1 tsp. baking powder
1/2 tsp. salt
1 Tbs. granulated sugar
4 eggs, separated
2 cups milk
4 Tbs. (1/2 stick) unsalted butter, melted, plus more for cooking
Powdered sugar for dusting

1-To make the cinnamon filling, in a bowl, still together the granulated sugar, flour, cinnamon and salt. Add the butter and, using the back of a spoon, mash the butter into the flour mixture until all of it is absorbed into the butter, forming a paste. Set the cinnamon filling aside.

2- To make the pancakes, in a bowl, whisk together the flour, baking powder, salt and granulated sugar. In another bowl, lightly whisk the egg yolks, then whisk in the milk and the 4 Tbs. melted butter. Whisk the egg yolk mixture into the flour mixture until well combined; the batter will be lumpy. Using an electric mixer fitted with the whisk attachment, beat the egg whites on high speed until stiff but not dry peaks form, 2 to 3 minutes. Using a rubber spatula, gently fold the whites into the batter in two additions.

Put 1/8 tsp. melted butter in each well of a filled-pancake pan. Set over medium heat and heat until the butter begins to bubble. Pour 1 Tbs. batter into each well. Spoon 1/2 tsp. of the cinnamon filling into the center of each pancake and top with 1 Tbs. batter. Cook until the bottoms are golden brown and crispy, about 3 minutes. Using 2 skewers, flip the pancakes over and cook until golden and crispy, about 3 minutes more. Transfer the pancakes to a plate. Repeat with the remaining batter and filling.

Dust the pancakes with the powdered sugar and serve immediately. Makes 35 to 40.

Thursday, November 12, 2009

Food Blogger Heaven

What would you say if one of your very favorite bloggers wrote to you saying, "I'm in town. Want to go to lunch?"

Umm.....let me think......YES!

That was my enthusiastic answer when the fabulous Jaden of Steamy Kitchen fame said that she was in town on her book tour.

I've had a blog crush on Jaden ever since I first stumbled on her blog. Her posts had me laughing out loud - her infectious personality just sprang out of the written words, beautiful pictures, and smooth, professional videos. So, naturally it was an automatic YES to the chance to hang out with her.

We met at the scenic Pike Place Market in downtown Seattle. It's one of the tourist must-see stops in Seattle. Amazing fresh produce and fish (the lobster tails in that picture are 2 lbs each!) and beautiful crafts fill the market stalls. We wandered through, oohing and aaahing, until our tummies told us it was time to think about lunch.

Here I must pause to let you in on a secret. I'm from the Seattle area, but I don't live in Seattle. If you write to me asking where a great place to eat is, I really can't help you with that. I rarely go into Seattle - all the one-way streets and lack of parking spaces discourage me. So when Jaden asked where we should eat, I drew a blank.

Fortunately, she has an iPhone and Twitters. She sent out a call for help and within minutes we had a handful of recommendations all pointing us to Matt's in the Market. And with good reason - the place is fabulous! You have to know it's there and know how to find it, and then be prepared to wait, but it's worth it.

After we were seated Jaden sweet-talked our serving into asking the chef if we could just have tastes of lots of things from the menu. Soon we had soup and plates with adorable miniatures of the menu items set before us. Jaden asked if she could have the recipe for an amazing dip and the executive chef, Chester Gerl, came out to personally give her the hand-written recipe and then gave her the history of the restaurant, his role in the restaurant, and where all the food came from.

We were ready to be done when we were asked if we didn't want to try the seafood? Well, you can hardly come to Seattle and not have seafood! So we were served bowls of buttery broth with manilla clams, mussels, scallops, and shrimp with the heads and eyeballs still attached. When I confessed to Jaden that I found food with faces a bit terrifying, she happily solved that problem by eating it for me.


At this point we were so full of good food we could hardly move. So when the server brought us a tray with samplings of 3 different dessert and ice cream pairings we said, "thank you, no." Right. We managed to stuff in bites of the mini pumpkin cake with golden raisins, a sorbet we guessed as being squash flavored, brownie topped with peanut butter ice cream and a berry sauce, and bread pudding with cherries topped by vanilla bean ice cream and a maple sauce.

Better than the food, though, was the conversation. I loved hearing about Jaden's new book (available now, makes a perfect Christmas present for yourself or a friend), her career, and her family. Her boys are about the cutest things going and she's a wonderful mother to them.

So, no recipe to share with you today. Just the giddy excitement of a day in the company of one of the nicest, funniest, most genuine food bloggers I know. I hope you get the chance to meet her, too!

Monday, November 9, 2009

Apple Polishing

Every year as fall approaches my husband gets excited about two things - football and apple pie. This year being no exception he started with the subtle hints ("Ooh, apples are in season!"), moved up to not-so-subtle hints ("You know, I really, really like apple pie."), and when no signs of apple pie making appeared in the kitchen, he went for the throat ("If you love me, you'll make me an apple pie," said with enormous Bambi eyes and the trembling lower lip).

Well, for crying out loud, I'll make the pie!

And not just any pie. I had plans for making the ultimate apple pie. The deepest of deep dish apple pies. The apple pie that would force all others to admit inadequacy. The recipe I chose used a springform pan. That's how seriously deep dish it is. And it took 5-6 pounds of apples. Oh, yeah, and it had a streusel topping, too. This big bad boy was going to be awesome!

But the transition from awesome sounding recipe to pie cooling on counter had a few problems. Because it took so long to bake, the crust got tough as dog biscuits. And the apples slices, which had been mounded over the rim when I put the pie in the oven, after cooling sunk down in the middle like a tire with a blowout. And the yummy streusel topping? The butter melted and left pools of grease over the top. Tasty grease, yes, but still not attractive.

I was so disappointed I took no pictures. Instead I'm going to share with you what I did with the leftovers.

When I peeled and cored the apples, I saved those bits in a saucepan, covered them with water, tossed in a cinnamon stick, and let it simmer for an hour or so.

When the water cooled, I strained out the bits and poured the apple water in a jar and stored it in the refrigerator. Why? Because it makes fabulous oatmeal. Replace regular water with the apple water, add chunks of apples to the cooking oatmeal, top with a bit of brown sugar and some cream if you're feeling decadent. You won't believe how wonderful it smells and tastes - full of apples and heady with cinnamon. I promise you you'll never go back to store-bought flavored oatmeals!


Apple Cinnamon Oatmeal

- makes 2 servings

2/3 cup apple water made from organic apple peels and cores*
1/3 cup rolled oats
handful of chopped apple (peel on is fine)

1- In a small saucepan, bring the apple water to a boil. Add the oats and stir to mix. Add the apple chunks.

2- Cook over medium heat, stirring occasionally, until the oatmeal is the desired consistency. I like it just when it stops looking soupy.

3- Ladle into bowls and top as you like with brown sugar, milk, or cream. My parents like a blob of peanut butter on theirs, but I think that messes with the consistency.


*This is one place where I must put my dainty foot down and insist on organic. A lot of the pesticide residue on apples is found in the peels and to boil the peels concentrates the residue into the apple water. A bowl of oatmeal in the morning is a delicious, warming breakfast for your family. A bowl of pesticides is not.

Note: the portions I used are for the serving size I like. For heartier appetites, use 1/2 cup oats per person. For daintier eaters, use 1/4 cup oats. The apple water is always in a 2 to 1 ratio with the oats. Twice as much water as oats. Isn't this the easiest recipe ever?

Wednesday, November 4, 2009

Leaning Tower of Deliciousness

When I was 8 years old my family visited Pisa, Italy. We saw the Leaning Tower and my sister and father actually went all the way up (I don't know if they even allow people on it anymore). I was terrified of slipping, sliding, and falling off the edge, so my feet stayed firmly on the level ground, but the sight was impressive enough from terra firma. How could something so tall lean so precariously without toppling over?

I was reminded of that sight when I made my daughter's birthday cake. She'd selected the Maple Walnut cake from Sky High - Irresistible Triple-Layer Cakes, my new go-to cake book. On the day of her birthday I made the cake and all the layers turned out beautifully, releasing nicely from their pans. I let them cool while I put together dinner. Everyone enjoyed the dinner and then started hovering around the cake prep area, as if their presence would aid in the cake construction.

As I put together the frosting I knew trouble was ahead. I had a very soft, whipped cream cheese base, to which I was to add melted butter and maple syrup. Maybe it would magically firm up as I added the butter? Maybe?? No. Common sense was right - it was very thin and drippy.


Looking at the frosting I was fairly sure that it would set up if I chilled it. But I had the birthday girl giving me hungry Bambi eyes. She didn't want to wait till the day after her birthday for her birthday cake. So, against the wisdom of common sense, I went ahead and slathered the cake with the runny frosting and piled up the layers. I tried to get a quick photo of the cake before cutting it, but it wouldn't cooperate. The layers were slipping and sliding over each other like a dog on roller skates. I kept turning the cake plate, trying to find one angle that didn't look disastrous. The whole thing was leaning, leaning, leaning. I gave up and sliced up pieces, the top layer breaking in half with the strain.

Was the birthday girl saddened? Not at all. The cake was delicious. We all marveled that a cake with a cup of chopped nuts in it could be so light, fluffy, and moist. And, I was right. The next morning, the extra frosting I'd put in the fridge was just right.


The moral of the story? As always, it's all about the timing. Don't leave it till the last minute. And if it tilts at an alarming angle, just remember - who would be able to recall that tower in Pisa if it wasn't leaning?

Leaning Tower of Maple Walnut Deliciousness
- adapted from Sky High - Irresistible Triple-Layer Cakes

1-1/3 cup walnut halves (make sure they're fresh!)
3 cups cake flour
1-1/4 cups packed light brown sugar
2-1/4 tsp ground cinnamon
1-3/4 tsp baking soda
3/4 tsp salt
1-1/2 sticks (6 oz) unsalted butter, at room temperature
1-1/2 cups pure maple syrup, preferably light amber
1 whole egg
1 egg yolk
1 cup milk
Maple Cream Frosting
(recipe follows)

1- Preheat the oven to 350 deg. F. Butter three 8-inch round cake pans. Line the bottom of each with a round of parchment paper and butter the paper. Set the pans aside.

2- Spread the walnuts out on a small baking sheet and toast in the oven until fragrant and lightly toasted, 7 to 10 minutes. Let them cool. Leave the oven on. When the nuts are cool, set aside 1/3 cup pretty halves for garnish and finely chop the remaining 1 cup.

3- In a large mixer bowl, combine the chopped walnuts, flour, brown sugar, cinnamon, baking soda, and salt. With the mixer on low, blend well. Add the butter and maple syrup and beat until blended. Increase the speed to medium and beat until the mixture is light and fluffy, about 2 minutes.

4- In a medium bowl, whisk together the whole egg, egg yolk, and milk. Add this milk mixture to the batter in 2 or 3 additions. Add at low speed to avoid spattering, then increase to medium speed. Scrape down the sides of the bowl after each addition. Beat until well blended.

5- Divide the batter among the three prepared pans. Bake for 32 to 35 minutes, or until a cake tester inserted in the center comes out clean. Let he cakes cool in the pans for 10 minutes, then turn out onto wire racks, gently peel off the parchment paper, and let cool completely.

6- To assemble the cake, place one cake layer, flat side up, on a cake stand or serving plate. Spread about 2/3 cup of frosting over the layer, spreading it evenly right to the edge. Repeat with the second layer and another 2/3 cup frosting. Set the third layer on top and frost the top and sides with the remaining frosting, swirling the frosting decoratively with an offset palette knife or the back of a spoon. Garnish with the reserved toasted walnut halves.

Maple Cream Frosting
- (makes about 4 cups)

2 sticks (8 oz) unsalted butter, at room temperature
2/3 cup maple syrup
12 oz cream cheese, at room temperature
6 cups confectioners' sugar, sifted after measuring


1- Place the butter in a wide medium saucepan and melt over low heat. Add the maple syrup, raise the heat to medium-low, and boil for 5 minutes, stirring frequently so the syrup does not burn.

2- Pour the hot maple butter into a heatproof bowl and let cool to room temperature.

3- Place the cream cheese in a large mixing bowl and beat will with an electric mixer to lighten. Gradually add the confectioners' sugar and beat until smooth. Scrape down the bowl well and continue to beat until light and fluffy. Add the maple butter and mix until completely blended. If the frosting is not stiff enough, you can either add more powdered sugar, or chill it in the fridge for 2 hours.

* The photo of the Leaning Tower is from the Wikepedia post about it.

Monday, November 2, 2009

The End...and A Beginning

Yesterday evening I got my very last pre-teen daughter hug. Today my daughter is 13. It is indeed a milestone. The child is in the rear view mirror and the teenager is hurtling at the windshield. Having been through it twice before, I'm fairly certain I'll be able to endure it again. Fairly certain. And just in case, I've stocked the liquor cabinet.

The birthday cake I've pictured here is not my daughter's. I've got to bake that today; I'm sure it will show up on the blog eventually. This one is her brother's cake that I made this summer. Since I've got to get her cake baked, I'll leave you with the recipe for this chocolate deliciousness, and a few of my favorite quotes about teenagers. And happy birthday, honey, I love you!

*Little children, headache; big children, heartache. ~Italian Proverb

*Adolescence is perhaps nature's way of preparing parents to welcome the empty nest. ~Karen Savage and Patricia Adams, The Good Stepmother

*Mother Nature is providential. She gives us twelve years to develop a love for our children before turning them into teenagers. ~William Galvin

*Adolescence is a period of rapid changes. Between the ages of 12 and 17, for example, a parent ages as much as 20 years. ~Author Unknown

*The troubles of adolescence eventually all go away - it's just like a really long, bad cold. ~Dawn Ruelas

*Small children disturb your sleep, big children your life. ~Yiddish Proverb

and my favorite, the one we've been threatening my daughter with for years:

*When a boy turns 13, put him in a barrel and feed him through a knot hole. When he turns 16, plug up the hole. ~ Mark Twain

Triple Chocolate Birthday Cake

- adapted from Sky High - Irresistible Triple-Layer Cakes


2-1/4 cups all-purpose flour
1 cup unsweetened cocoa powder
2-1/4 tsp baking soda
1-1/4 tsp baking powder
1 tsp salt
2-1/2 oz. unsweetened chocolate, coarsely chopped
1 cup milk
1-1/4 cups hot water
1 Tbsp + 3/4 tsp espresso powder
2 eggs
1 cup mayonnaise (not Miracle Whip or salad dressing)
1-1/2 tsp vanilla extract
2-1/4 cups sugar
White Chocolate Mousse (recipe follows)
Sour Cream Chocolate Icing (recipe follows)

1- Preheat the oven to 350 deg. F. Butter the bottoms and sides of three 9-inch round cake pans. (Make sure the cake pans have straight sides, so the layers stack evenly.) Line the bottom of each pan with a round of parchment or waxed paper and butter the paper.

2- Sift together the flour, cocoa powder, baking soda, baking powder, and salt into a bowl. Set the bowl aside.

3- Put the chocolate in a large, heatproof bowl. In a saucepan, bring the milk to a simmer. Add the hot water and espresso powder to the milk. Stir to combine, then pour the mixture over the chocolate. Let stand for a minute, then whisk until smooth. Let the mixture cool slightly.

4- In the bowl of an electric mixer, beat together the eggs, mayonnaise and vanilla until well blended. Gradually beat in the sugar. Add the dry ingredients and the chocolate liquid alternately in 2 or 3 additions, beating until smooth and well blended. Divide the batter among the three prepared cake pans. Smooth the tops with a rubber spatula or off-set spatula.

5- Bake for 25 to 28 minutes, or until a cake tester inserted in the center comes out almost clean. Let the cakes cool in their pans on wire racks for 10 to 15 minutes. Unmold onto the racks; carefully peel off the paper and let cool completely, at least 1 hour. (If you need to bake a day ahead, at this point, wrap the layers well and refrigerate.)

6- To assemble the cake, place one layer, flat side up, on a serving plate or cake stand. Cover the top evenly with half of the White Chocolate Mousse, leaving a 1/4-inch margin around the edge. Repeat with the second layer and the remaining mousse. Set the third layer on top and pour half the Sour Cream Chocolate Icing over the filled cake. Spread it all over the sides and top. This is the crumb coat. Refrigerate uncovered, for at least 30 minutes to allow the icing to set. Cover the remaining icing and set it aside at room temperature.

6- Frost the top and sides of the cake with the remaining icing, which should have the consistency of mayonnaise. If the icing is too soft, chill it briefly. If it's too stiff, microwave it for just 2 or 3 seconds to soften it, then mix well. Use the back of a spoon to make swirls in the frosting, if you like.


White Chocolate Mousse

4 oz. white chocolate, coarsely chopped
1 cup heavy cream
1 egg white
1 tbsp sugar


1- In a small metal bowl set over a pan of very hot water, melt the white chocolate with 1/4 cup of the cream. Whisk until smooth. Remove from the heat and let the white chocolate cream cool to room temperature.

2- When it has cooled, beat the remaining 3/4 cup heavy cream until soft peaks form. In a clean bowl, whip the egg white with the sugar until fairly stiff peaks form.

3- Fold the beaten egg white into the white chocolate cream, then fold in the whipped cream just until blended. Err on the side of undermixing.


Sour Cream Chocolate Icing
12 oz. bittersweet or semisweet chocolate, coarsely chopped
1 stick (4 oz) unsalted butter
2 Tbsp light corn syrup
1/4 cup half-and-half, at room temperature
1/2 cup sour cream, at room temperature


1- Melt the chocolate with the butter and corn syrup in a double boiler over barely simmering water or in a heavy pan over very low heat. REmove from the heat and whisk until smooth.

2- Whisk in the half-and-half and sour cream. Use while soft.