Early on in my marriage I loved surprises. Or rather, I loved the idea of surprises - that special moment when my honey gives me a beautifully wrapped gift and when I open it, I'm overwhelmed. At a loss for words I can only stammer, "Honey, it's perfect!" That never happened.
I'd play the game correctly, giving him lots of hints ("Gee, this coat is getting so worn. Did you see that cute coat that's on sale that I circled in the ad and left on your pillow?"), but instead of the coat I'd get something to which I'd smile and say thank you, but on the inside I was thinking, "Really? You really thought out of all the possible choices THIS was what I most wanted?"
Not to knock my hubbie. He loves me and really tries, but we've figured out that it works better all around if I do the shopping for my presents. I look at it this way - I save him the hassle of trying to guess what I want and then the hassle of shopping for it and I get the bonus of getting exactly what I want. I'm really happy, so he's happy, too. Win, win, win.
This year for my birthday I chose and ordered in plenty of time to be inspired for my birthday cake, Sky High - Irresistible Triple-Layer Cakes. When it came I oohed, aahed, and picked out my birthday cake. Lovely, light, lemony, with blueberries. Perfect! Except for the weather. It was waaaaay too hot to bake a cake. I whined about that here.
But I was not to be denied my birthday cake. As soon as it cooled down to reasonable temperatures, I had company over and baked this baby. It was almost everything I'd hoped for. Light, lemony layers set off by luscious buttercream blueberry jam slathered between the layers. But the one thing that had really caught my eye in the cookbook didn't work out for me. Some of the jam is supposed to be added to the batter and marbled into the cake. The dainty swirls barely showed in my cake. Boo! But if that's the worst surprise of the day, I can handle it.
Sorta-Marbled Lemon-Blueberry Birthday Cake
- adapted from Sky High - Irresistible Triple-Layer Cakes
2 sticks (8 oz) unsalted butter, at room temperature
2 cups sugar
2 tsp grated lemon zest
1-1/2 tsp lemon extract
7 egg whites
3 cups cake flour
4 tsp baking powder
1/2 tsp salt
1-1/4 cup milk
Lemon-Blueberry Preserves
Lemon Buttercream Frosting (below)
Fresh blueberries for decoration
1- Preheat the oven to 350 deg. F. Butter the bottom and sides of three 8-inch round cake pans. Line the bottom of each pan with a round of parchment paper and butter the paper.
2- In a mixer bowl, cream the butter, sugar, lemon zest, and lemon extract until light and fluffy. Gradually add the egg whites 2 or 3 at a time, beating well between additions and occasionally scraping down the sides of the bowl with a rubber spatula.
3- In a small bowl combine the flour, baking powder, and salt, whisking gently to blend. In 2 or 3 additions, beat the dry ingredients into the butter mixture, alternating with the milk, scraping down the sides of the bowl several times. Beat on medium-high speed for about e1 minute to smooth out any lumps and aerate the batter.
4- Scoop 1 cup of the batter into a small bowl. Divide the remainder equally among the 3 prepared cake pans, smoothing the tops with a rubber spatula. Add 2-1/2 Tbsp of the Preserves to the reserved batter and blend well. Drizzle heaping tsp of this blueberry mixture over the batter in the pans. Using a skewer, swirl the blueberry mixture in short stroked to drag it down through the lemon batter without mixing it in.
5- Bake for about 25 minutes or until a cake tester or wooden toothpick stuck into the center comes out clean and the cake begins to pull away from the sides of the pan. Let the layers cool in their pans for about 10 minutes, then turn out onto wire racks, carefully peel off the paper liners, and let cool completely, at least one hour.
6- To assemble the cake, place a layer, flat side up, on a cake stand or serving plate. Spread half of the remaining Lemon-Bleuberry Preserves over the top. Place a second cake layer on top of the first and spread the remaining preserves over it. Finally, place the third layer on top of the second and frost the sides and top of the cake with the Lemon Buttercream Frosting. Decorate with fresh blueberries.
Lemon Buttercream Frosting
- makes about 3-1/2 cups
1 cup sugar
1/4 cup water
2 eggs
3 sticks (12 oz) unsalted butter, at room temperature
2 tbsp freshly squeezed lemon juice
1- In a small nonreactive saucepan, combine the sugar and water. Bring to a boil over medium heat, stirring to dissolve the sugar. Continue to boil without stirring, occasionally washing down the sides of the pan with a wet pastry brush, until the syrup reaches the soft-ball stage, 238 deg. F on a candy thermometer. Immediately remove from the heat.
2- In a large mixer bowl with the mixer on medium speed, beat the eggs briefly. Slowly add the hot syrup in a thin stream, pouring it down the sides of the bowl; avoid hitting the beaters, or the syrup may splatter. When all the syrup has been added, raise the speed to medium-high and beat until the mixture is very fluffy and cooled to body temperature. This can take 15 to 20 minutes.
3- Reduce the mixer speed to medium-low and gradually add the softened butter 2 to 3 Tbsp at a time, beating well between additions. As you're adding the last few Tbsp of butter, the frosting will appear to break, then suddenly come together like whipped butter. Beat in the lemon juice and the frosting is ready for use.
Tuesday, September 29, 2009
Saturday, September 26, 2009
Can You Guess?
I got to do something fun. Can you guess where I've been? Here's a hint:
Can you resist those brown eyes?
Here's another hint:
Wouldn't you love to stroke that soft fur? But I wasn't at a petting zoo. Here's another hint:
Yes, it involved baking.
Need still one more hint?
Yes, I got to bake with Peabody of Culinary Concoctions by Peabody! In our version of Baking -from my home to yours, I got to spend most of the day with Peabody baking. Well, mainly watching her bake. I think I got to break a couple of eggs. That counts as baking together, right?
We talked and ate, discussed blogging and cookbooks, baked three different treats, and took pictures of everything (we are bloggers, after all!).
In case you're wondering, Peabody is every bit as nice as she seems on her blog. And her food is not styled with glycerin and shellac to look mouthwatering, it's genuinely delicious.
Spending time with Peabody is always a treat. You might not live close enough to get to have fun with her, but I hope you can find a fellow food blogger in your area to share a baking day together. Who else is going to understand a cookbook collection that would put Barnes & Noble to shame? Or 12 different sizes of tart pans? Or 6 different kinds of peanut butter in the pantry? A blogging buddy is a kindred spirit indeed.
Thursday, September 24, 2009
Guilt-Me Cookies
Here's a little mental health check-up for you. What emotion would you say is in the driver's seat of your life right now? Is it happiness? Fear? Anger? Pity? Lust? Grief? Excitement?
Unfortunately, I think the one driving my life-mini-van right now is guilt. I feel guilty about not being more thorough in my children's schooling. I feel guilty that the house is so messy. Guilt washes over me when I think about the cards I meant to send, the phone calls I intended to make, and the unanswered e-mails languishing in my in box. Totting up the unfinished craft projects, scrapbooks, and piles of fabric waiting to be turned (someday) into quilts makes my guilt go into overdrive. And let's not even mention the blog. Two posts a week? Guilt, guilt, guilt.
Is it because I'm out partying all night and trying on shoes all day that so much is left undone? Hardly. You would have to look long and hard to find a less well-shod non-party-goer. No, the sad truth of the matter is that it all comes down to organization and the basic constraint of only 24 hours per day. So much to do, so little time.
Occasionally I'll meet someone who says, "Oh, my, you bake, you blog, you homeschool your children, and you have a business, too? How do you do it all?" The answer is, "Pretty poorly."
Well, what's a girl to do when swamped with guilt like this? Eat a carrot stick and feel more in control of life? Heck no! I say, make cookies! That's lots more fun than dusting the furniture or doing laundry, anyway. Plus then the whole family is happy and doesn't notice the insulating layer of dust or mind that they have to turn their underwear inside out to get another wearing from it.
These are amazing cookies. If you are feeling any negative emotion, a bite of this moist, flavorful, heavenly cookie (molasses with a hit of dark chocolate) will make you feel lots better. And if you're already happy, it'll just super-charge your day. So stop procrastinating -get your butter out to warm up to room temperature. You'll be able to fit this into your day. And if something else falls to the wayside (like ironing or taking out the trash), no one will notice or care.
Chewy Chocolate Gingerbread Cookies
- adapted from Martha Stewart's Cookies
1-1/2 cups plus 1 Tbsp all-purpose flour
1-1/4 tsp ground ginger
1 tsp ground cinnamon
1/4 tsp ground cloves
1/4 tsp freshly grated nutmeg
1 Tbsp unsweetened Dutch-process cocoa powder
1/4 pound (1 stick) unsalted butter at room temperature
1 Tbsp freshly grated peeled ginger
1/2 cup packed dark brown sugar
1/2 cup unsulfured molasses
1 tsp baking soda
1-1/2 tsp boiling water
7 oz. best-quality semi-sweet chocolate, cut into 1/4-inch chunks
1/4 cup granulated sugar
1- In a bowl, sift together the flour, ground ginger, cinnamon, cloves, nutmeg, and cocoa. In the bowl of an electric mixer fitted with the paddle attachment, beat butter and fresh ginger on medium speed until lightened, about 4 minutes. Add brown sugar; beat until combined. Add molasses; beat until combined.
2- In a small bowl, dissolve baking soda in boiling water. Beat half of the flour mixture into the butter mixture. Beat in the baking soda mixture, then the remaining half of the flour mixture. Stir in the chocolate. Using a rubber spatula, scrape the dough out onto a piece of plastic wrap. Pat the dough out to a 1-inch thickness and wrap with the plastic wrap. Refrigerate until firm, 2 hours or overnight.
3- Preheat the oven to 325 deg. F. Line two baking sheets with parchment paper.
4- Roll dough into 1-1/2 inch balls; place 2 inches apart on prepared baking sheets. Chill 20 minutes. (Don't skip this chilling step! The dough gets very sticky as it warms.) Roll the balls in granulated sugar and place back on the baking sheets.
5- Bake until surfaces just begin to crack, 10 to 12 minutes, rotating the sheets halfway through the cooking time. Let cool on the sheets 5 minutes. Transfer to a wire rack and cool completely.
These cookies are best the day they are made, but can be stored in airtight containers at room temperature up to 5 days.
~~~~~~~~~
One more reason to feel guilty: Today is the post day for the Bread Baking Babes. As you might have noticed, I'm not posting the wonderful Chinese Steamed Flower Buns that was our assignment for the month. Guilt!!! I'm a bad Babe, but you can check out the other amazing Babes to see what they did with this fun recipe. Links to their sites are on the side bar.
Monday, September 21, 2009
What's For Tea?
Short and sweet today. Lots to do and the clock is ticking.
Usually I'm a soft and chewy cookie kind of gal. Dry crumbly cookies remind me of the nasty things you get at the grocery store. Yuck. Nothing says fresh like a warm, soft, gooey cookies.
I've decided, though, that there is a time and place for the dry, crumbly, sandy-textured cookies. Tea time is a good time and place for them. They won't get chocolate smudges on your white gloves, and, if no one is looking, they are great for dunking into your tea.
This cookie has a complex flavor with toasted pecans and the echo of chocolate from cacao nibs competing for first place. Buttery and ever so crunchy, they've won a place in my cookie jar.
Plus, they have the ease and convenience of make the dough today, slice and bake tomorrow. You can even bake some for now and freeze some of the dough for later. Beautiful!
Nibby Pecan Cookies
- adapted from Bittersweet by Alice Medrich
1 cup (3-1/2 oz) pecan halves
1/2 lb (2 sticks) unsalted butter, softened
3/4 cup sugar
generous 1/4 tsp salt
1 Tbsp plus 1 tsp bourbon (optional, I didn't use it)
1-1/2 tsp pure vanilla extract
1/3 cup cocoa nibs
2 cups all-purpose flour
1- Preheat oven to 325 deg. F.
2- Spread the pecans on a cookie sheet. Toast them in the oven for 7 to 8 minutes, or until fragrant and lightly colored. Let cool, then chop. (Turn the oven off.)
3- Combine the butter, the sugar, salt, bourbon, if using, and vanilla in a medium bowl and, using a large spoon or an electric mixer on high speed, beat until smooth and creamy but not fluffy (about 1 minute with a mixer). Stir in the pecans and cocoa nibs. Turn off the mixer and add all the flour at once. Beat on low speed, just until the flour is fully incorporated, or stir in by hand.
4- Form the dough into a 12-inch log about 2 inches in diameter. Wrap the dough in plastic wrap and chill for at least 2 hours, preferably overnight. (The dough can be frozen for up to 3 months. If you put it in the freezer, be sure to label it so you know how to bake it.)
5- When you are ready to bake, position the racks in the upper and lower thirds of the oven and preheat the oven to 350 deg. F.
6- Using a sharp knife, cut the cold dough log into 1/4-inch thick slices. Place the cookies at least 1-1/2 inches apart on ungreased cookie sheets.
7- Bake for 12 to 14 minutes, or until the cookies are light golden brown at the edges, rotating the cookie sheets from top to bottom and front to back halfway through the baking. Let the cookies firm up on the pans for about 1 minute before transferring them to a cooling rack with a metal cookie spatula. Let cool completely. For best flavor and texture, store the cookies in an airtight container for at least 24 hours before serving. The flavor improves as they sit. They can be stored airtight for at least 1 month.
Friday, September 18, 2009
Tuna's Second Chance
One of the big decisions in high school was whether to buy a lunch in the cafeteria or to bring a lunch. Because my parents were the definition of thrift, part of my daily routine was making my lunch. Since I am a creature of habit, I made the same brown bagger every day. A peanut butter and jam sandwich plus an apple in the fall or an orange in the winter.
There were other sandwich options, of course. Lunchmeat and cheese with Miracle Whip. That strange creation of my father's - jam and cheese. Or tuna fish. Tuna fish was right out. It was disgusting as a brown bag sandwich. The moisture from the pickles and mayonnaise seeped into the fluffy white bread, turning it into mush, leaving the tuna dry and nasty. Plus, it smelled up my whole locker.
With that background, it's hardly surprising that I haven't been a big fan of tuna. Then I made an amazing discovery. There are differences in tuna. No, you say, reeling in surprise. Yes, I say, it's true! The cheapest can at the grocery store is not necessarily a bargain if nobody will eat it. Invest in a nice white albacore, packed in oil, and you'll see why some people actually like tuna.
I got a grill pan last year and I've been playing with it, trying new sandwich combo's. This one was so good I needed to share it with you. First of all, the bread is my new go-to favorite for panini sandwiches. It's Sourdough Ciabatta and the recipe is on King Arthur's website. It's really just about foolproof. A couple of times I've had to leave the house in mid-bread preparation and my husband has shaped and baked the loaves and they've turned out just great. Not that I'm calling my husband a fool, but showing that the instructions are clear enough for an engineer to follow.
For the sandwich innards, I wish the pictures could show you how amazing it is. This is not the boring tuna sandwich of my youth. It delivers an amazing flavor punch from the combination of artichoke hearts, sundried tomatoes, capers, onions, and fresh herbs.
If you think of yourself as a tuna hater, this might be the sandwich to persuade you otherwise. Give it a try. Lunchtime will never be the same.
Tuna Artichoke Panini
- adapted from love and olive oil (blog)
1/3 cup mayonnaise
1 tsp lemon zest
1 small jar marinated artichoke hearts (about 1/3 cup), liquid reserved
1 tbsp capers, drained and rinsed
1/4 cup grated parmesan cheese
Salt and pepper to taste
1 tsp fresh oregano leaves or 1/2 tsp dried oregano
1 can albacore tuna, packed in oil, drained
1/4 cup red onion, diced
1/4 cup sundried tomatoes, chopped
Sourdough Ciabatta Bread
olive oil
1- Preheat the panini maker.
2- Combine the mayonnaise, lemon zest, capers, parmesan cheese, oregano, and 2 Tbsp of the artichoke liquid in a food processor. Pulse 4 to 5 times till well combined. Taste and season with salt and pepper as needed.
3- Chop the artichoke hearts and combine in a bowl with the tuna, red onion, tomato. Stir in the mayonnaise mixture.
4- Slice a loaf of the ciabatta in half horizontally. Cut pieces as big as you want for your sandwiches.
5- Spread the mixture over the bread. Brush top and bottom of the sandwich with olive oil. Cook until filling is heated and both sides are golden brown.
Monday, September 14, 2009
I'm Happy to Help
A friend of mine always answers the phone, "Hello, how may I serve you?" I think that's pretty risky. After all, you never know who might be calling or what kind of favor they might ask of you. Sometimes favors can be painful, expensive, or just annoying.
Imagine my pleasure then on being asked by Beth Lipton (aka CookiePie) to help out with a virtual cookbook tour. Now that's my kind of favor! I got a copy of her new book, You Made That Dessert? - Create Fabulous Treats, Even if You Can Barely Boil Water and I was supposed to pick one thing from it to bake and blog. Tthe hardest part about it was selecting just one thing. I gave it to my husband to let him pick what sounded really good to him and he returned the cookbook bristling with bookmarks. They all look good!
I love this cookbook. It's geared toward folk with kitchen phobias, giving very clear directions, straightforward steps, and any term which might be confusing is defined. Although it's aimed at beginners, the recipes are far from mundane and boring. They're elegant desserts that call for real ingredients. A pet peeve of mine is recipes that call for a boxed cake mix or a boxed pudding mix as an ingredient. (There is one recipe that calls for a boxed brownie mix, but since she includes several brownie recipes in the book, I'll give her a pass on that one.)
The cookbook is not enormous, but it fits in so much practical information, Beth must have used a shoehorn to get it all in. There are conversion tables, a glossary of terms, a short compendium of kitchen tools and ingredients, as well as baking tidbits scattered throughout the book.
Each recipe is clearly presented with all of the ingredients and all of the tools required listed in a side bar. Helpful for a kitchen newbie who doesn't know what her springform pan from her springerle mold. I think this is a perfect wedding or shower gift. What a great start to a marriage to know how to make your sweetie's favorite sweeties!
I have made more than one recipe from the book, but the one I'm sharing with you today is a gem. It's super simple, amazingly tasty, and it uses up 4 bananas. The amazing caramel frosting is irresistible. I sat my son down to do his handwriting next to the covered cake and when I returned 1/2 an hour later, about 1/4 of the cake was denuded of frosting. Yeah, irresistible.
Still not convinced you need to get your hands on this book? Check out what some other bloggers have made from it:
Two Peas and Their Pod
Recipe Girl
The Life and Loves of Grumpy's Honeybunch
Eat Me Delicious
Culinary Concoctions by Peabody
Banana Snack Cake
- from You Made That Dessert? by Beth Lipton
8 Tbsp (1 stick) unsalted butter, at room temperature (plus 2 Tbsp for preparing baking pan)
1-1/2 cups (6.4 oz) all-purpose flour (plus 3 Tbsp for preparing baking pan)
1 cup (4.5 oz) whole-wheat flour (or all-purpose)
1 tsp baking powder
1 tsp baking soda
1/2 tsp salt
4 large ripe bananas
1 cup sour cream, at room temperature
2 tsp vanilla extract
1 cup (8.4 oz) packed dark brown sugar
2 large eggs, at room temperature
1/2 cup finely chopped walnuts or pecans (optional)
Tools needed:
9x13-inch baking pan
Small bowl
2 large bowls
Fork
Electric mixer
Flexible spatula
Toothpick
Wire cooling rack
1- Preheat the oven to 350 deg. F. Coat a 9x 13-inch baking pan with a thin layer of butter. Spoon 3 tablespoons of flour into the pan and move the pan all around to coat the bottom and sides with a thin layer of flour. Tap out and discard the excess flour.
2- In a small bowl, mix together the all-purpose and whole-wheat flour (if using), baking powder, baking soda, and salt, and stir with a fork. In a large bowl, mash the bananas with a fork, leaving some chunks, then stir in the sour cream and vanilla.
3- In a separate large bowl, with an electric mixer on medium speed, beat the butter and brown sugar until fluffy, about 2 minutes. Scrape down the sides of the bowl with a flexible spatula and beat again for 30 seconds. Add 1 egg, beat until incorporated, then beat in the next one. After adding the second egg, scrape the sides and bottom of the bowl with the spatula and beat again until uniform.
4- Using your flexible spatula, stir half of the dry ingredients into the butter mixture, mixing until the two are nearly combined. Stir in the mashed banana mixture, then add the remaining flour and walnuts (if using) and stir until completely combined, taking care to scrape the bottom of the bowl to incorporate all of the flour. Try to mix the batter as little as possible.
5- Pour the batter into the pan, smooth the top with your flexible spatula, and bake for 45 to 50 minutes, until a toothpick inserted in the center of the cake comes out clean and the cake springs back when lightly pressed. Let it cool completely in the pan on a wire rack. Dust the top with powdered sugar, or frost the cake with Rich Caramel Frosting.
Rich Caramel Frosting
1-1/2 cups (11.5 oz) packed light brown sugar
1/3 cup heavy cream
5 Tbsp unsalted butter, cut into 10 pieces
1/8 tsp salt
1 tsp vanilla extract
Tools:
Dry measuring cups
Liquid measuring cup
Measuring spoons
Saucepan
Whisk
Large bowl
Electric Mixer
1/3 cup heavy cream
5 Tbsp unsalted butter, cut into 10 pieces
1/8 tsp salt
1 tsp vanilla extract
Tools:
Dry measuring cups
Liquid measuring cup
Measuring spoons
Saucepan
Whisk
Large bowl
Electric Mixer
1- Combine the brown sugar, cream, butter, and salt in a saucepan. Place over medium heat and cook, whisking often, until the butter has melted, the sugar is fully moistened, and the ingredients are combined, about 2 minutes. Continue to cook, whisking more frequently, until the caramel reaches a full boil (that is, even when you whisk it, it still boils). Once it reaches the full boiling stage, let it boil for 1 to 2 minutes, whisking vigorously and constantly. Remove it from the heat and whisk in the vanilla. (Be careful: The caramel might spatter a bit, and it is extremely hot.)
2- Pour the hot caramel into a large bowl and beat with an electric mixer on medium-high speed until cooled to lukewarm, and frosting has thickened to a spreading consistency and lightened in color, about 6 to 8 minutes. Use the frosting right away.
Saturday, September 12, 2009
U.B.O - (Unidentified Baked Object)
Can you guess what this is? Have you ever seen something like this crawl out of your oven? Before I do the big reveal, I need to tell you a little back story. You can mull over your guess while you're reading.
I have a thing for shaped pans. Sure I have your standard round and square pans, but what draws me in a like a sucker punch are the pans that have fun shapes. I must have spent a good 15 minutes in Williams-Sonoma once rooted to the spot, admiring a pan that was shaped like garden stuffs. You could make the cutest little Mr. MacGregor's garden cake with it - Peter Rabbit wouldn't have been able to resist!
I've also seen darling train cakes, snowman cakes, Christmas tree cakes, and even a giant Oreo cake. All of these pans make me sigh wistfully, but I try to let my common sense rule. I don't have the budget or the space to buy all these darling pans that are for one or two uses.
But if a friend brings one and says I may borrow it, that's a whole nother story!
My Baking Babe buddy, Tanna, was in town recently and brought along a pan she'd splurged on. Rather than let it sit and collect dust in her pantry, she's circulating it around, sharing the joy that a fun shaped cake brings.
The U.B.O. came about because I had no idea how much batter to put in the cake. I made my standard banana bundt cake from Baking. The batter came really close to the rim. A wiser person than I would have judiciously removed some batter and put it in a smaller baking vessel. Wise I am not. We watched in fascinated horror as the cake baked, rising and flowing like lava over the edge of the pan to plop and singe on the cook surface beneath the pan.
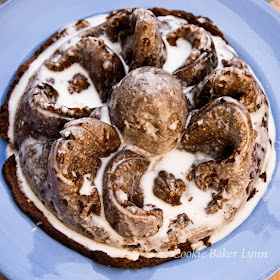
I had zero expectations of a great cake coming out of this fearsome mess. But it released well (thanks to lots of soft butter pushed into every crevice with my pastry brush), and out popped this fun octopus. Au natural it looked a bit bland, so I gave it a bath in a sugar glaze to bring out the details.
What do you think? I think he looks a bit cross. Didn't matter - he tasted great! And, of course, my kids were delighted that we were eating octopus for dinner.
What did you think it was?
Thursday, September 10, 2009
Motivational Carrot Ice Cream
Homeschooling has many challenges. I won't name names, to protect the innocent, but one of my children lives in his/her own world, sings his/her own theme song, and has the attention of a butterfly on crack. It's tough to get this child to settle down, focus, stop humming the Duel of the Fates, and finish an assigned page of work.
I know there are many different strategies for dealing with a child like this. I'm a firm believer in a combination of threats and bribery - the carrot and the stick. If this child knows there's no playing with toys, no TV time, and most importantly, no ice cream until the work is finished, he/she is much more likely to finish his work in 2 hours, rather than 12 hours.
Obviously, a key to my homeschooling success is to have a freezer well-stocked with ice cream. My most recent churning is heavenly. It's a luscious dark chocolate, sprinkled with cacao nibs. The base for the ice cream is so thick it's like pouring pudding into the ice cream freezer. Make sure you have a heavy duty ice cream maker for this one. I made it once in my Donvier and I broke the handle trying to turn it!
The Depths of Chocolate Ice Cream
- adapted from The Perfect Scoop by David Lebovitz
2 cups (500 ml) heavy cream
3 Tbsp (21 g) unsweetened Dutch-process cocoa powder
5 oz (140 g) bittersweet chocolate (70% cacao), chopped*
1 cup (250 ml) whole milk
3/4 cup (150 g) sugar
Pinch of salt
5 large egg yolks
1/2 tsp vanilla extract
1/2 cup cacao nibs*
1- Warm 1 cup (250 ml) of the cream with the cocoa powder in a medium saucepan, whisking to thoroughly blend the cocoa. Bring to a boil, then reduce the heat and simmer at a very low boil for 30 seconds, whisking constantly. Remove from the heat and add the chopped chocolate, stirring until smooth. Stir in the remaining 1 cup (250 ml) cream. Pour the mixture into a large bowl, scraping the saucepan as thoroughly as possible, and set a mesh strainer on top fo the bowl.
2- Without washing the pan, warm the milk, sugar, and salt in the same saucepan. In a separate medium bowl, whisk together the egg yolks. Set the bowl on a rubber glove or silicone hot pad to keep it from skittering over the counter. Slowly pour the warm milk into the egg yolks, whisking constantly, then scrape the warmed egg yolks back into the saucepan.
3- Stir the mixture constantly over medium heat with a heatproof spatula, scraping the bottom as you stir, until the mixture thickens and coats the spatula. Pour the custard through the strainer and stir it into the chocolate mixture until smooth, then stir in the vanilla. Stir until cool over an ice bath.
4- Chill the mixture thoroughly in the refrigerator, several hours or overnight, then freeze it in your ice cream maker according to the manufacturer's instructions.
* I used Amano Jembrana 70% dark chocolate and Amano Madagascar Cacao nibs in this. Fabulous!
Friday, September 4, 2009
Alpha Baker
This summer my daughter, Sarah, and I took a class together at Sur La Table. Her confidence with pies was low and I still didn't know how to roll out a pie crust into a round, so we were excited to take the Summer Baking: Pies and Tarts class. Our instructor was Rachael Coyle, a pastry chef, and she was super. She gave very clear instruction, showing each step of the way, giving pointers as she demonstrated. Then the class was divided into groups and each group got to try their hand at making the pies and tarts.
I jotted down some of the information that was new to me.
~ In her pie crust recipes, Rachael doesn't give a measurement for water. It should be added a tablespoon at a time and worked in by hand so that you'll know when it feels right, rather than just dumping in the amount a recipe calls for and ending up with a gloopy mess. Because the amount of moisture the flour can absorb is very weather dependent, this step should always be done by hand.
~ When working in the water, as bits become moistened, pull them out of the bowl and set them aside. You avoid overworking the dough that way and are only adding moisture to the dry bits.
~ You can use a food processor to cut in the chilled butter, but add the water by hand. If you continue to use the food processor, you'll continue chopping up the butter, and won't end up with the pea-sized pieces needed to give a flaky pie crust.
~ If you make a double batch of pie dough, you can wrap 1/2 of it in a double layer of plastic wrap and put it in the freezer. It will keep for up to 1 month.
Rachael also gave very specific instructions on how to achieve a circle of pie dough.
~ Generously flour your work surface. Not just a dusting. You want enough flour so that the dough won't stick and you can move it easily.
~ Move the rolling pin back and forth straight away from your body and straight back in. Then turn the dough 45 degrees and repeat. Turn and repeat. Turn and repeat. Never try to push the rolling pin at an angle, as you'll get uneven force on the pin and the dough will be uneven in thickness.
~ Feel the edges to make sure it's even. Then just roll over the thick bits to even it out.
~ Use a dry pastry brush to brush the excess flour off the top of the crust. As you lift the crust, either draped over the rolling pin or folded, brush the underside with the pastry brush to remove the excess flour.
Then as we broke into groups, I learned a few other things. I learned that I'm an Alpha in the kitchen and it's really hard for me to sit and watch someone else do it wrong.
I saw a woman blithely rolling out her pie crust in precisely the way the instructor had just said NOT to do it, rolling back and forth at angles. I watched another woman manhandle her dough into a homogenous mass. And the pair at the KitchenAid were throwing ingredients in without regard to recipe or instructions. Sarah said it was really funny watching my face; she knew exactly what I was thinking as I bit my tongue to keep from shrieking, "Why are you here? Why did you pay $69 for the class if you weren't going to listen to the instructor? If you know everything already, why did you think your pies and tarts needed improving?"
Whew, deep breaths, deep breaths. Control regained.
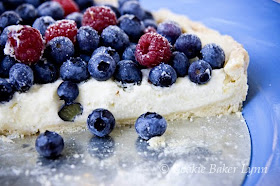
When I got home from the class I was eager to put what I'd learned into practice. I made the Summer Berry Tart and wow, was it delicious! So, rounding out my week of blueberries, here's the tart recipe with pointers. But of course, if you already know all about making tarts, be sure to do it your way. Just don't tell me about it. It would stress me.
Summer Berry Tart with Mascarpone Cream
Pate Sucrée
- enough for one 8-9-inch tart
7 oz. all-purpose flour
2 oz. granulated sugar
pinch of salt
4 oz (1 stick) of unsalted butter, cut into 1/2-inch pieces and chilled
1 egg yolk
2 Tbsp heavy cream, plus more as needed
(To cut the stick of butter, cut the stick lengthwise with a long knife, turn the stick a quarter turn and slice lengthwise again. Then chop slices off the end.)
Either by hand or with a stand mixer fitted with the paddle attachment, cut the butter into the flour, sugar, and salt until the butter is very fine; the mixture should look like course sand. In a separate bowl, whisk the egg yolk and heavy cream. Add the liquid to the flour mixture and just mix until combined (just turn the mixer on for a second and then off); add more heavy cream if the dough seems dry. Gently, with minimal handling, press the dough into a flat circle, about 1-inch thick. Wrap the dough in plastic wrap and chill for at least 2 hours or overnight.
for the tart:
3/4 cup heavy whipping cream
1/4 cup sugar
1 Tbsp Grand Marnier (optional)
1 cup mascarpone cheese at room temperature
1/2 vanilla bean, split and scraped or 1 tsp vanilla extract
2 pints assorted berries
confectioner's sugar for dusting
1- On a lightly floured surface, roll the chilled pastry out into a circle just under 1/4 inch thick. Fit the pastry into a lightly greased tart tin (with a removable bottom) and press dough into the corners to that it lies flat with no air pockets. Trim excess pastry from the edges. Chill shaped tart shell for at least one hour.
2- Preheat oven to 350 deg. F. Blind bake the tart shell: fit the chilled pastry with a round of parchment paper and fill the parchment with dried beans or pie weights. Bake for 30 minutes; remove the parchment and the weights and bake for another 10 minutes or until the pastry shell is cooked through and golden brown. Let it cool completely.
3- Whip the cream with the sugar and Grand Marnier to medium peaks. Chill.
4- In a stand mixer with the paddle attachment or with a handheld mixer, beat the mascarpone with the vanilla bean or extract until smooth with no lumps. Gently fold the whipped creaminto the mascarpone until just mixed.
5- Fill the cooled tart shell with the mascarpone cream and spread into an even layer. Arrange fresh fruit over the top. Dust with confectioner's sugar just before serving. Store any leftovers in the refrigerator.
Wednesday, September 2, 2009
Save the Blueberries
In my high school home economics class we briefly covered canning food. What I took away from that section of the course was 1) pressure cookers can explode like a bomb, raining shrapnel all over your kitchen, and 2) botulism will kill you. To this day I still check for bulging lids before opening a can from the grocery store.
While this is good safety information to have, I don't think the joy of canning really got through to me. In fact, the thought of it terrified me. It wasn't until my in-laws brought over a big box of tomatoes one summer and helped me "put up" the whole batch that I thought just maybe I could give this whole canning thing a whirl.
I'd love to report at this point that I've become a canning whiz and that my pantry shelves are lined with mason jars, filled to the brim with the goodness of summer's bounty. It's not. Maybe if I had a productive garden, I'd be tempted to drag out my canning paraphernalia. But, as I've mentioned before, the only thing that's doing well in my garden is my blueberries.
So, blueberry jam it is. I'm not a seasoned expert at jam, but this one is pretty simple, and if you're only making one batch, you don't even really need to seal it. Just spread on bread and enjoy. It's packed with a lot of flavor and zero High Fructose Corn Syurp. Yeah!
This is my entry for the Under The High Chair Virtual Jam Swap. If you'd like to participate, clink on the link for details.
Lemon Blueberry Preserves
- adapted from Sky High
3 cups blueberries, fresh or frozen
3/4 cup sugar
2 Tbsp freshly squeezed lemon juice
1-1/2 tsp grated lemon zest
1 tsp grated fresh ginger
1- If using frozen blueberries, thaw them completely in a bowl, saving any juices.
2- Puree the blueberries with any juices they've exuded in a blender. Pass the puree through a coarse strainer to remove the skins.
3- In a heavy, medium, nonreactive saucepan, combine the blueberry puree with the sugar, lemon juice, lemon zest and ginger. Bring to a gentle boil over medium heat, stirring frequently to dissolve the sugar. Continue cooking, stirring often, for 20 minutes, until the preserves have thickened and are reduced to 1 cup or pass the thickness test. Place 1 tsp of the mixture on a small glass or ceramic plate and put it in the freezer until cold. Drag your finger through the thickened puree; a clear path should remain. If it's not ready cook 5 minutes longer and repeat the test. Pour the hot preserves into a hot jam jar and seal with a clean, hot lid. Or, if you're going to use it right away, let the preserves cool, then place in a clean jar, cover, and refrigerate for up to 5 days.
Tuesday, September 1, 2009
Forgetful Blueberries
The week of blueberries continues with these amazing, yet bewildering bars. I say bewildering because somewhere in the combination of ordinary ingredients a strange alchemy occurs. The result is a bar with peculiarly amnesiac qualities.
This is the situation: husband approaches the cooling bars on the counter and asks politely if he may have one. (A wise and well-trained blogger's husband ALWAYS asks first.) Given the green light he helps himself to one and proceeds to eat it with pleasure and much finger-licking.
Ten minutes later, same husband approaches the bars and again asks if he may try one. "Try one? Didn't you just have one?" I reply. "Um, no, I don't remember having one," he says, eyes wide with innocence, and plucks up another.
You see what I mean? They're so good that they induce amnesia. You forget all about that first one and go back for seconds, even thirds, forgetting that you've even had one. So enjoy the bars, but beware....
Forget Me Not Bars
- adapted from Fine Cooking
8 oz (1 cup) unsalted butter, softened; more for the pan
13-1/2 oz (3 cups) all-purpose flour
1-1/2 cups old-fashioned rolled oats (not quick oats)
1-1/3 cups packed light brown sugar
1 tsp salt
1 tsp baking powder
1 large egg, separated
14 oz can sweetened condensed milk
1/2 cup fresh lemon juice
2 tsp grated lemon zest
2-1/2 cups room-temperature blueberries (about 13 oz), washed and drained on paper towels
1- Position a rack in the center of the oven and preheat it to 350 deg. F. Line a 9 x 13-inch pan with foil, leaving a 1-inch overhang on the ends. Lightly butter the bottom and sides of the foil.
2- In a large bowl combine the flour, oats, sugar, salt, and baking powder. With your fingers blend the butter completely into the flour mixture. Transfer 2 cups of the crumble mixture to another bowl and set it aside for the topping.
3- Blend the egg white into the remaining crumbs and press the mixture into the bottom of the pan. Press firmly to level the crumbs. Bake the crust for 10 to 12 minutes, until it starts to form a dry top.
4- While the crust is cooking, in a medium bowl whisk together the condensed milk, lemon juice, lemon zest, and egg yolk. Let this mixture stand for 5 minutes; it will begin to thicken.
5- Sprinkle the blueberries evenly over the hot crust and then drop spoonfuls of the lemon mixture over the blueberries. Spread gently with a spatula to distribute it a little more evenly, being careful not to crush the berries. It's fine if the lemon mixture isn't perfectly even. Bake until the lemon mixture just begins to form a shiny skin, 7 to 8 minutes.
6- Sprinkle the reserved topping over the lemon-blueberry layer, pressing the streusel between your fingers into small lumps as you sprinkle. Bake until the filling is bubbling at the edges and the topping is brown, 25 to 30 minutes.
6- Let the bars cool in the pan on a rack until just warm, about an hour. Carefully lift them out of the pan using the foil overhang and transfer to a wire rack to cool completely. Remove the foil and cut into 24 bars when cool. The bars may be stored at room temperature for a few hours, but otherwise should be kept in the refrigerator.
(Note: As I was typing this up, the part in Step 5 of baking for 7 to 8 minutes sounded totally foreign to me. Did I do that step or did I just go straight to sprinkling the topping over it? I totally don't remember. See the mysterious power of the bars?)